
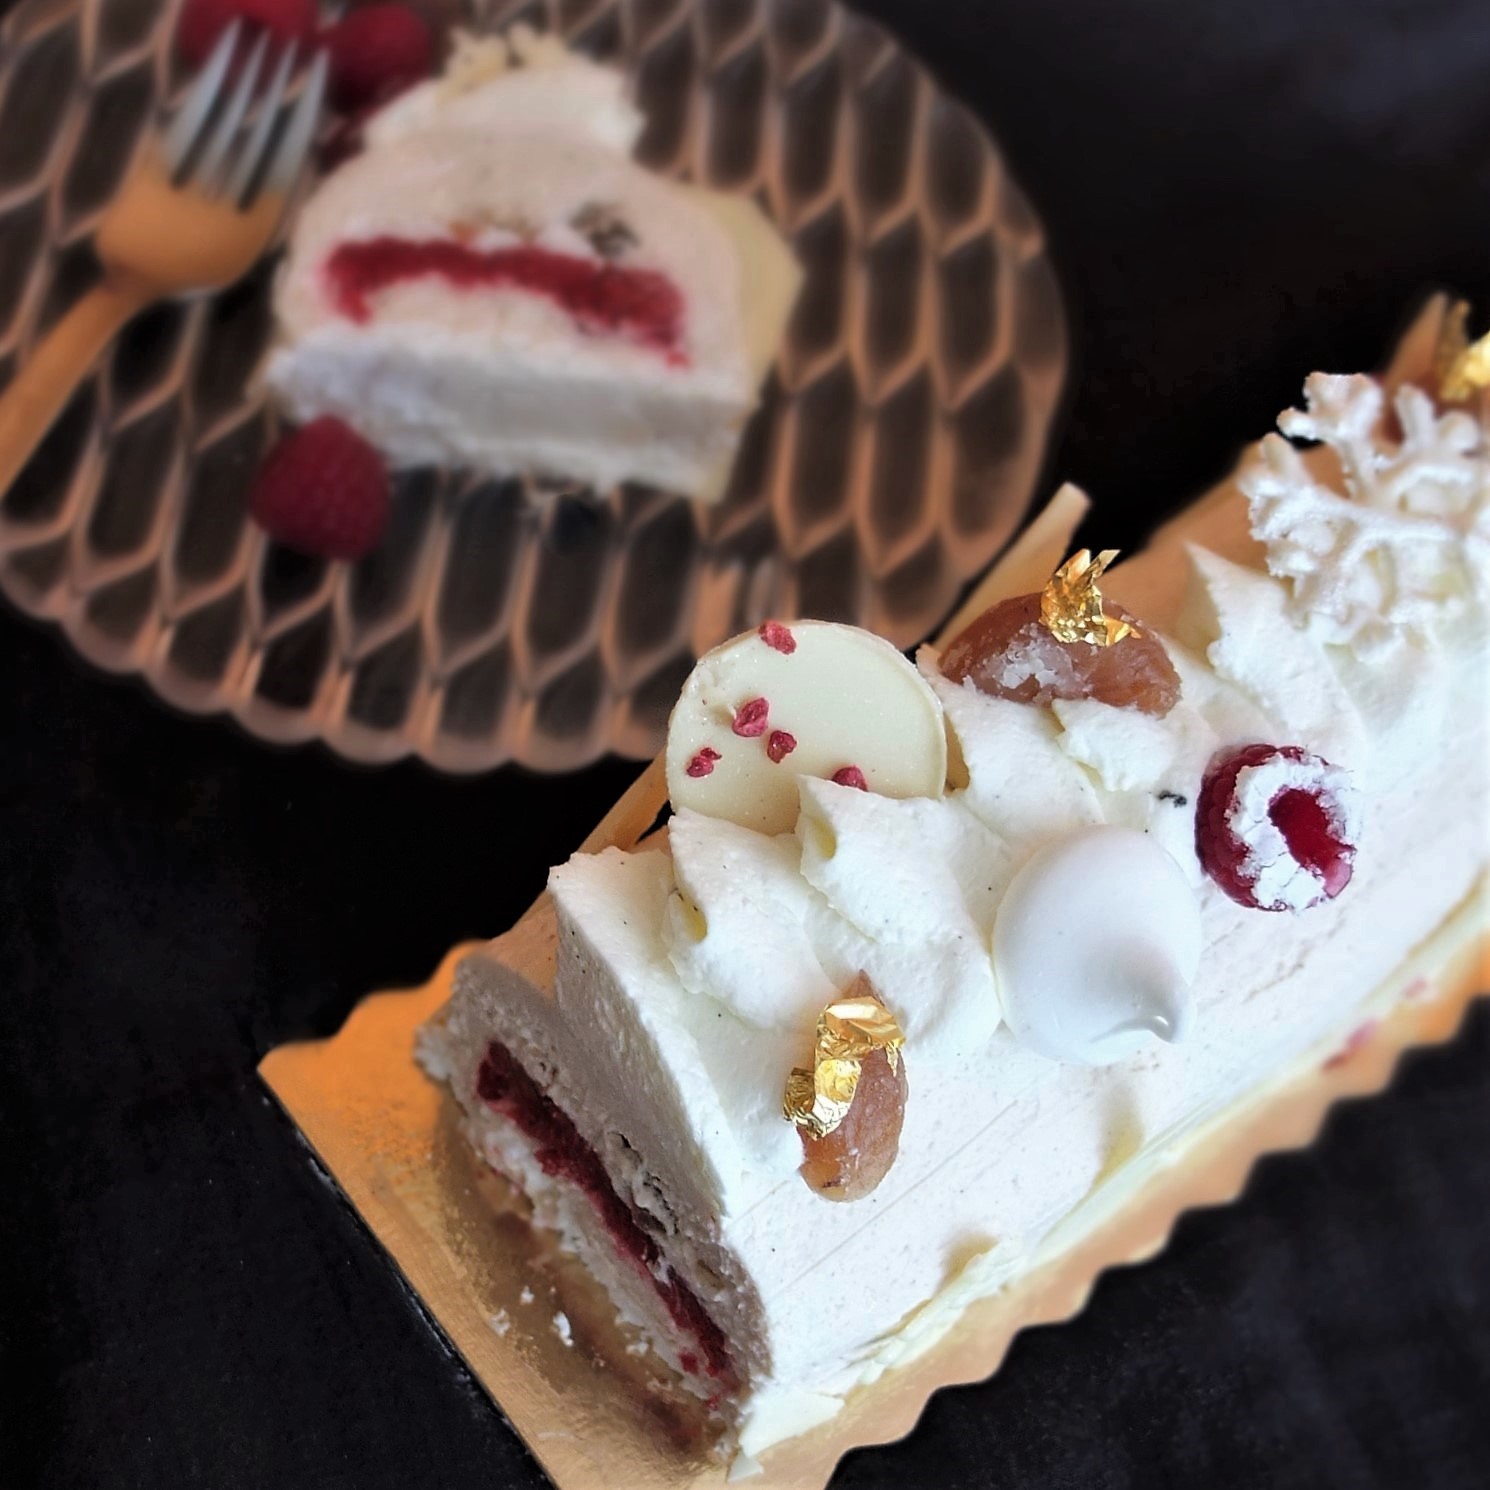
Several of my near-disasters could provide you with amusement and ideas on how to battle fiendish obstacles in the kitchen with ease (?!). Somehow this log cake emerged from the battlefield, surprisingly not so bad and quite lovely just like in a fairy tale! It’s incidentally gluten-free and the main elements are relatively easy and fast to whip up: two layers of meringue, a light chestnut mousse, raspberries (I used frozen ones), whipped chantilly cream and white chocolate decorations. The optional marrons glaçé or candied chestnuts remind me of mum’s love for these typical treats at a French Christmas. So if you’d like a lighter, fruity, chestnutty treat for the festive season or any time of the year, here’s a heavenly raspberry and chestnut log cake with meringue. I’m très attached to this bûche and called it Le Sparkly!

The Sparkly – Raspberry, chestnut and meringue log cake
You can also make simpler versions like a free-form log or snowballs.

But the bûche is lovely. If you’re in a pre-Christmas rush with no time for sorry tales then please scroll down to the recipe. Maybe come back for helpful tips or a laugh. Please don’t be put off by baking disaster stories, they happen to all of us and it’s not so bad if you can eat the cake!
Disaster stories with a sparkly ending
My second ever post on this blog (Thoughts on a chocolate pear log) provides a little French yule log history and the tale of a series of baking disasters concerning a Christmas bûche two years ago. It seems there’s a bit of curse on my logs. They turn out looking quite presentable, but getting there…! Here’s what happened this time:
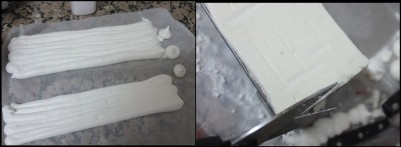
- The imperfect meringue. One of the meringue rectangles cracked down the middle. I looked at it and thought ‘Oops, not a problem: it’s hidden in the middle of the cake’. Yay. It was also very tricky to cut with a knife so I used scissors. So not the worst of my troubles…
- The troublesome mousse. When I folded the chestnut into the whipped cream, the mousse started becoming grainy. The chestnut had cooled too much and the gelatine had started to set. Eeek. I was supposed to be gently folding but brought in the big guns (the whisk) and whisked it just a little. The mousse was saved. Phew. Not perfect but still light and lovely. And not lumpy.
- The evil mould. The frozen cake (entremets) wouldn’t come out of the metal log mould. Funnily enough this also happened two years ago and I’m starting to look askance at my evil mould. Anyway, this time I had a blow torch and went in all guns blazing. 5 minutes later… more blowtorch. By the time I forced, slid and persuaded the mould to release my cake (you swine!) the chestnut mousse was no longer smooth but looking rather ruffled.
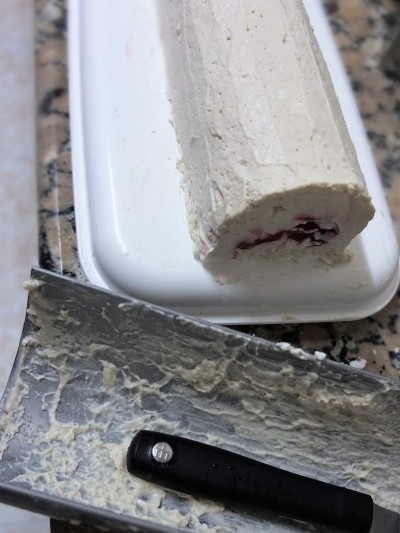 Darn. I wouldn’t be able to glaze the log so smoothed the mousse down with a small offset spatula (a butter knife would do). Then I put it in the freezer overnight while I pondered on how to decorate my log and make it look nice. Stupid mould (or me). Still, the shape wasn’t bad.
 - The very troublesome white chocolate decorations. While my cake sat in the freezer awaiting its fate, I tackled the chocolate. I thought I’d temper so it would stay shiny with a nice snap. Ha ha. The temperatures were fluctuating on my thermometre but it was late night and I ignored this. Doh. Imprecision is not okay for tempering chocolate and my resulting chocolate firmed up enough to cut shapes but softened quickly. The solution: put the shapes in the refrigerator as quickly as possible? Yes, as this cake lives in the fridge. But I lost some snowflakes that softened too much and fell apart en route. Some also broke when I prised them off the baking paper but more than half were saved and the remainder were very tasty. I needed the sugar to keep going. 🙂

White chocolate piped snowflake decorations
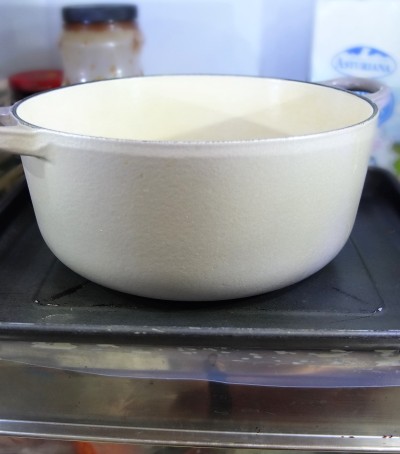
- The next day and more troublesome chocolate decorations. Yes, just when I thought things were working out. The previous day I’d made two presentable rectangles to cover each end of my log by cutting around a piece of card. They were even a bit shiny but slightly soft of course. And I’d covered them in plastic then put a heavy weight on them (my Creuset saucepan) because I know chocolate curls up otherwise.
 For some reason I thought a few hours was enough so released them. The next morning they were wavy. Aargh. But it was helpful when they invariably softened because I could cover and weigh them down again and they straightened out – a little. I could even trim them without bits snapping off! So sometimes disaster is your friend.
 - The bothersome Saint-honoré nozzle and wonky line. After two nights sleeping on it and awaiting inspiration I realised I should make a long swirly line of chantilly cream along the top of my chestnut log, as practised on the Cordon Bleu course with the Saint-honoré nozzle. This would look much more sophisticated than covering everything with cream. In theory. I clearly need more practice with that bothersome nozzle. I did various try-outs on baking paper then ventured onto the top of the log. Pipe, pipe, pipe… oh dear. That line isn’t straight. Scraped it off (good thing the cake’s frozen) and back in the piping bag. Pipe, pipe, pipe… hmmm. It looks a bit drunk but will do as I don’t know how long chantilly cream survives re-piping. The solution: after sticking lots of bits (decorations) strategically along the line of cream, the wonkiness wasn’t so noticeable, unless you’re a chef pâtissier but luckily there wasn’t one in the house. Phew. Again.

Before and after
- The messy bottom. Frazzled in the midst of my log experience, I slowly began to notice an unattractive line of meringue showing along the bottom of my log. Aargh. I looked around in desperation (didn’t tear my hair out ’cause that’s unhygienic) then spotted my unused white chocolate shards and trees. Aha. I stuck them on the sides. Then I stuck little triangles between them. All covered up down there. Phew. And double phew. Finally!

- The loooong photo shoot. Okay, the cake was done and looked surprisingly like a pâtisserie fashion model, from afar. But long logs are so hard to photograph!! You’ll probably be fine. Me, I put it on advanced function, point, press and hope for the best.


Anyway, there are two reasons I wrote all this. One, I thought you might appreciate knowing it isn’t all plain sailing and easy-peasy making a special cake. But improvising and a gritty determination to eat cake can pull you through. We all live and learn. And isn’t it great how lots of imperfect elements can come together to make quite a nice cake? Reason number two, writing all this down was very therapeutic for me. Lol.
And here’s the recipe! Hurray!
THE RECIPE

The Sparkly raspberry, chestnut and meringue log cake
I’m just going to say again that despite my troubleshooting stories this cake is not so difficult to make (don’t laugh). It’s my invention based on the classic French confection le merveilleux, which has meringue layers, cream and chocolate shavings. So you could spread whipped cream over your log and cover in white chocolate shavings, like a merveilleux.
Equipment
An inox log mould like the de buyer gouttière mould on Amazon France (or make the free-form log). Clean food-friendly plastic sheet if making chocolate rectangles. Piping nozzle no. 1, 2 or 3 and disposable piping bag.
Timing
Previous day (or early morning the same day): meringue layers (20 minutes to make, bake 1 hour 45 mins to 2 hours or more, allow to cool 2 – 3 hours) and white chocolate shapes (20 – 30 mins to make).
On the day you’re serving the log: chestnut mousse (20 mins to make) then assemble. Freeze 2 hours or more before unmoulding then decorate (15 mins). Wait 1 to 2 hours to defrost then eat. Or assemble then freeze until needed.
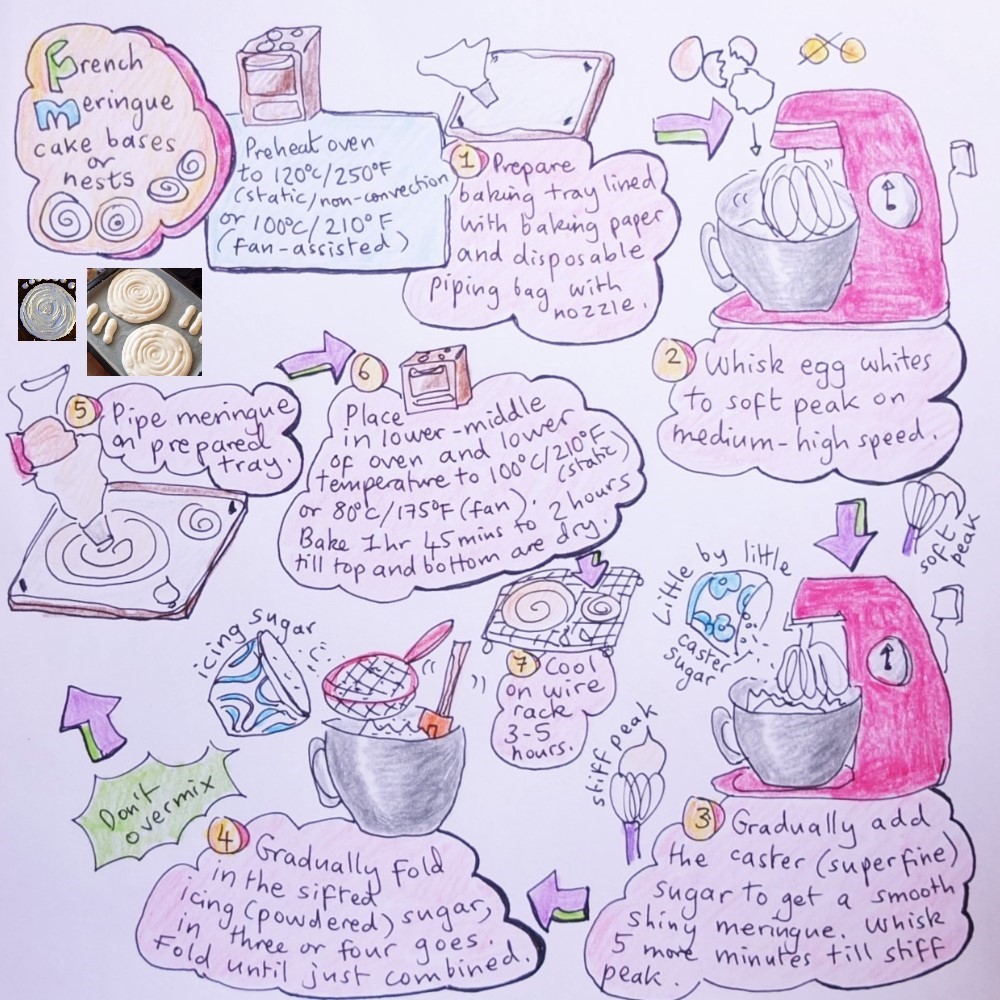
Meringue layers
- 115-120g/ml egg whites (from 3 medium-large eggs)
- 105g/1/2 cup minus 1/2 tablespoon caster/superfine sugar (or golden caster sugar)
- 105g/3/4 cup plus 4 and 1/4 teaspoons icing/powdered sugar
- 1/8 to 1/4 teaspoon pure vanilla extract
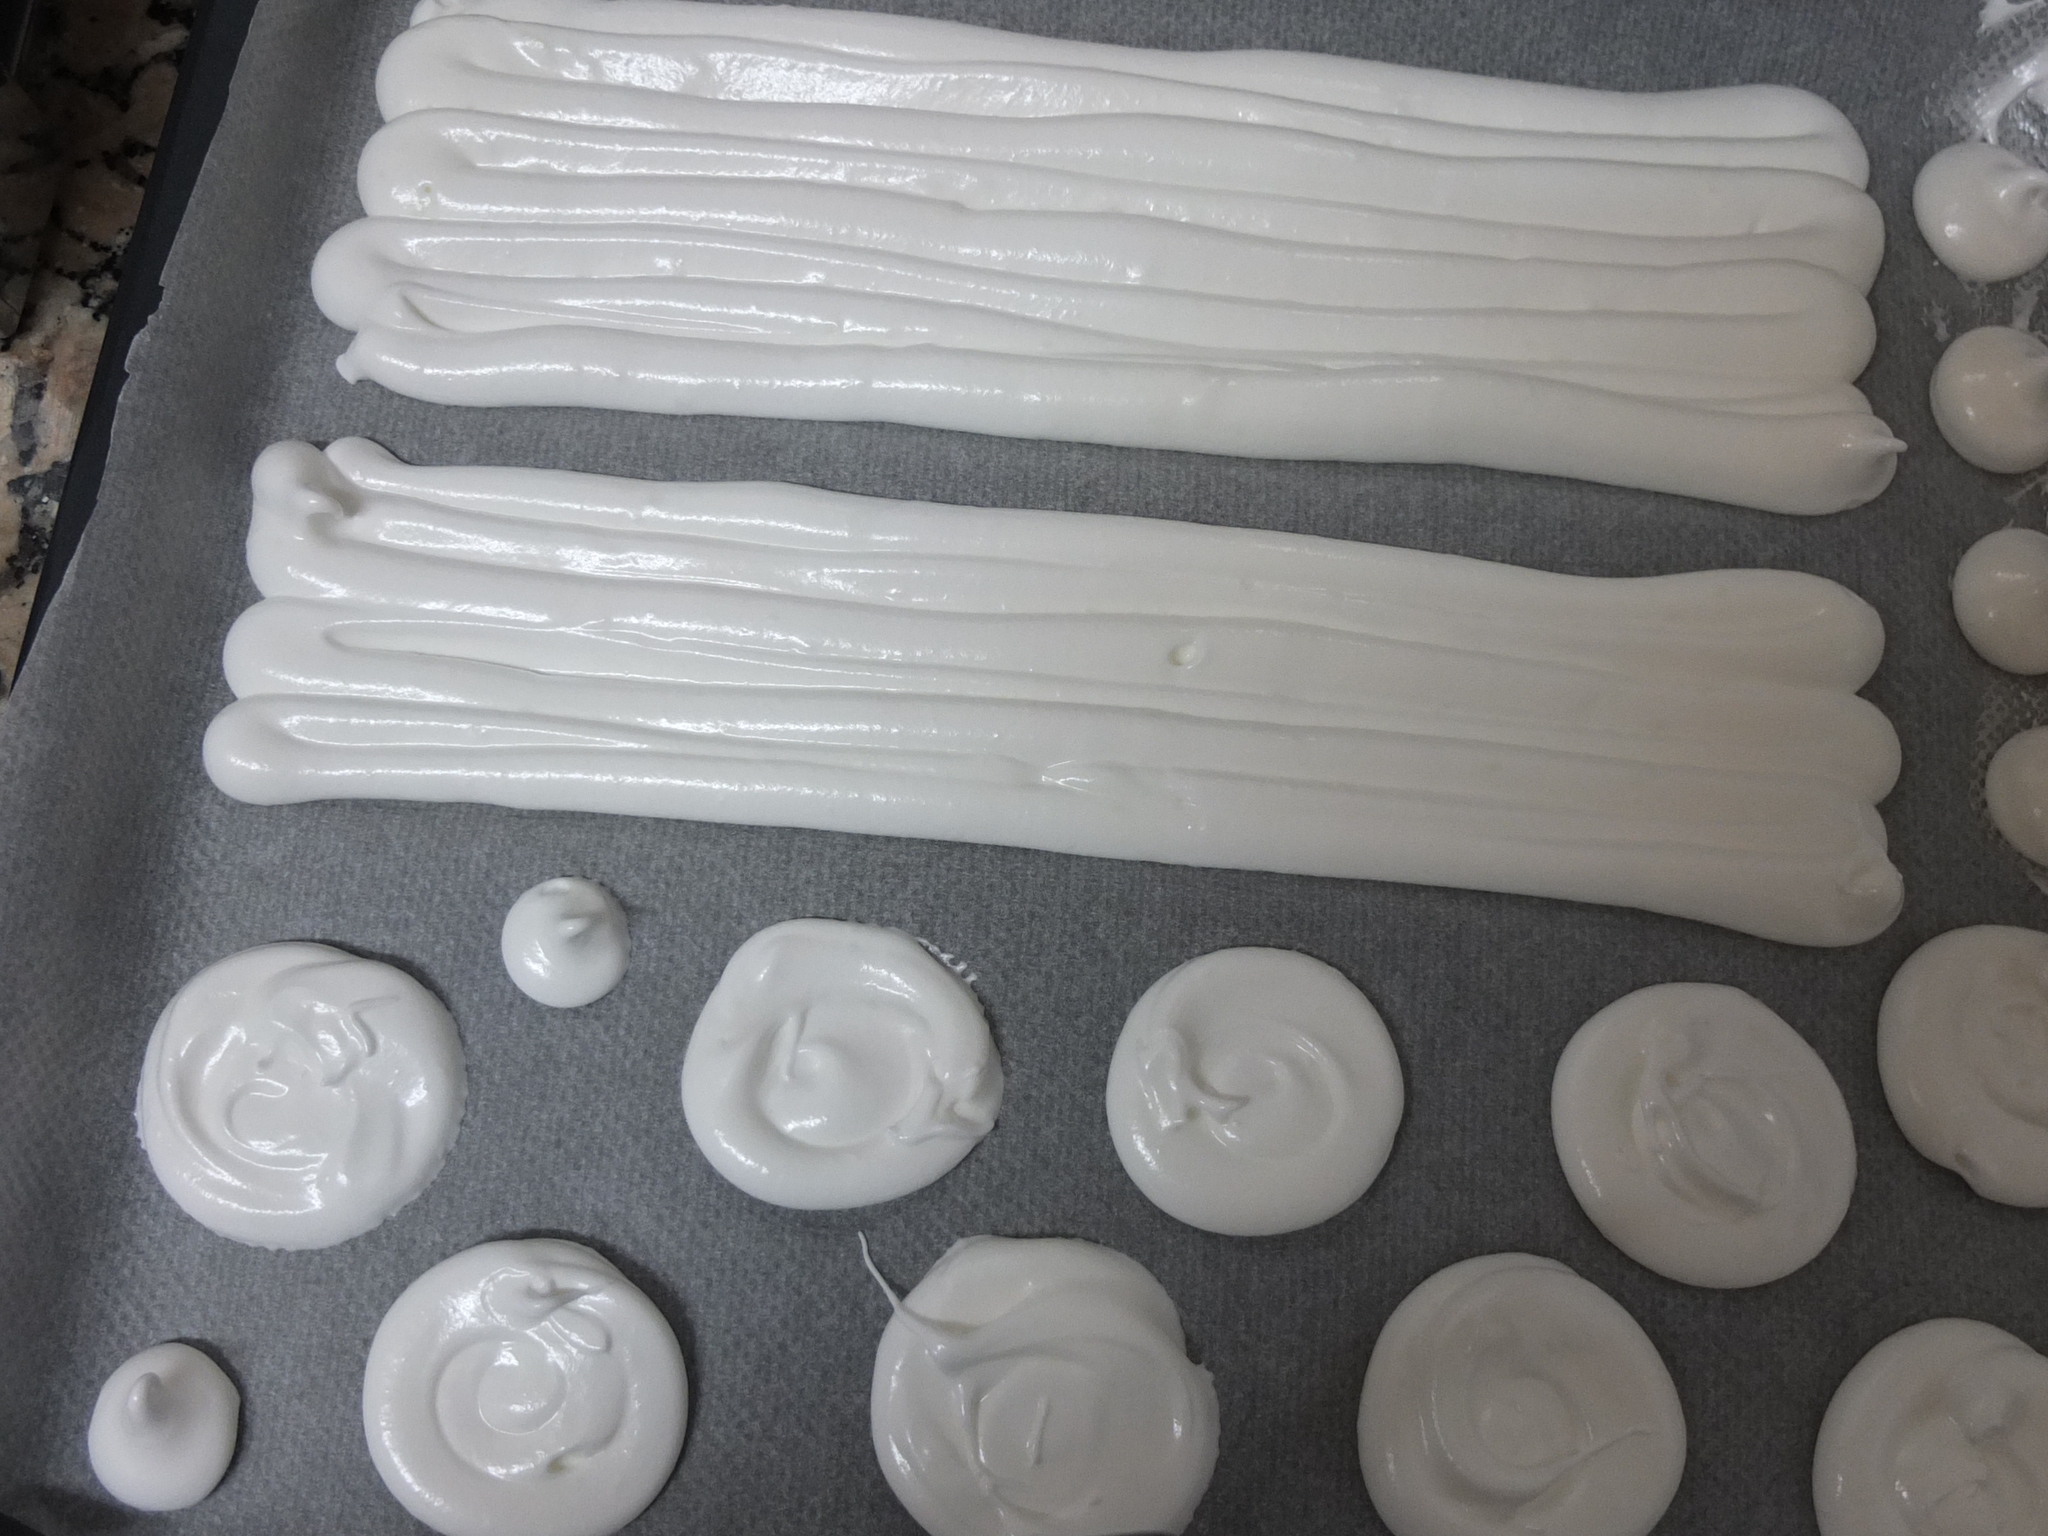
Follow the illustrated recipe below. Pipe two rectangles with a medium-sized nozzle. One smaller rectangle should fit in the middle of your mould and the other at the open bottom. With the leftover meringue mixture make kisses or mushrooms for decoration or mini discs for snowballs or verrines (trifles in glasses).
If using the following day, store the meringue in airtight glass jars or in a sealed foil package.
White chocolate decorations
- 200-250g (7-9oz) good-quality white chocolate drops (or a bar cut into small pieces)
- freeze-dried raspberry pieces, optional
Optional rectangles for the ends (alternatively, cover in chocolate shavings): temper the chocolate following the temperature curve for white chocolate. Use two-thirds of the chocolate to spread on a plastic sheet, and follow the instructions for making milk chocolate shapes in my basics section using a homemade cardboard rectangle. Remember to put another sheet of plastic on top then a baking tray and something heavy to flatten the rectangles and keep them from curving.
Shards and discs: On the chocolate leftover around the rectangles cut out shards and sprinkle some with freeze-dried raspberry pieces (optional). For discs cut around round metal cutters with a sharp knife.
Snowflakes: use the remainder of the white chocolate to pipe snowflakes (instructions on my sparkly chocolate snowflakes post). You can also pipe free-form trees and stars.
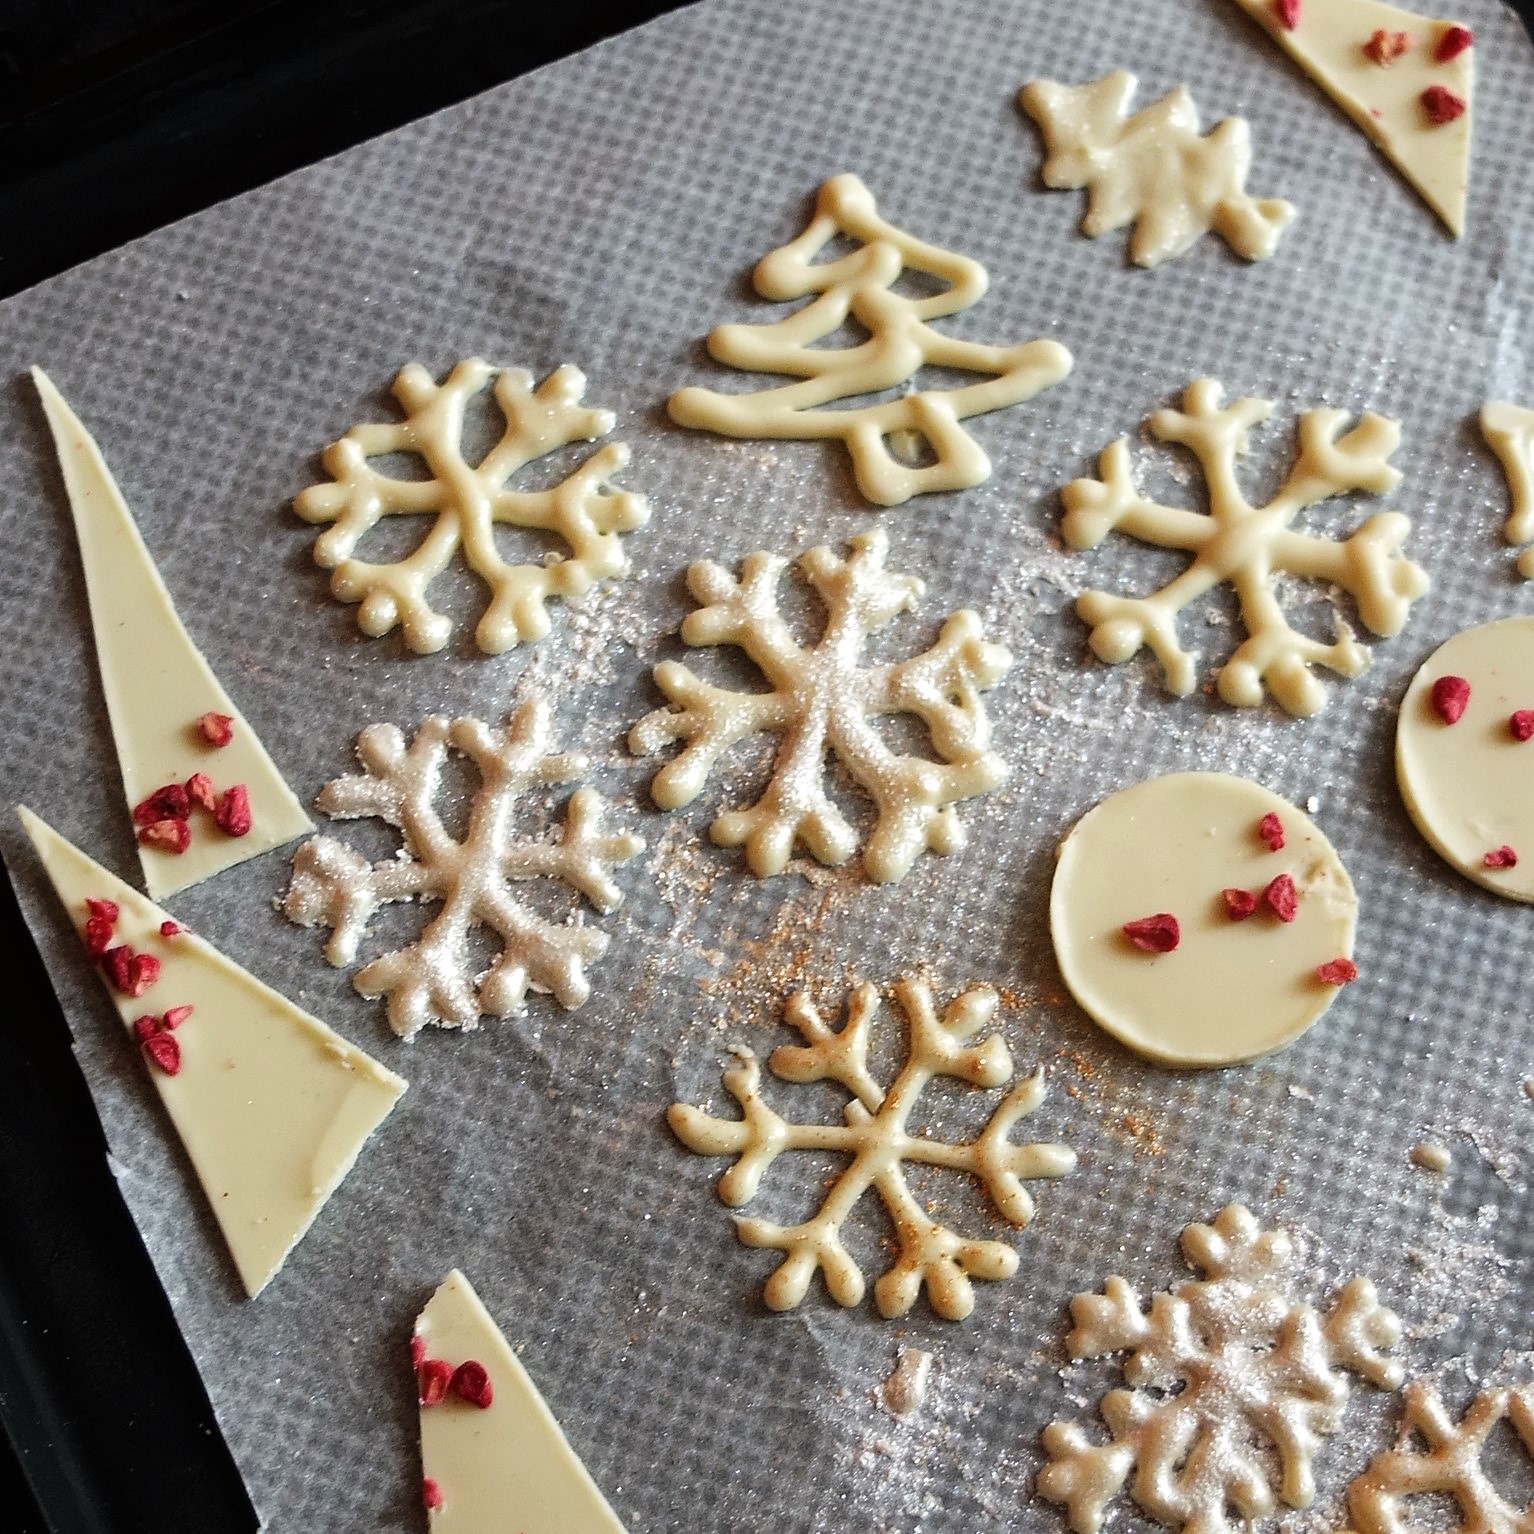
White chocolate piped snowflake decorations
Light chestnut mousse
As soon as your chestnut mousse is ready you need to pipe it into your log mould before it starts setting. So get the other elements ready first (meringue, raspberries, candied chestnuts…) then follow the illustrated recipe below to make the mousse (but instead of using a little water to cover the gelatine, use a lot in a bowl).
- 1 sheet of gelatine (2g)
- 200g/1 and 1/4 cups sweetened chestnut cream like Clément Faugier
- 400g/ml whipping cream (35%), cold


Assembly – in the mould
Note: if you don’t have a blowtorch you can line your mould with plastic film that sticks out over the sides so you can pull the frozen log out. The finish won’t be as smooth but you wait till it defrosts a bit to smooth it down.
- your chestnut mousse
- 2 marrons glacés (candied chestnuts)
- around 200-250g/7-9oz raspberries, fresh or frozen (defrosted) – I used frozen. Use more or less raspberries according to taste and how much space you have in your mould
- your 2 meringue rectangles
- Pipe a layer of chestnut mousse in your log tin and fill in the bottom to make a flat base.
- Crumble or cut pieces of the marron glacés (optional) over the mousse at the bottom.
- Cut the smaller meringue rectangle to fit.
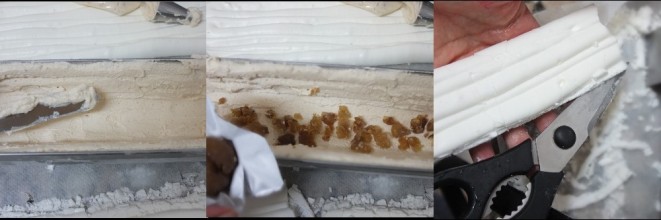
- Place your meringue layer upside-down over the chestnuts and mousse.
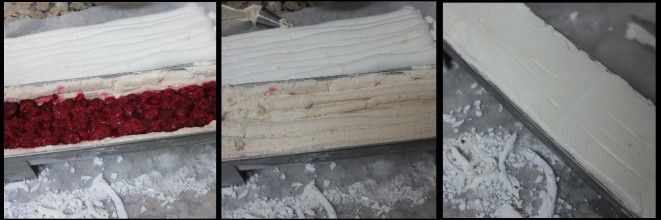
- Put all your raspberries on the meringue layer (if they’re fresh, keep a few for decoration).
- Cover with a layer of chestnut mousse, leaving room for the larger meringue rectangle.
- Place the meringue rectangle upside-down on top (if you don’t want the meringue to show at the bottom of your log then make it fit inside the mousse without overlapping).


FREEZE FOR 2 to 5 hours, or overnight – until set so you can unmould it.
Unmoulding and decorating your log
When frozen and set, use a blowtorch to heat up the metal log mould (or lift out holding the edges of the plastic film if using). This should release your log eventually (ahem, see troubleshooting note no. 3 above). Slide a sharp knife between the bottom of the sides and mould to help release the log. Place the log on the serving plate or board, ready to decorate.
The vanilla chantilly cream
- 200g/ml whipping cream (35%), cold
- 25g caster/superfine sugar
- 1/5 – 1/4 tsp pure vanilla essence or seeds scraped out of 1/4 vanilla pod
Whisk the cream to soft peak. Gradually whisk in the caster/superfine sugar. Add the vanilla essence. Continue whisking to stiff peak (the cream should hold its shape well) but be careful not to overwhisk or it will turn to butter.
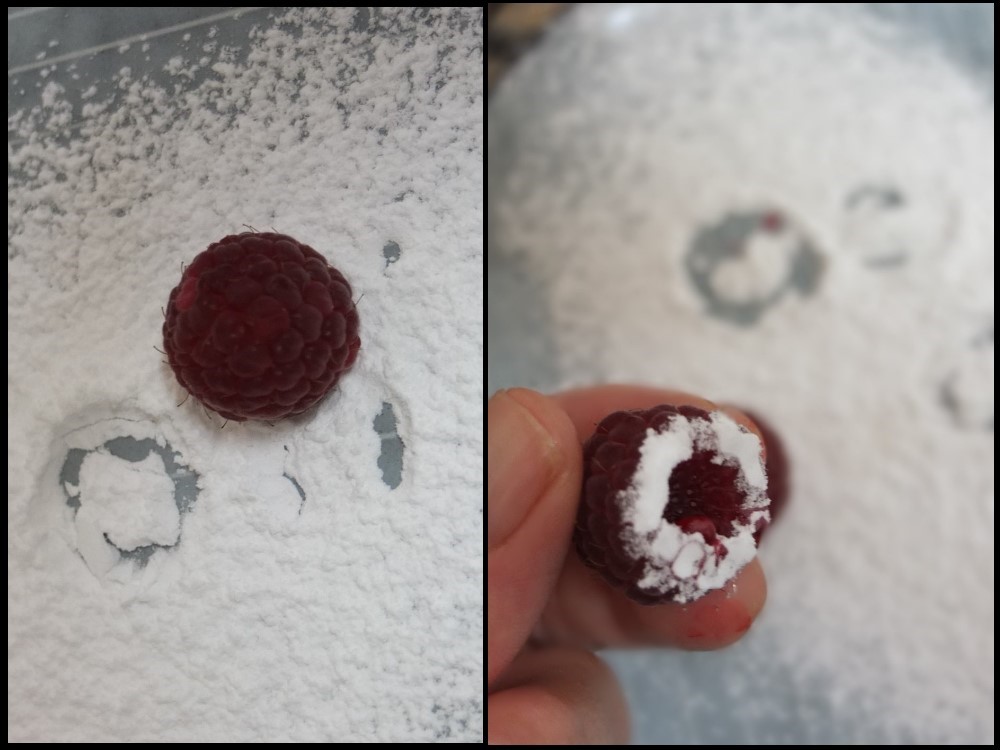
Icing sugar raspberries
These are best made at the last minute because the icing sugar starts dissolving. Or just use raspberries with no icing sugar.
Decoration
- 1 candied chestnut, edible gold leaf (optional), meringue kisses, white chocolate decor shapes, raspberries, whipped cream … anything else you like to personalise your log
- Pipe a swirly line of chantilly cream along the top of your log. You can use a Saint-honoré nozzle.
- Spread cream at each end of your log and cover with your white chocolate rectangles or white chocolate shavings.
- Place snowflakes and discs, raspberries and pieces of candied chestnut artistically on your log, along the cream.
- Place gold leaf on top of each chestnut piece (optional).
- Place white chocolate shards, trees and triangles along the bottom of the log if needed to neaten it up.
- Stand back and admire your log. Yeah, those rectangles are a bit curvy. lol..

Storing and eating
The log needs to defrost 1 to 2 hours at room temperature before serving. The raspberries take longest to defrost but if they’re still cold there’s a slight ice-cream cake effect you might like. Store in the fridge and eat on the same day because the following day the meringue will still be yummy but soft.
To keep some for later consumption freeze in an airtight container up to 2 weeks (for peak condition) or 1 month. I froze most of it and some will be for friends coming to my house this week to eat cake and drink cava, and then for mum who’s coming to Barcelona to visit over the festive season. Yay!
By the way, serve with fresh raspberries and extra pieces of candied chestnuts for extra yumminess.
Variations
Free-form bûche
Make a bigger rectangle for the bottom then a slightly smaller one for the middle. Place the bigger rectangle on the serving plate or board. Spread a layer of chestnut mousse and raspberries. Cover with the second meringue rectangle. Sprinkle with little pieces of candied chestnuts (optional) then spread a rectangular dome of chestnut mousse over this. Smooth chestnut mousse all around to shape a log cake. Now decorate as above or cover in a layer of whipped cream and chocolate shavings.
Snowballs
Follow the instructions for the free-form bûche with small discs of meringue. The snowballs recipe will be posted next year.
Verrines
With the leftovers…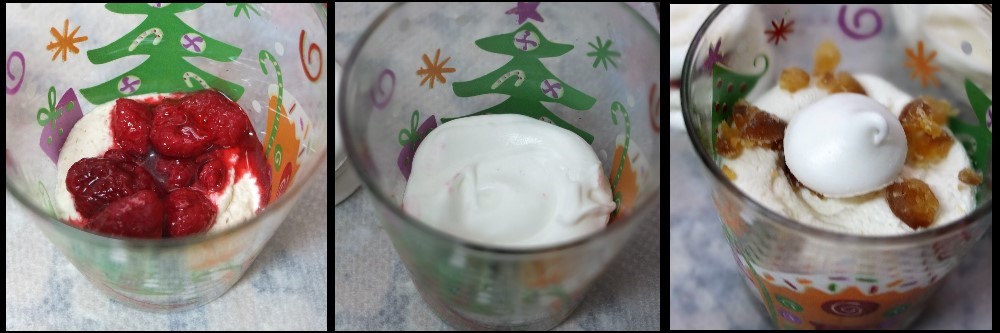
Cake anyone?
Sorry about the ridiculously long post and ramble dear reader. Please let me offer you some Le Sparkly raspberry and chestnut bûche to make up for it. It’s my favourite log cake because the raspberries really lighten up and balance the slightly heavier but delicious chestnut. It’s earthy but fruity, chestnutty, creamy, crisp and light. It’s very like a well-dressed and uncrushed Eton Mess. Yum.
For you.

Now let’s all dash off and get on with Christmas preparations, making dinner, working, or just having a lovely day. Wishing you lots of happy baking and eating! 🙂 Lili x
P.S. This could be my last post before Christmas. I think I’ll soon be off rock climbing with friends in Southern Spain for almost a week and I hear the villa doesn’t have internet. So I’m wishing you a very merry Christmas now! Muak! xxx

That’s a beautiful cake! Have a wonderful Christmas and be safe!
LikeLiked by 1 person
Thank you Deborah! Have an amazing Christmas too! 🙂
LikeLiked by 1 person
Looks great
LikeLiked by 1 person
Thank you! 🙂
LikeLike
Looks and sounds delicious:) Love chestnuts;)
Merry Christmas!
LikeLiked by 1 person
Thank you! Yes, chestnuts are yummy! 🙂 Have a lovely Christmas too! 🙂
LikeLiked by 1 person
I have had many kitchen baking disasters and none of them resulted in something as beautiful as your log cake. Well done 🙂 It looks amazing!
LikeLiked by 1 person
Aw thank you! Happy you like this cake… and yes I’ve had less attractive disasters too! Lol. Though I’m still a bit traumatised by this one. 🙂 p.s. love your recipes and really want to try your aquafaba royal icing to make a gingerbread house like you did!
LikeLiked by 1 person
Thanks Lili. Happy holidays!
LikeLiked by 1 person
Will there be some in the freezer? Merry Christmas!
LikeLiked by 1 person
🙂 Yes, I just checked and there’s still some waiting in the freezer for you! (at the moment!) Merry Christmas to you too! Hey apparently there is internet at the villa so I’ll be in touch between climbs. 🙂
LikeLike
All of that work Lili and you produced a beautiful artistic cake. I have a bundt pan that I got rid of because it was so greedy in hanging on to my cakes. Have a wonderful holiday and I look forward to seeing more of your works of art!
LikeLiked by 1 person
Thanks so much Julie for your lovely words! You’re very kind. It’s interesting to hear about your bundt pan – shame it had to go but a good idea. I’m going to see how mine does next time and give it one more chance..! 🙂 Have a really nice Christmas too! 🙂
LikeLiked by 1 person
WOW AWESOME. Thanks for sharing. Please hop over and see what we have for you to munch on. Hope to see you soon. 😉
LikeLike
Beautiful!
LikeLiked by 1 person
Aw thanks! 🙂
LikeLiked by 1 person
Oh, it’s really lovely, Lili! The finished cake looks like a fairytale, it’s like a small snowy forest full of magic 🙂 Have a great day!
Marianne
LikeLike