This sourdough brioche is adapted from the really clear and complete Sourdough Schoolhouse online pastry course. You can also make brioche with fresh or dried yeast following my plaited brioche recipe but personally I now prefer this sourdough version which produces a healthier naturally-yeasted bread following a process of longer fermentation as in the old days. It gives you a brioche that’s light and fluffy with a very slight interesting tang so not sour but delicious.
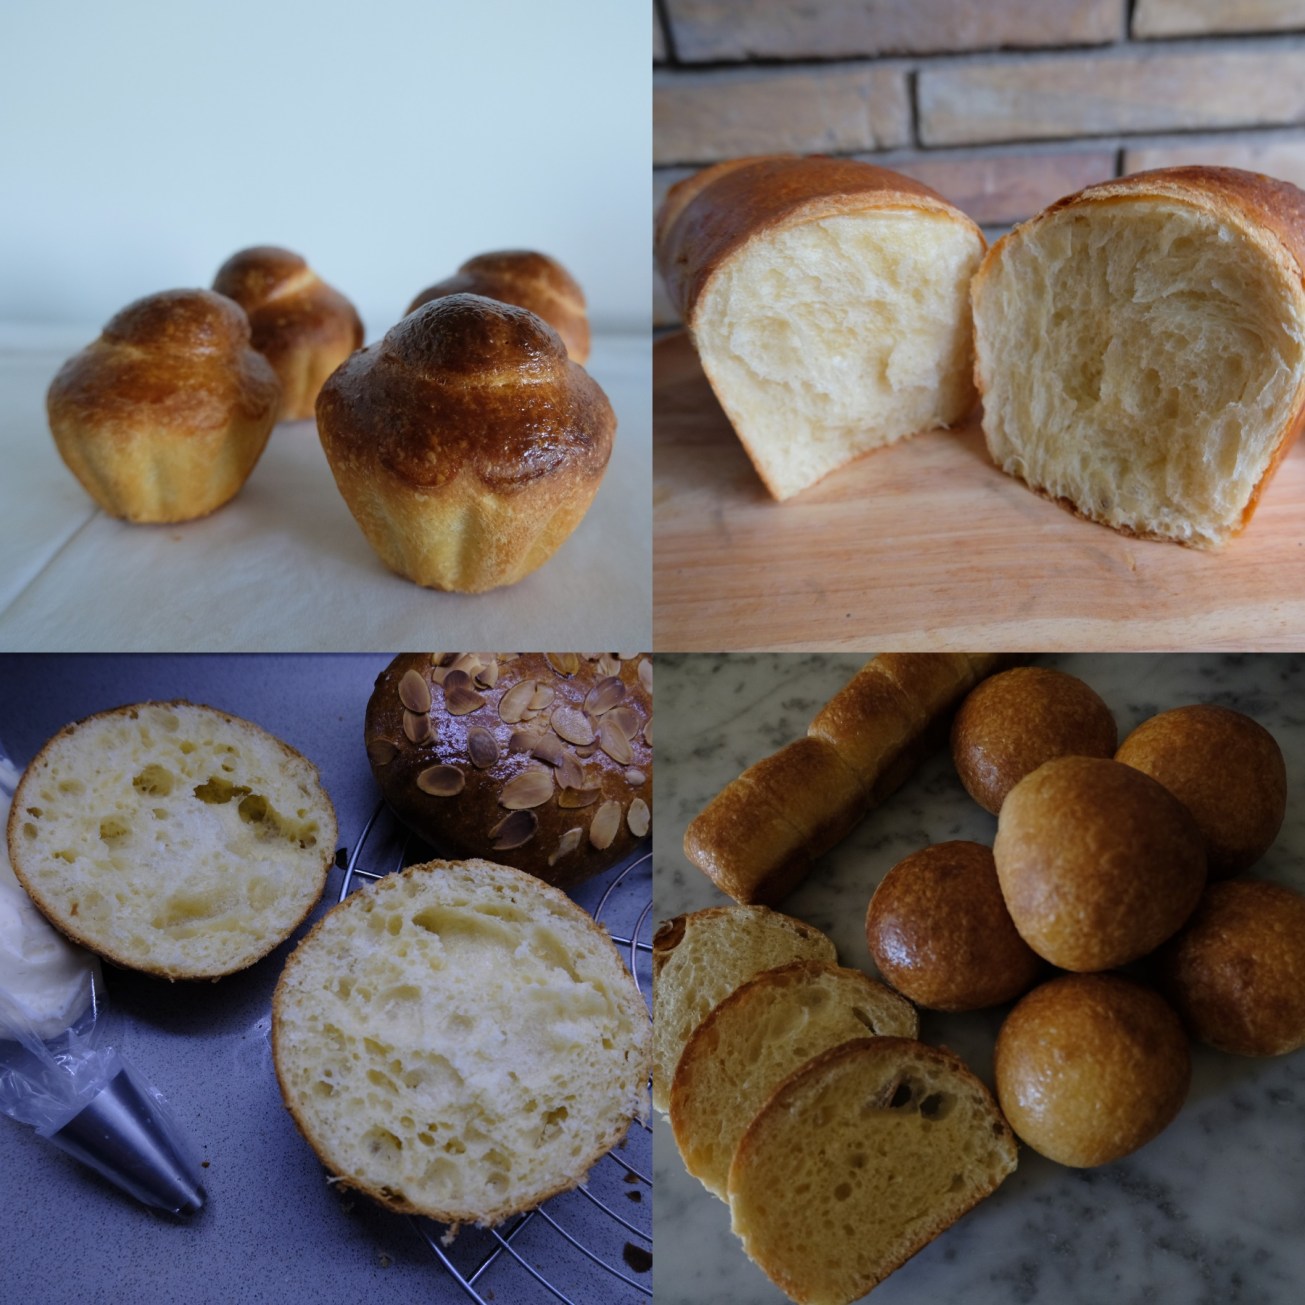
I started using the French kneading system when I noticed how sticky my dough was and didn’t want to add more flour which would make the dough heavier. If you’re not very experienced with kneading bread you can use half quantities the first time you make these so the dough is easier to work with. Then use full quantities which makes it so worthwhile with lots and lots of brioche! Yum. I like making a combination of brioche burger buns, polonaise buns and a big brioche loaf for sandwiches or toasted sandwiches.

Equipment
A digital weighing scale is useful if making sourdough brioche as it’s difficult to measure sourdough starter with a cup.
DAY 1 evening – refresh your usual 100% hydration sourdough starter
DAY 2 morning – make levain (6-10 hours before mixing the dough ingredients) with your active sourdough starter:
- 20g/scant 1/8 cup sourdough starter
- 100g/ml tepid water (between 23-27ºC/74-80ºF)
- 100g/3/4 cup less 1 tsp organic strong white bread flour
Whisk together starter and water then stir in flour. Leave in a tall jar covered or lightly covered to ferment until more or less doubled in size, bubbly and active.
DAY 2 afternoon/evening – mix dough and bulk ferment
Timings: takes about 5 hours overall.
- 600g/4 and 3/4 cups strong white flour (or half strong white flour and half plain or 00 flour – all 00 flour also works well)
- 120g/ml full-fat milk
- 180g/scant 1 cup of your prepared active sourdough levain (made 6 – 10 hours ago so it’s bubbly and more or less doubled in size) – it will be almost all of your prepared levain less 1 tablespoon.
- 300g beaten egg at room temperature (about 5 and 1/2 medium-large free-range eggs)
- 240g/1 cup unsalted butter cut into smallish pieces and softened at room temperature (good quality French-style like le Président)
- 60g/1/4 cup unrefined sugar – I use unrefined golden caster sugar
- 12g/2 tsp fine sea salt
Method
MIXING AND EARLY KNEADING
- Warm the milk to fairly hot on low heat with the salt and sugar and stir so they dissolve.
- Add the milk liquid (no higher than 59°C/138°F) and beaten egg to a large bowl and whisk. Check the temperature is just tepid-warm so it won’t be too cold or too hot (this kills the yeast) – between 23-27ºC/74-80ºF.
- Whisk in the sourdough levain till combined.
- Stir in the flour and knead 1 or 2 minutes with your hands until there are no dry bits. Leave to rest 5 minutes.

- Put the dough on a flat surface like marble (picture 4 above). Knead this sticky dough a further 3-5 minutes using FRENCH-STYLE KNEADING and a metal scraper to occasionally help scrape the dough off the surface and bring it round into a ball. Here’s a youtube video showing the kneading method – start watching from 3:00. Don’t flour the surface as these doughs come out especially lovely and fluffy when you don’t add flour.
- Add a few pieces of butter and knead until incorporated in the dough. Repeat until all butter is incorporated. This takes about 10 minutes and gives you a lighter dough (picture 1 below).
- Keep kneading French-style until you have a dough that’s less sticky and more able to form a ball. The kneading could take another 15 to 20 minutes until it’s still sticky but holds its shape better when you scrape into a ball (picture 2 below). Let it rest 5 minutes.
- Knead again another 15 to 20 minutes. You’ll feel it getting more elastic and coming off the surface more easily, but it will still leave a sticky trail on the surface. Keep scraping with the metal scraper to bring dough back into the ball. Because of all the butter it may not be perfectly smooth with a windowpane effect as in the video but it will be close and that’s good enough (pictures 3 and 4).

- Place in a clean bowl. Cover with a damp tea towel or reusable plastic shower cap/lid.
BULK FERMENTATION
This is the start of your bulk fermentation and you can use your mobile phone alarm to set times at the required intervals: 30 mins, 30 mins, 1 hour, 1 and 1/2 hour then 1 hour (5 turns). For example if bulk fermentation starts at 17:00 set alarms for 17.30, 18:00, 19:00, 20:30, 21:30. So your bulk fermentation is more or less 4 and 1/2 hours. These timings can be approximate and flexible. Try to keep the dough at a room temperature of 23-27ºC/74-80ºF. It’s okay a bit cooler but you can place the covered bowl with you under a duvet/blanket!
- So let the dough rest the first 30 minutes.
- 1st turn (1st alarm call). Stretch 1 side of your dough up and fold to the middle, turn the bowl 1/5 of the way round and repeat to make 4 to 5 folds towards the centre and keep building the structure. Repeat. Use a rounded pastry scraper to scrape under the dough and take out of the bowl to shape into a rough sticky ball then put back into the bowl. Cover with plastic cap or lid.

- Let the dough rest 30 minutes.
- 2nd turn (2nd alarm call). Repeat step 2. Let the dough rest 1 hour.
- 3rd turn. Gently stretch and make 3-4 folds to the centre (turning the bowl 1/4 of the way round after each fold). Hold the dough grabbing with a hand on each side to pull and stretch gently then shape back into a ball, doing this twice. The dough should look and feel smoother and silkier now but is still sticky. Put back in the bowl. Cover. Let the dough rest 1 and 1/2 hours.
- 4th turn. Pull and stretch the dough gently between your hands again, once or twice. Shape back into a ball and place back in the bowl. Cover.
- Let the dough rest 1 hour.
- 5th (last alarm call). Gently repeat step 6 then place bowl in fridge overnight for long fermentation.

DAY 3
Timings: about 30 mins to warm a little from fridge; shaping: 15 mins + 20 mins waiting; proofing: 3 to 5 hours or more; baking: buns,12-14 mins and larger loaves, 20-30 mins. Cooling: about 1 hour.
DIVIDING AND CUTTING
Take dough out of fridge to soften a little, 30 mins or so depending on room temperature. I find it best not to let it soften too much for hours as it makes it more difficult to work with the dough but timings are flexible and it depends on room temperature and humidity. Weigh your dough (it should be around 1250 to 1340g) and calculate weights for each brioche shape you want. Here’s a possible way to split it:

Cut pieces of the dough with your metal scraper (or big sharp knife), slicing straight down on the surface for the size rolls or buns you’d like. Use a weighing scale to make exact sizes. When all the pieces are cut it’s time to shape.
SHAPING
Pre-shape
This dough is quite wet and sticky so this can be a bit tricky. The usual bread roll technique is shown here in a Bake with Jack shaping rolls video. You can do the first part: flatten each piece (de-gassing it) on a very lightly floured surface. Lightly stretch and fold in the sides (between 3 to 6 of them) into the middle to make a ball. Turn upside-down so the lightly floured side is now on top and stays as the top of the bun/roll. You can see this technique in steps 1 to 5 of the illustration below from my plaited brioche recipe:


You can roll them under your cupped palm but if the brioche balls are very sticky (or big) it can be difficult to do this. So instead you can follow a different technique where you use your metal scraper to bring the ball towards you and rotate to create tension in the skin. This is shown with a bigger boule in this high hydration video.
Different ways to shape brioche, including a loaf tin and brioche à tête are also shown by Mark Sinclair in his video (see from 3:20).
I found my brioche dough was sticking to the scraper so put a little water on it initially. You can also try putting a little flour on it but do use as little flour as possible.

After this imperfect pre-shape let them rest 20 minutes then shape again (if needed)
Second (final) shaping
Roll lightly under your palm or for bigger and stickier balls use your metal pastry scraper to pull towards you and around. You should get well-structured balls that keep their shape and have formed a light outer skin. When you poke lightly with a finger the skin springs back a little. This will help your buns rise well and means the structure is good. NOTE: If you’re having a lot of trouble shaping and getting a good structure then place balls in baking tins lined with paper or lightly greased with butter. Tins help brioche rise and be even fluffier.

Carefully place buns on the baking tray on a lightly greased silicone mat or baking paper. They should be well-spaced out to allow for rising. Or place in tins.

PROOFING
Let them proof on baking trays 3 to 5 hours or more, depending on room temperature. Around 25-28ºC/77-82ºF works well for me but a bit under or over is fine too (when colder it will take longer and in hotter weather they’ll proof faster). Cover with a large plastic bag/reusable plastic film so they don’t dry out. The brioche should increase in size 30 to 50%.
Finger poke test: if you poke with a finger and the dough springs straight back it’s not ready to bake yet. If it springs back slowly and leaves a bit of an indent it’s ready. If it just leaves an indent then it’s on the way to overproofing so rush it into the oven!

BAKING – 2 trays
- When you see the brioches are almost ready preheat oven to 240ºC/460ºF fan or 260ºC/500ºF static non-convection.
- When ready to put in oven brush brioches on 1st tray lightly with beaten egg (whisked with a little milk or water).
- Place 1st tray in oven and immediately lower heat to 220ºC/430ºF fan or 240ºC/460ºF static non-convection. Bake 8 minutes.
- Lower to 190ºC/375ºF fan or 210ºC/410ºF and turn tray around. Bake buns 4 to 5 minutes more, loaf 12 to 17 minutes more.
- The buns and loaves are ready when light golden brown on top with a pale brown circle underneath surrounded by a light golden ring.
- Take out of oven and cool on wire rack.
- For the 2nd tray increase heat in oven, wait until it reaches the correct heat and repeat steps 1 to 6.


EATING AND STORING
Wait 20 – 30 minutes or more before eating. Yum yum. Let cool completely before freezing in reusable sealed plastic bags or storing in airtight tupperware at room temperature. Brioches are best eaten on the same day but can be refreshed by toasting or warming in an oven on medium heat 8 to 10 minutes or more. I defrost mine a few hours at room temperature before warming in the oven. They come out so lovely and fluffy!
I’ve made brioche polonaises and tartes tropeziennes with my sourdough brioche and also just had vegan burgers in brioche buns and soft fluffy slices with butter. Have made amazingly delicious bostocks too. Brioche is such a beautiful and versatile enriched bread.

Sourdough brioche bostocks

Sourdough orange blossom brioche polonaise
Hope you give this sourdough brioche a go and enjoy the process. It seems long at first but you just need an evening in at home. And the next day potter around while they proof. The actual work involved is not that long – sometimes minutes or seconds!! It’s worth it! Also the more often you make brioche the easier. It can become a lovely relaxing and therapeutic routine. 🙂
