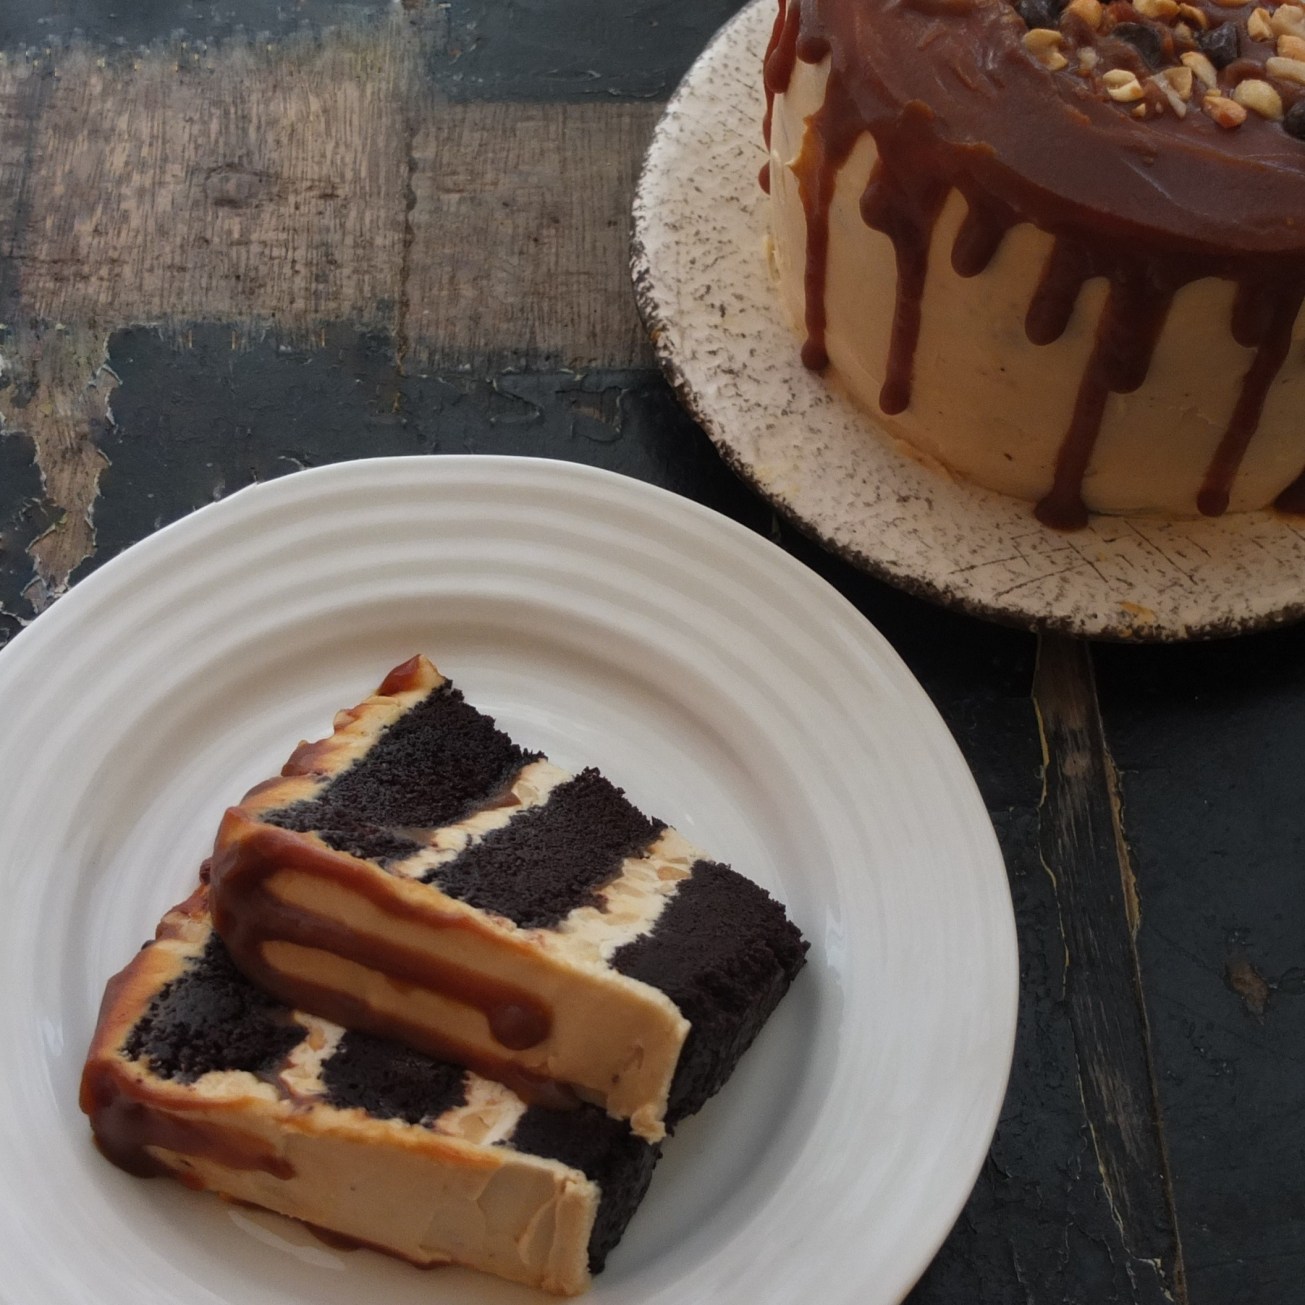
This cake is like a snickers (marathon) chocolate bar but much better my climbing friend assured me. Another friend said it was perfect! Hurray! Everyone has loved this cake. There’s a lovely balance between the moist cocoa sponge that isn’t very sweet, the homemade peanut nougat layer and that delicious slightly burnt caramel sauce and buttercream. I adapted the original recipe from the Brown Eyed Baker making it gluten free and omitting the chocolate ganache. You can use unrefined golden caster sugar like I did or standard sugar and flour. The quantities here are for a small or mini cake as you don’t need much to reach dessert heaven. Want to join me for some Snickers Layer cake? 🙂
Snickers layer cake
RECIPE
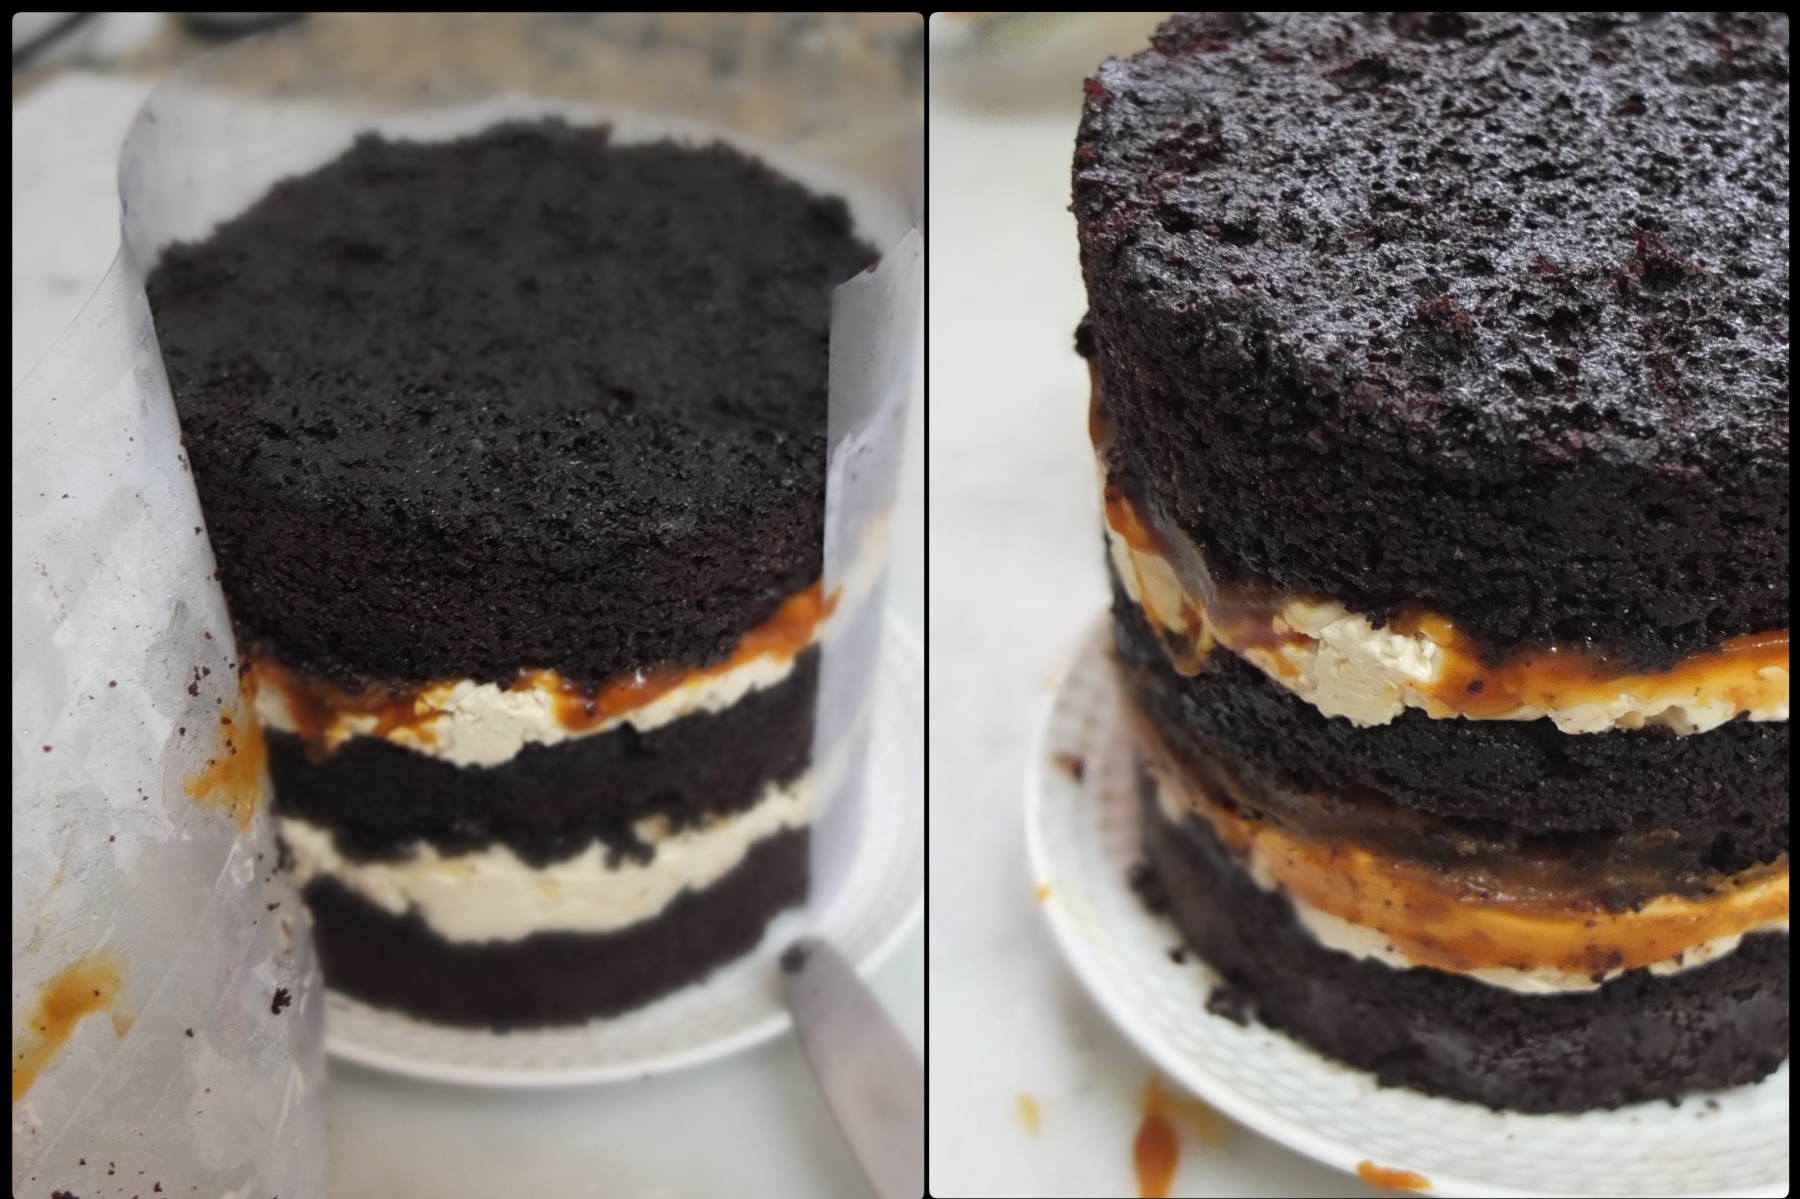
The Brown Eyed Baker’s recipe’s great and here if you want to make a larger cake, add a chocolate ganache on top or use three round baking tins. I used Christina Tosi’s method of making the sponge as a tray bake and cutting out the rounds to insert in a cake ring lined with acetate then freezing all the assembled layers overnight. I find this method really relaxing and easy to frost. As for the chocolate ganache, my cake testers (aka friends) assure me it isn’t necessary. Good news… I was happy to omit an element and save time. 🙂
Special ingredients: sorry about the shop-bought marshmallow fluff but it was handy and worked really well for the nougat. If you can’t get hold of it here’s a homemade marshmallow fluff recipe from Bigger bolder baker. All the other ingredients are pretty standard but I used Valrhona cocoa powder because I heard it’s delicious – it’s true!
Timings
Day 1: sponge (10-15 mins work + 20-30 mins baking then cool around 2 hours, in the fridge if you like); caramel sauce (10-15 mins work then cool a few hours); nougat (15-20 mins work then cool an hour or so); assemble cake. Freeze overnight.
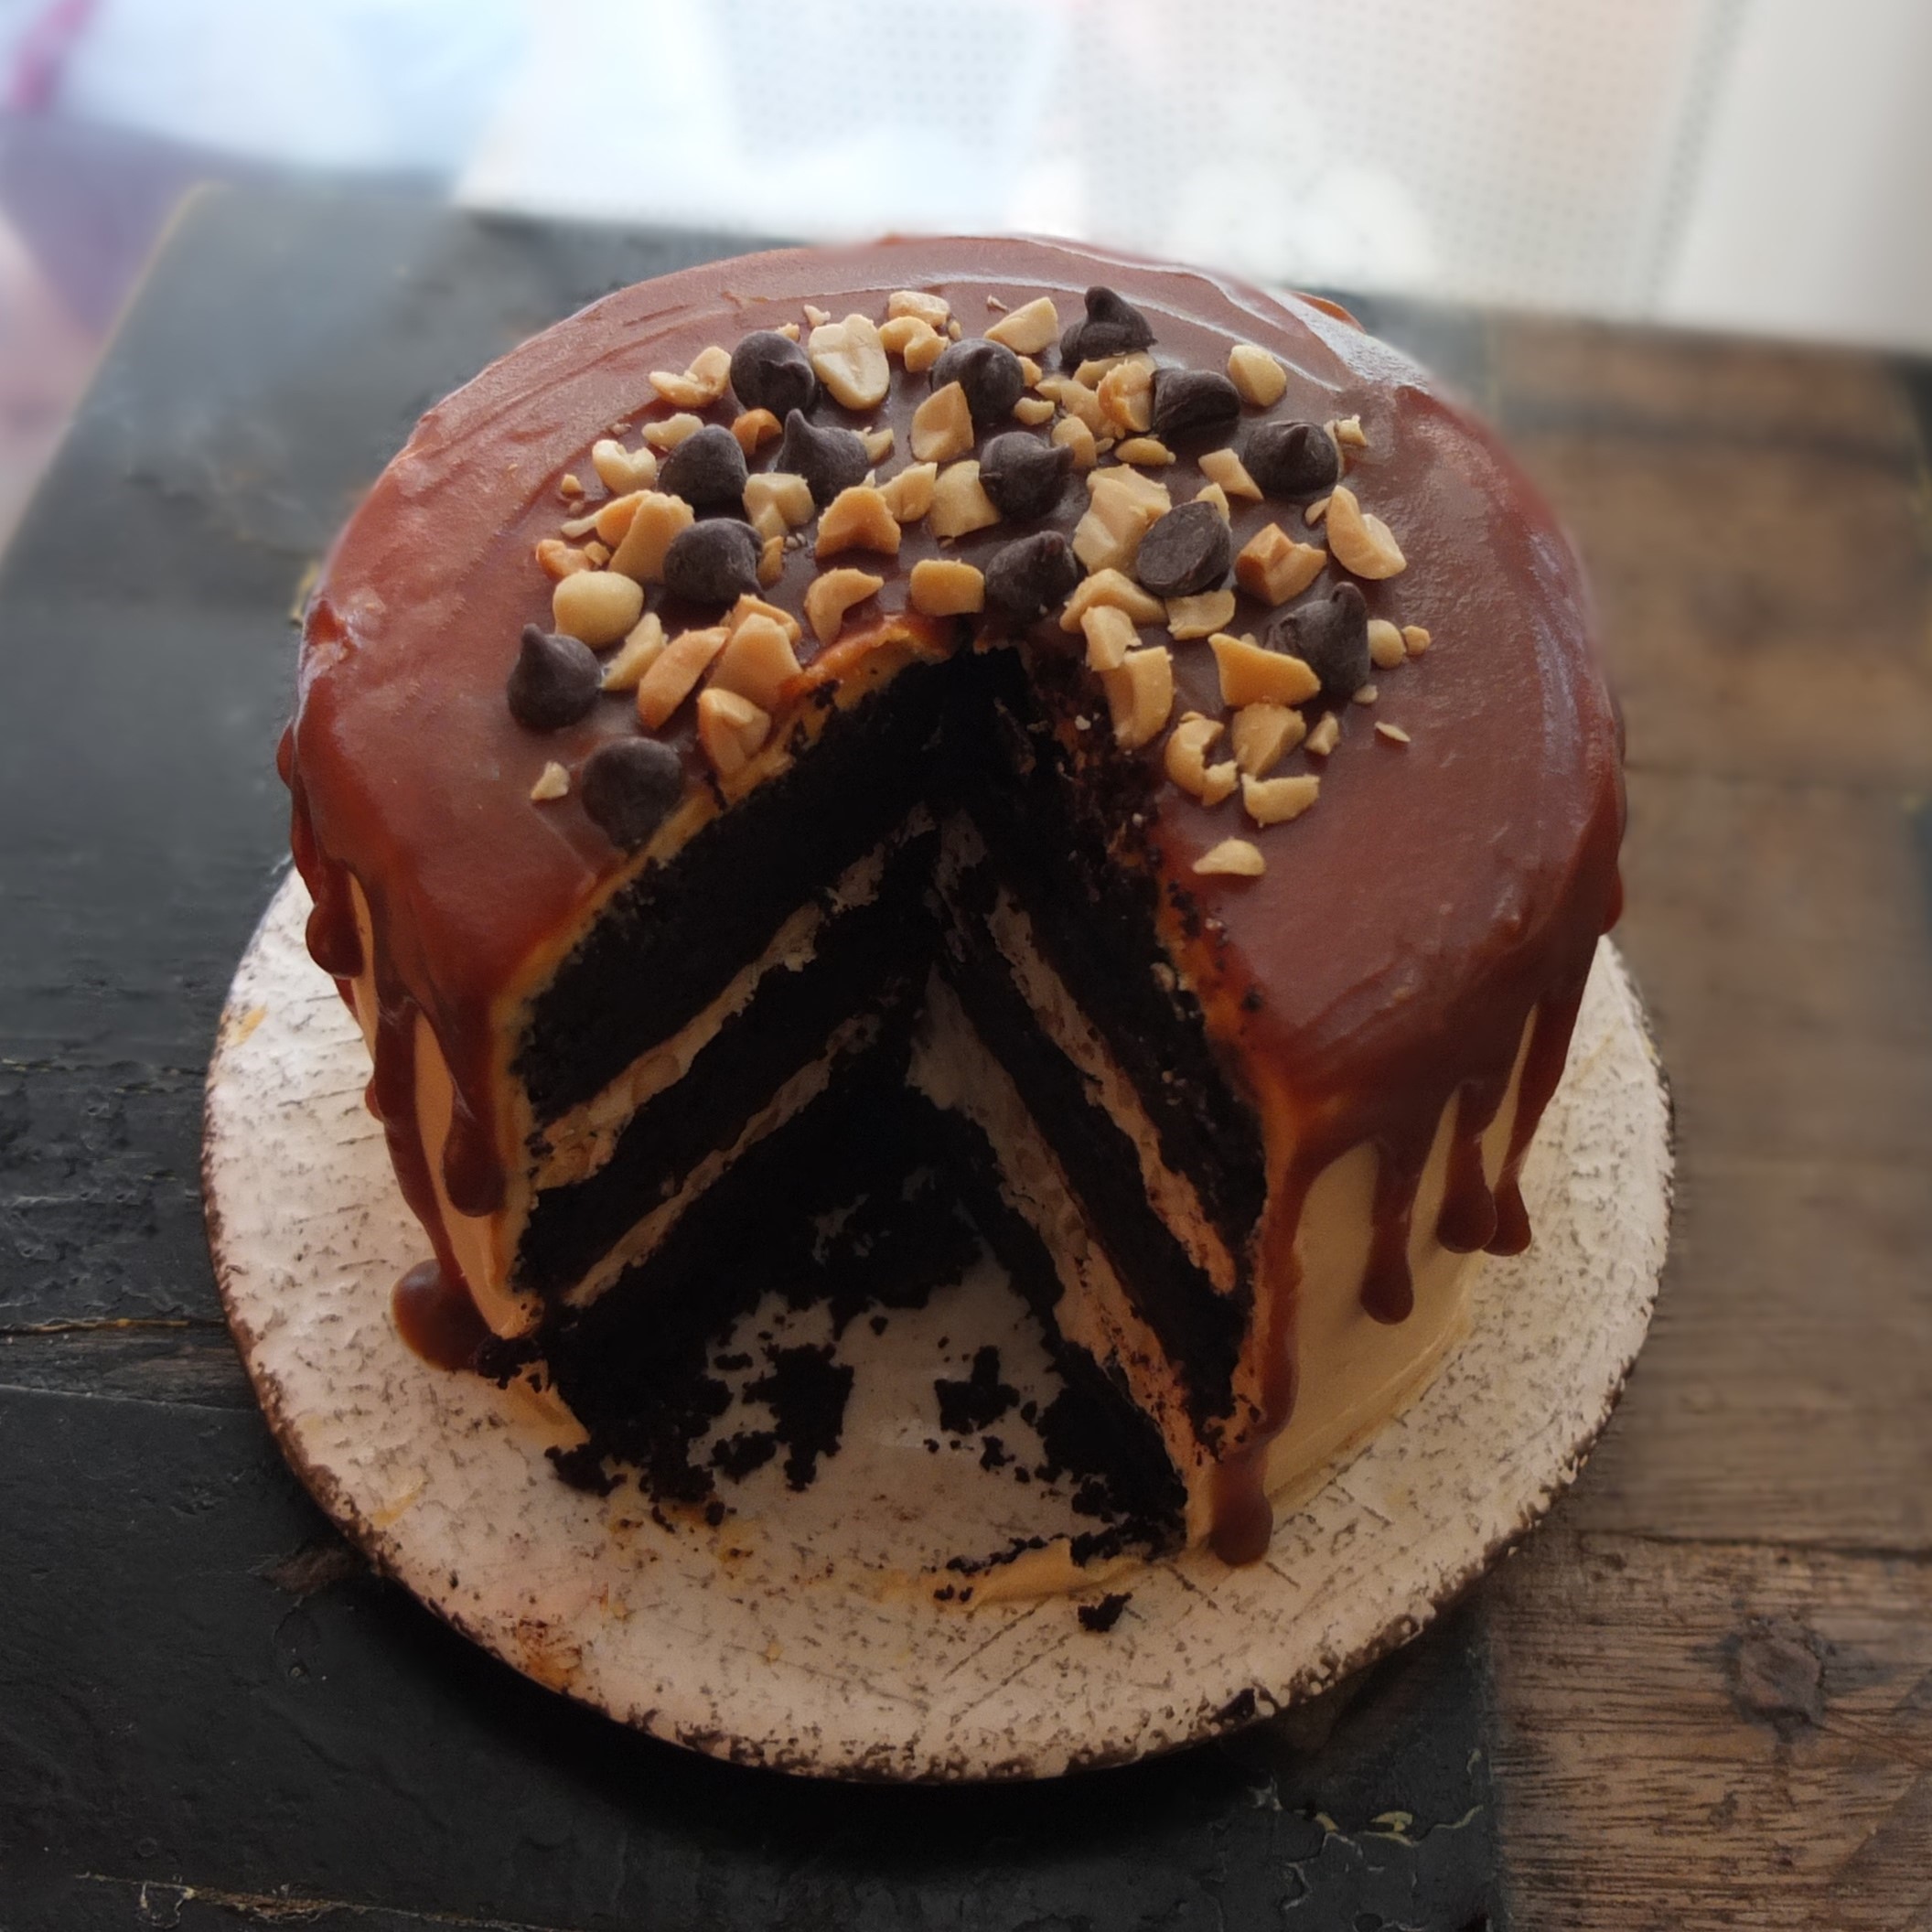
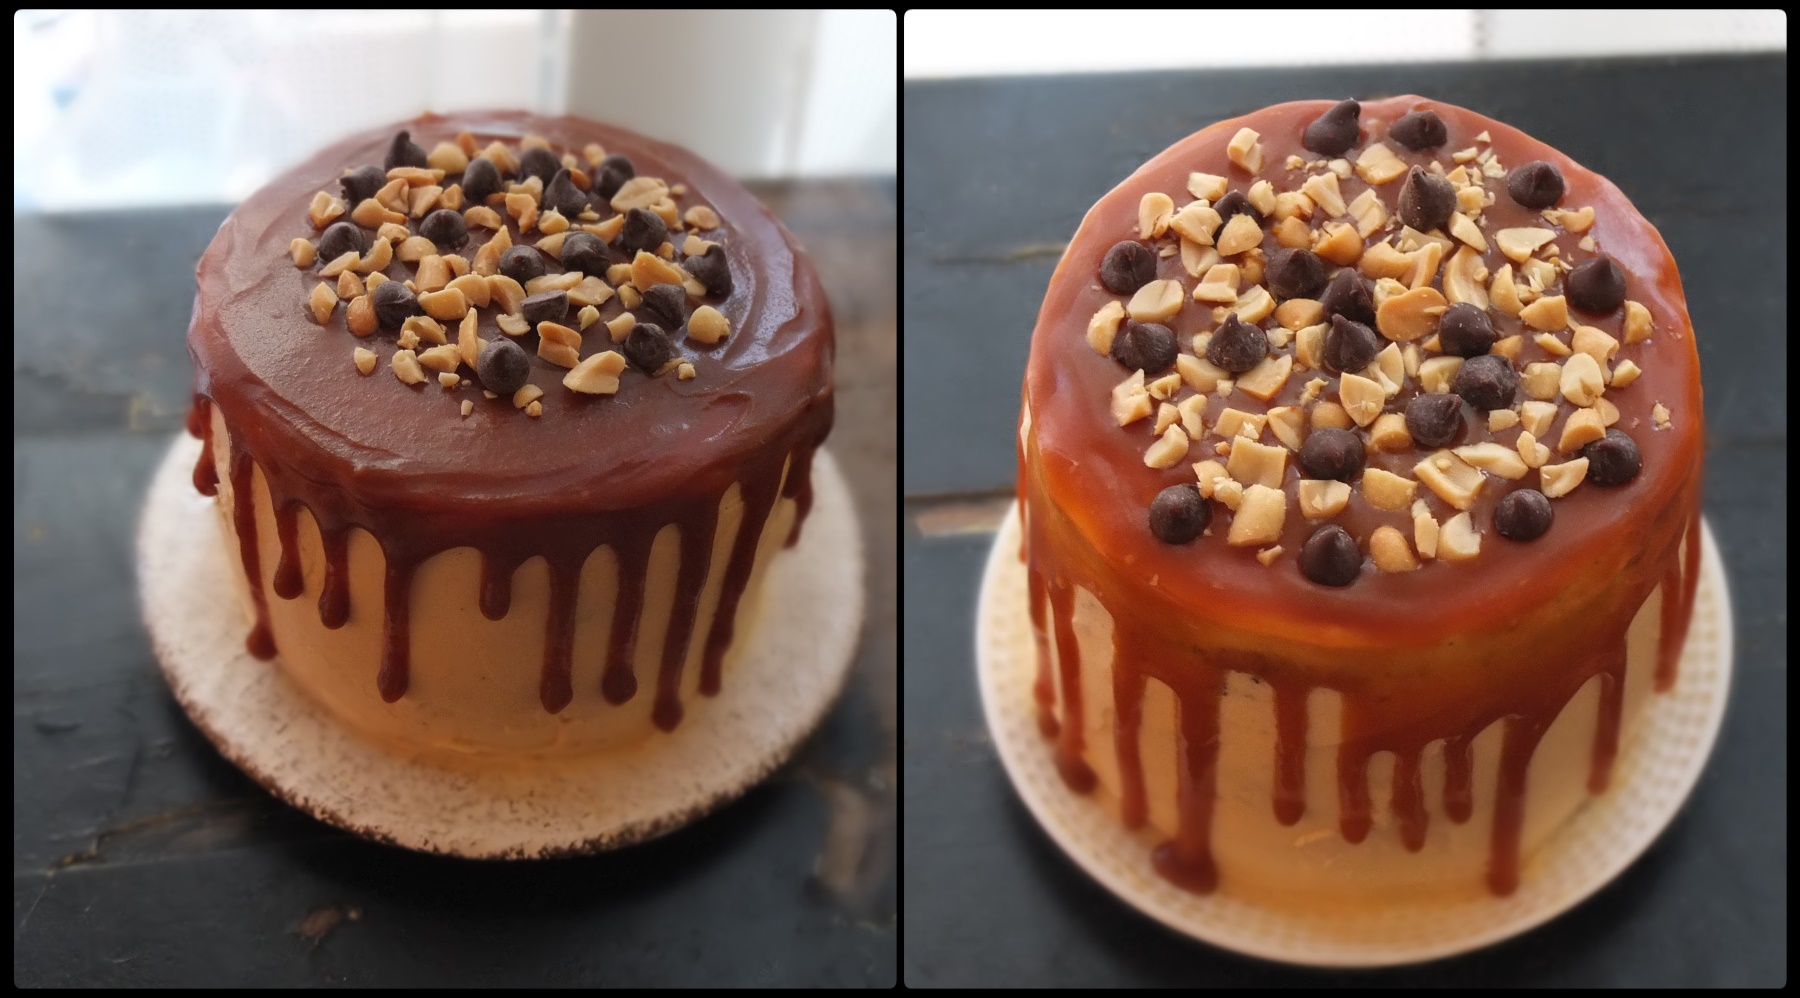
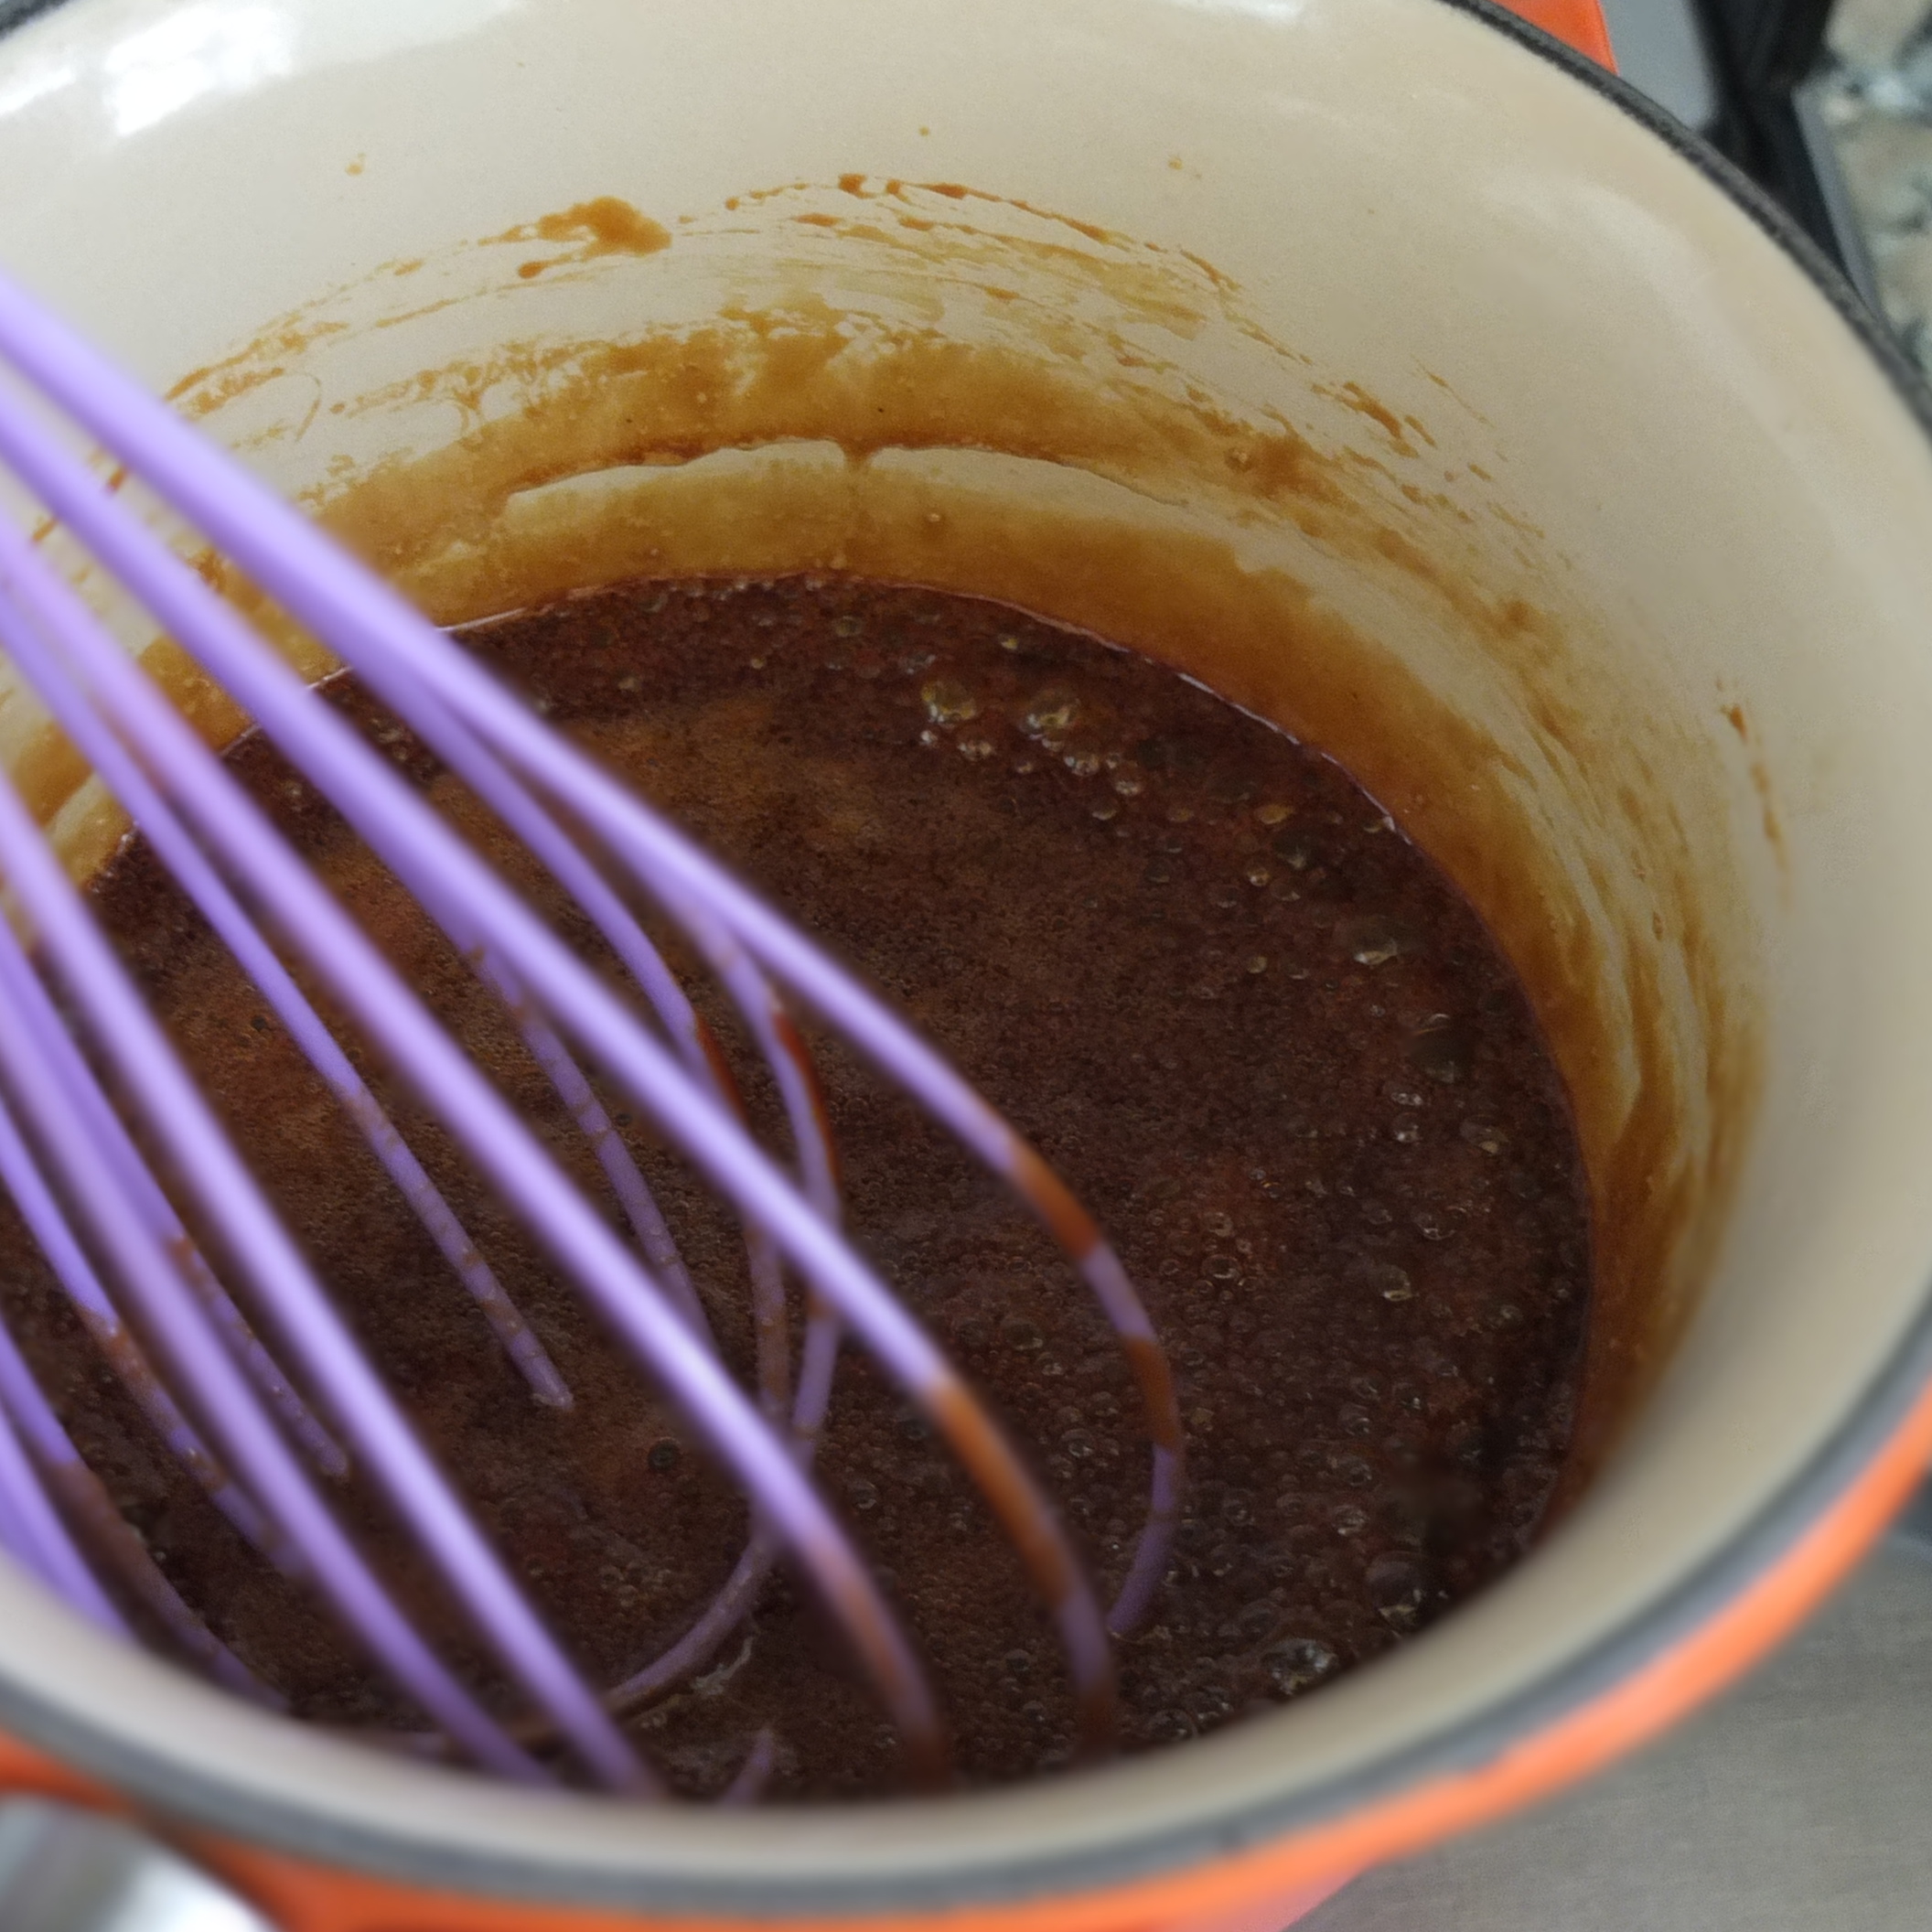
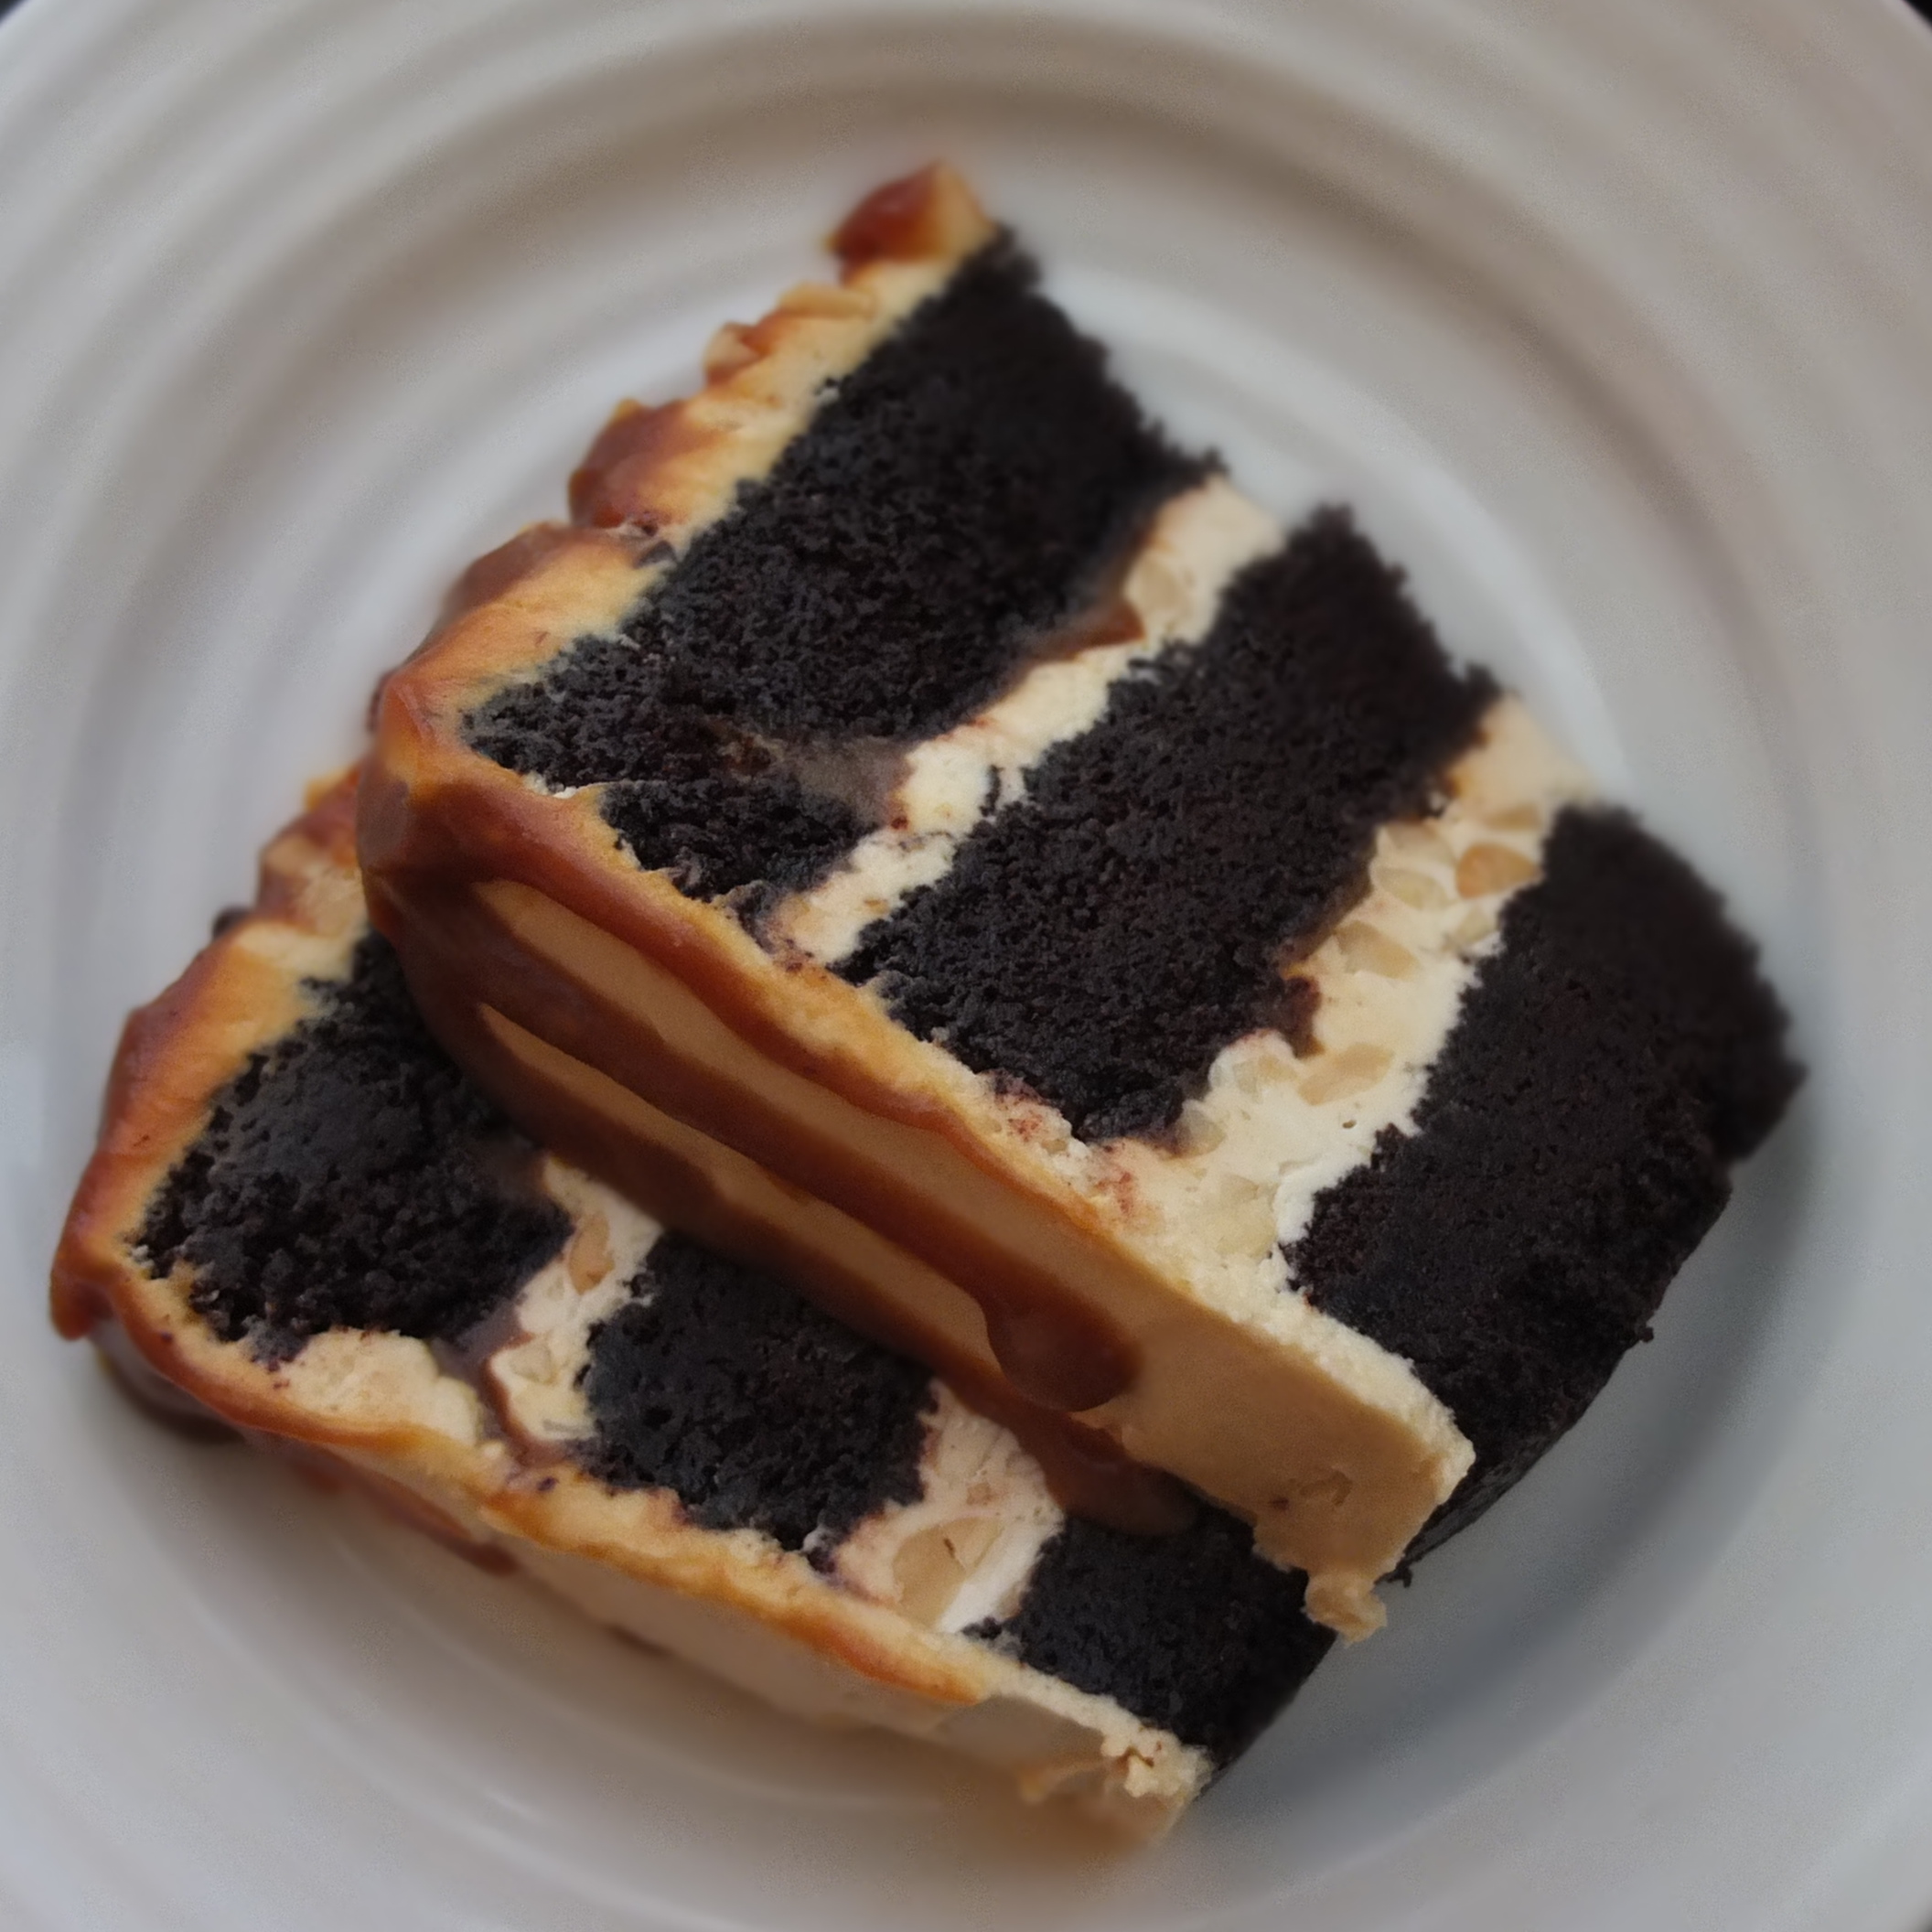
In the photo on the right you’ll see a more runny effect because I made a new batch of caramel the same day as piping it – you’ll get a nicer drip with caramel sauce made the previous day (photo on the left). I also prefer the darker caramel flavour with its delicious slightly burnt flavour – the lighter one is sweeter.
Day 2: make caramel buttercream and frost cake (20-25 mins work + freezing 2 x 30 mins to 1 hour between coats); pipe caramel sauce drip + sprinkle on nuts/chocolate chips (10 mins). You can eat the cake after defrosting in the fridge 4 hours or so (slices 1 – 2 hours at room temperature if you’re in a hurry).
CARAMEL SAUCE
Snickers layer cake
Small cake – 14cm/5.5in diametre
- 150g/3/4 cup less 3 and 3/4 tsp caster (superfine) sugar (I used golden unrefined) or 150g/3/4 cup granulated sugar
- 63g/4 and 1/2 tbsp good quality unsalted butter
- 90ml/g liquid whipping cream (35% fat)
- 3/4 tsp (4.5g) fleur de sel salt (1/2 tsp or less if using fine sea salt)
Mini cake – 12cm/4.7in diametre
- 100g/1/2 cup less 2 and 1/2 teaspoons caster (superfine) sugar (I used golden unrefined caster sugar) or 100g/1/2 cup granulated sugar
- 42g/3 tbsp good quality unsalted butter
- 60ml/g liquid whipping cream (35% fat)
- 1/2 tsp (3g) fleur de sel salt (1/3 tsp or less if using fine sea salt)
Method
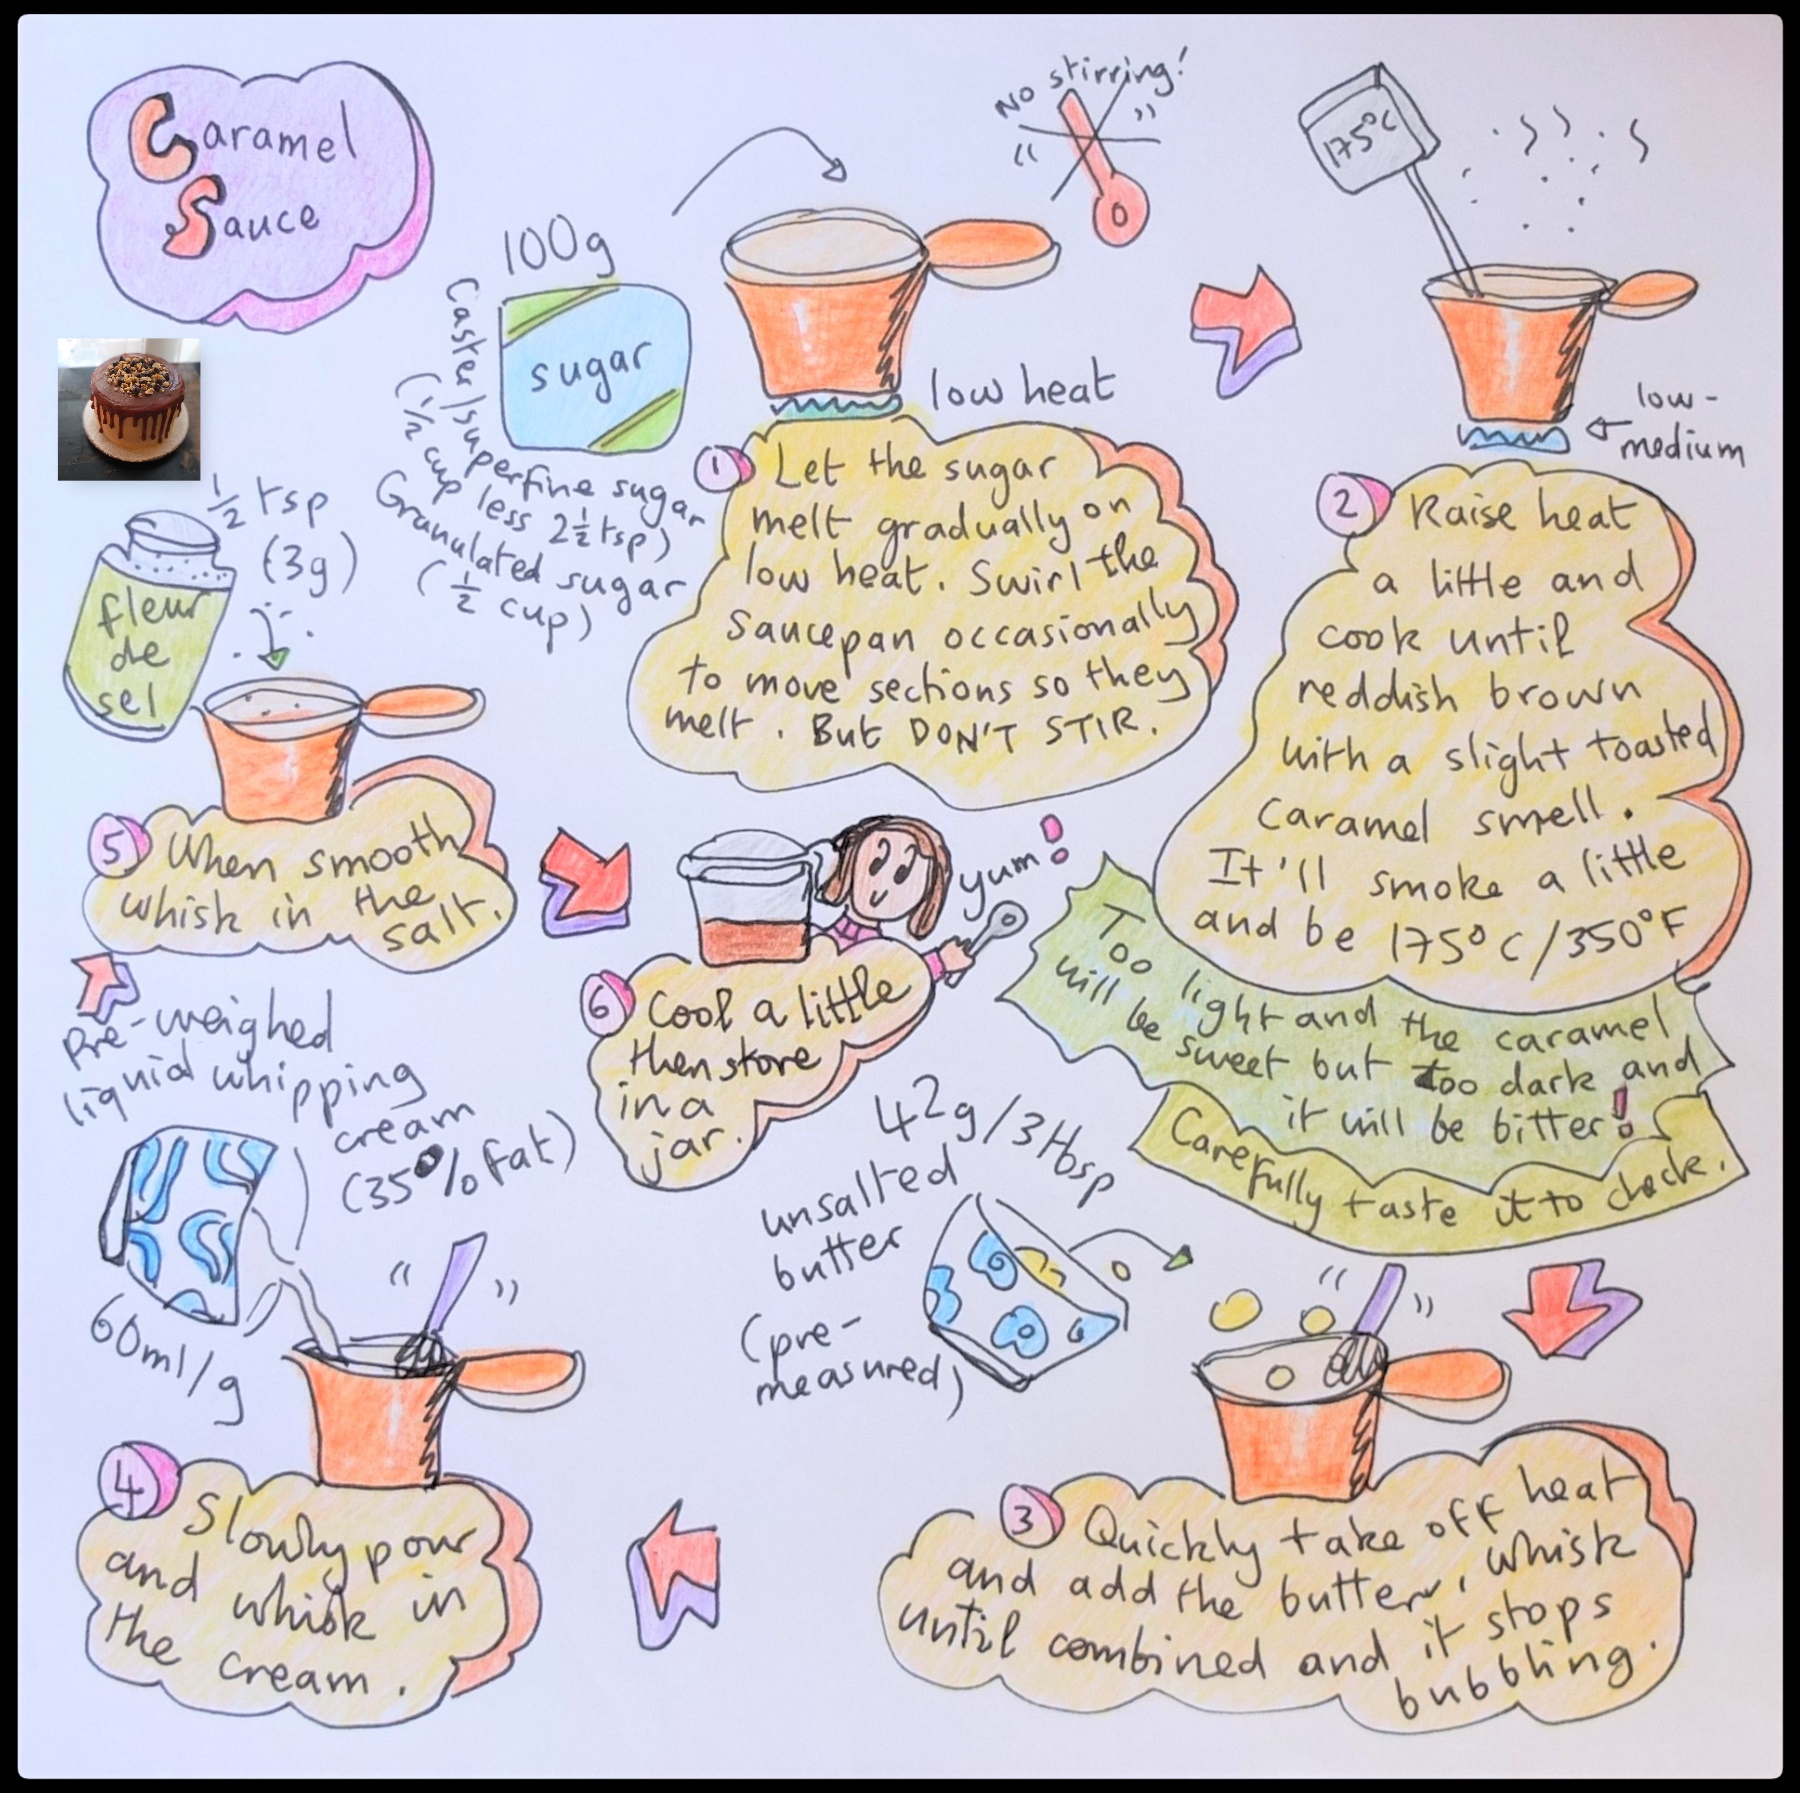

When the sugar has completely melted into a liquid caramel make sure it’s not too light and not too dark. There will be some hot steam coming up. The caramel keeps rising in temperature so as soon as it’s ready add the butter quickly and whisk in well. If after adding the cream it looks too dark and tastes bitter then sorry but you need to start again – this is quite normal with caramels and have had to do that myself! It is quite a dark tasty caramel …
This caramel sauce keeps in an airtight jar in the fridge for up to 1 month.
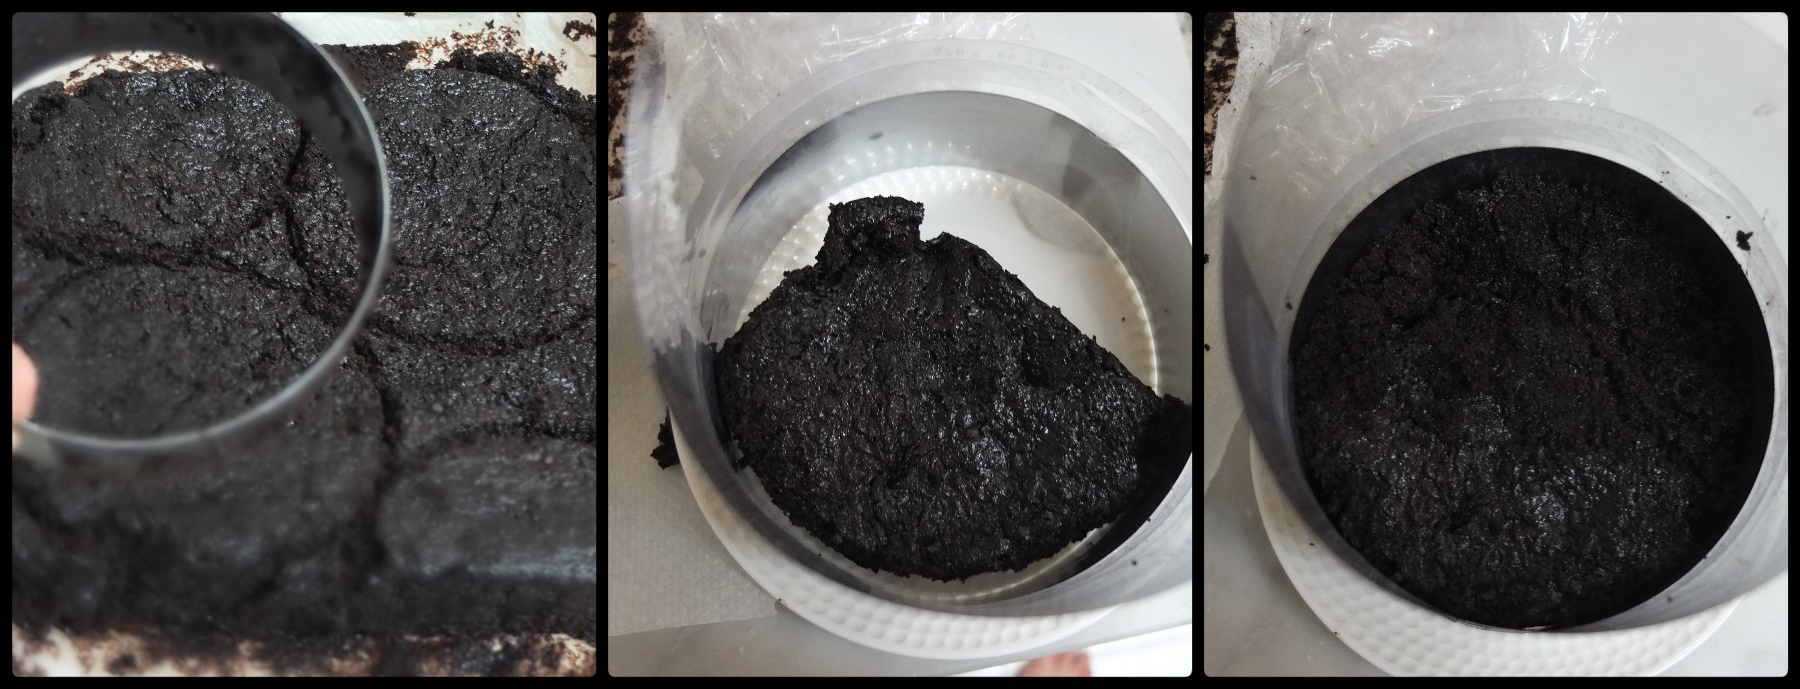
COCOA SPONGE
Small cake
Baking tin: 32cm x 23cm (13in x 9in) and 4.5 to 5cm high (2in) – more or less similar to this rectangular tin;
- 160g/1 and 1/4 cups + 1/2 tablespoon gluten-free flour mix (I used Doves Farm self-raising gf) or cake flour
- 300g/1 and 1/3 cups caster/superfine sugar (or 1 and 1/2 cups granulated sugar)
- 63g/1/2 cup + 1/2 tbsp dutch-processed cocoa powder (I used Valrhona, yum)
- 1/2 tbsp (7g) sodium bicarbonate (baking soda)
- 3/4 teaspoon baking powder
- 3/4 tsp fine sea salt
- 90g beaten egg (about 1 and 1/2 medium-large eggs), at room temperature
- 180g/3/4 cup (add 1 extra tbsp if using gluten-free flour mix) buttermilk, at room temperature
- 180g/3/4 cup strong black coffee, hot (I diluted 1 tablespoon instant Nescafé granules in boiling water)
- 78g/6 tbsp vegetable oil like grapeseed, canola or light 4º cold-pressed olive oil
- 2 tsp pure vanilla extract
Mini cake
Baking tin (suitable for mini tabletop oven): 22.8cm/9in x 22.8cm/9in square tin or similar sized rectangle tin.
- 102g/3/4 cup + 4 and 1/3 tsp gluten-free flour mix (I used Doves Farm self-raising gf) or cake flour
- 192g/3/4 cup + 5 tsp caster/superfine sugar (or 192g/1 cup less 2 tsp granulated sugar)
- 40g/1/3 cup dutch-processed cocoa powder (I used Valrhona, yum)
- 1 tsp (4.5g) sodium bicarbonate (baking soda)
- 1/2 tsp baking powder
- 1/2 tsp fine sea salt
- 58g beaten egg (about 1 medium-large egg), at room temperature
- 115g/1/2 cup less 1 and 1/3 tsp (add 1 extra tbsp if using gluten-free flour mix) buttermilk, at room temperature
- 115g/1/2 cup less 1 tsp strong black coffee, hot (I diluted 1 tablespoon instant Nescafé granules in boiling water)
- 50g/4 tbsp vegetable oil like grapeseed, canola or light 4º cold-pressed olive oil
- 1 and 1/4 tsp pure vanilla extract
Preparation
- pre-heat oven to 160°C/320°F (fan-assisted) or 180°C/355°F (static, non-convection oven).
- grease tin lightly and line with baking paper
Method
- Sieve the dry ingredients into a large mixing bowl (flour, sugar, cocoa powder, sodium bicarbonate, baking powder and sea salt). Whisk to combine well.
- In a medium bowl whisk together the egg, buttermilk, hot coffee, vegetable oil and vanilla to combine.

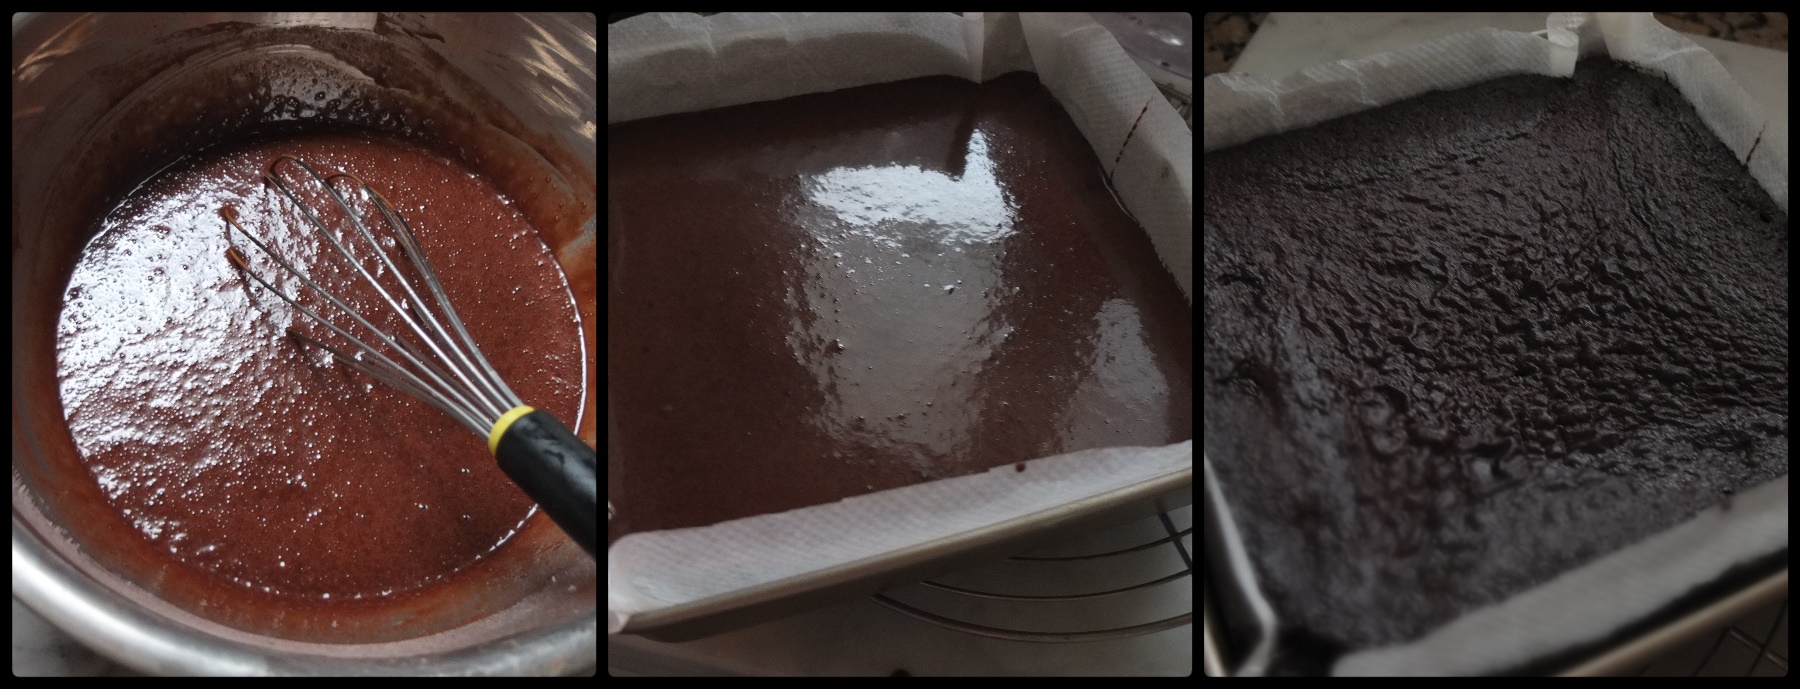
- Make a well in the dry ingredients and slowly pour in the liquid while stirring with a hand whisk until just combined. The mixture will be pretty liquid.
- Pour the mixture in the prepared tin.

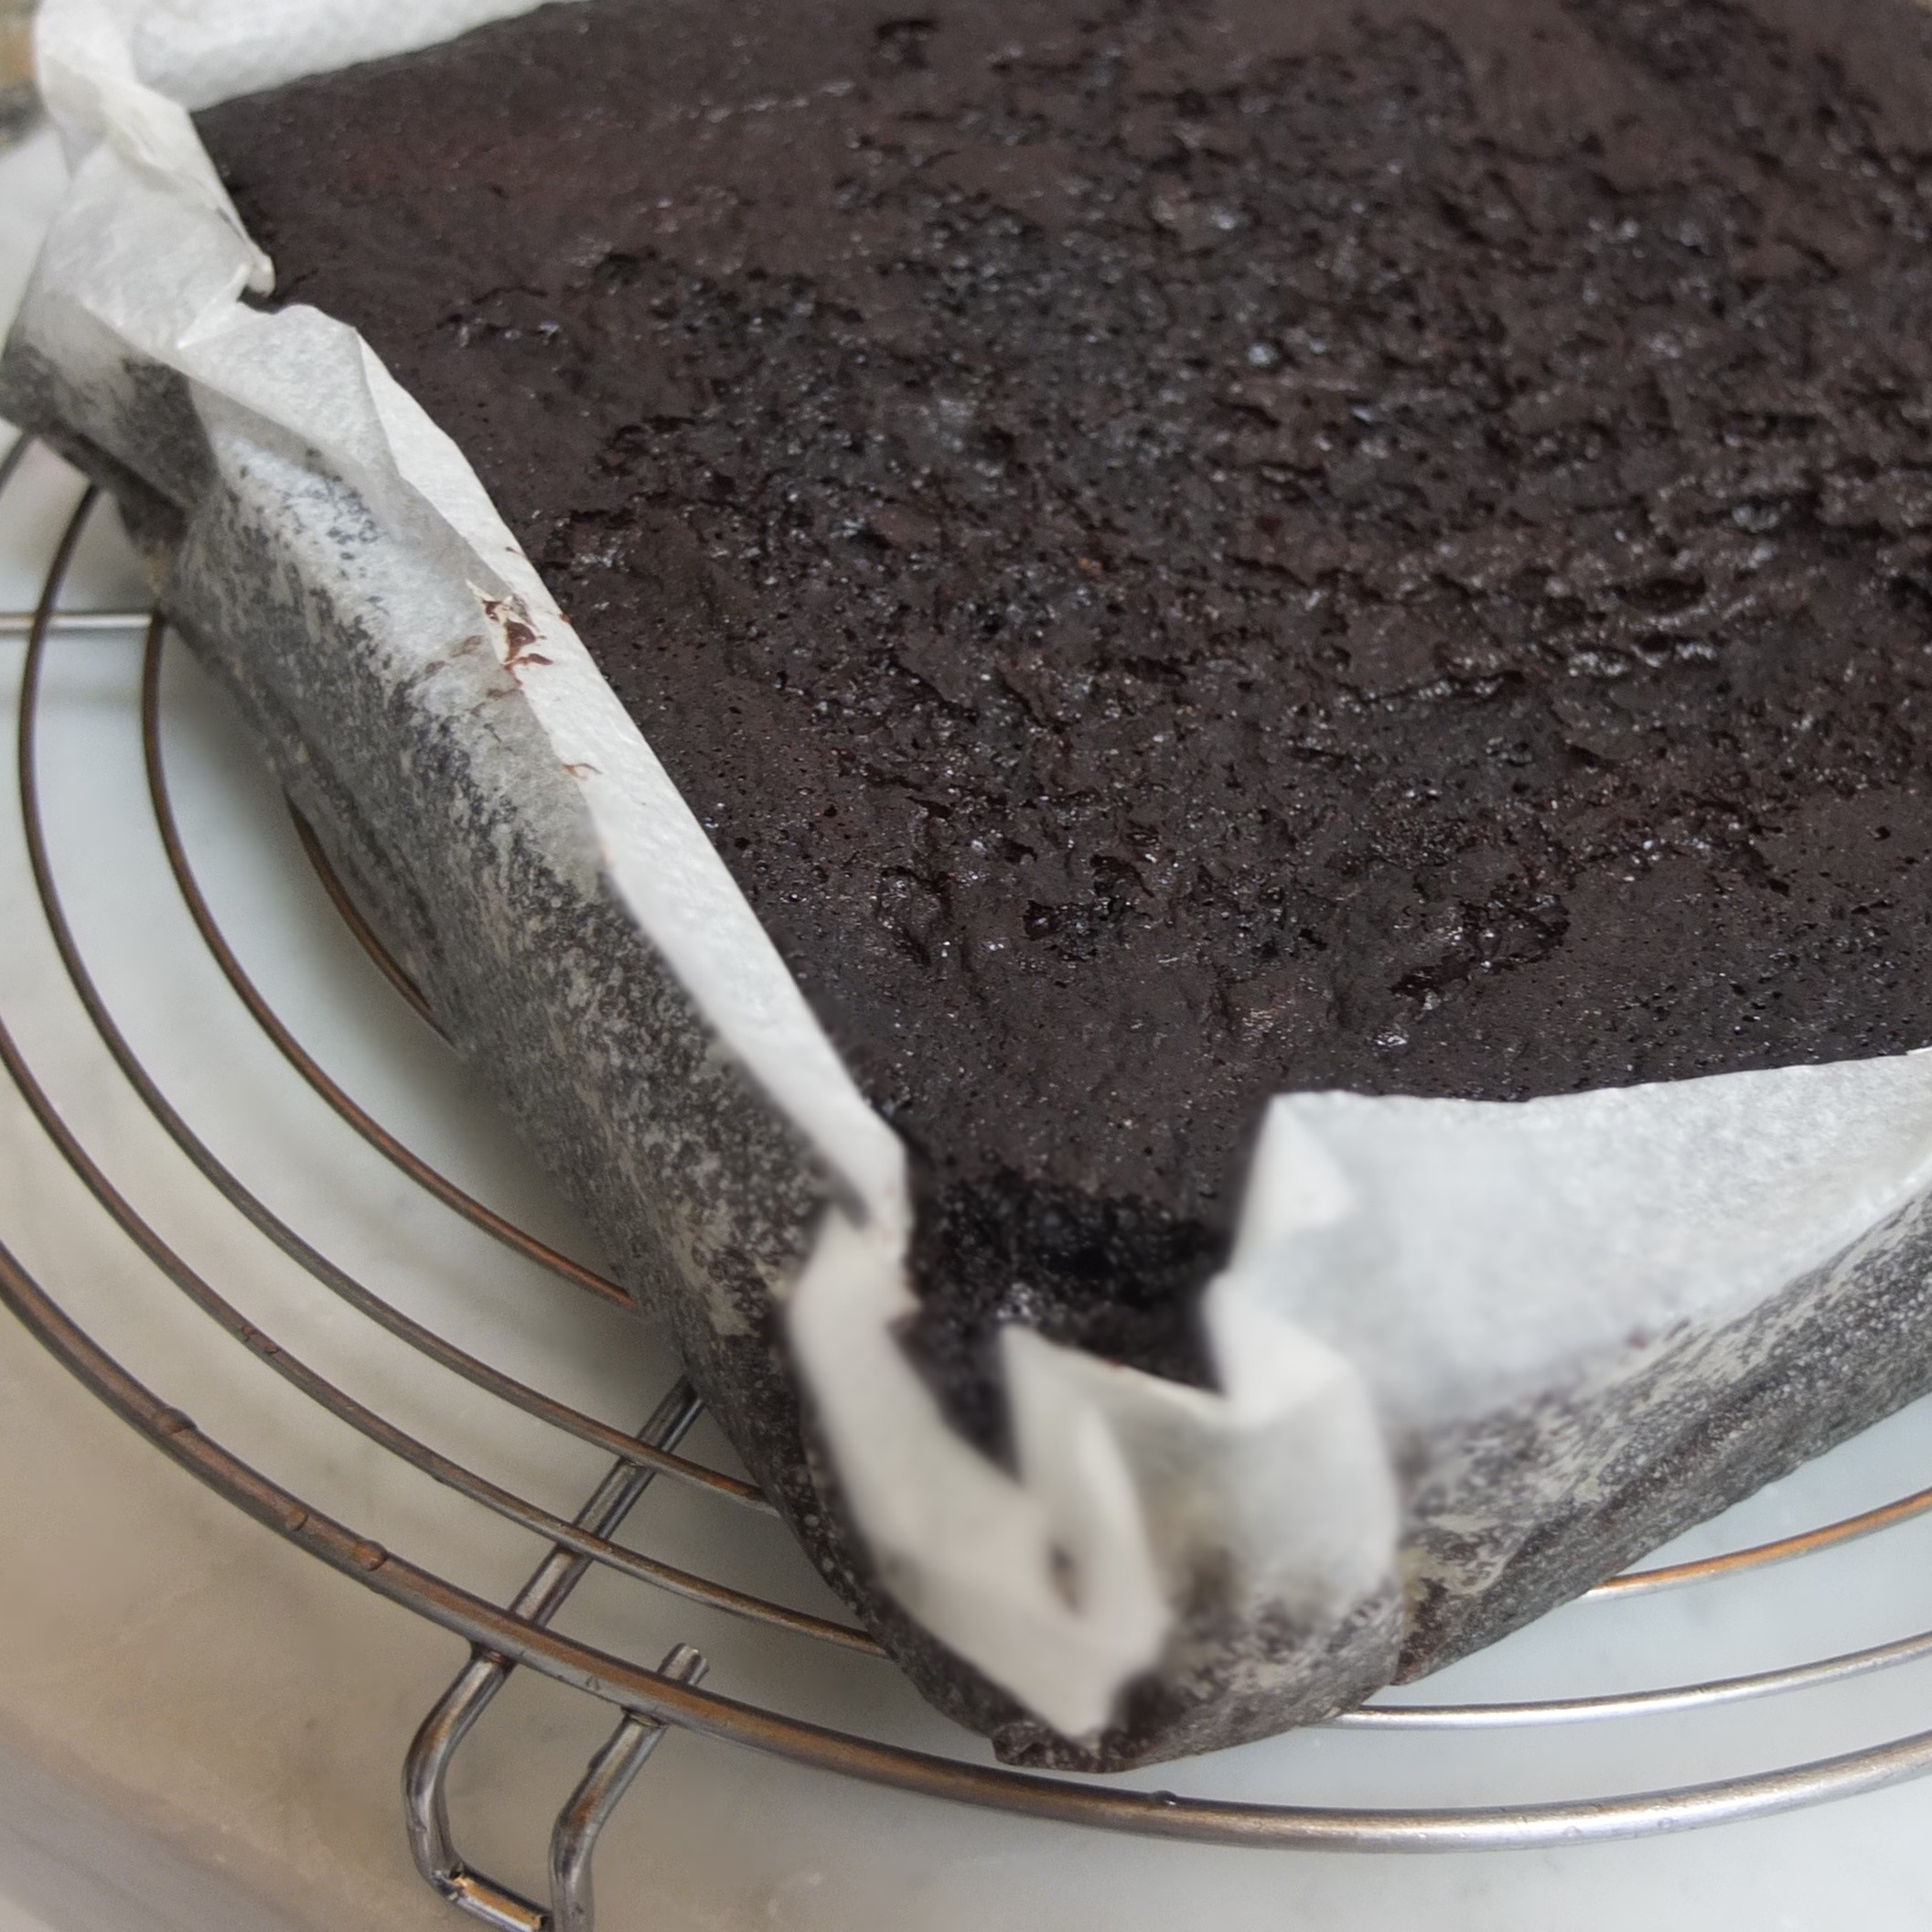
- Bake in the middle of the oven 20-30 minutes until the sponge springs back very slightly when you press the top gently with your finger (and a skewer inserted in the middle comes out clean).

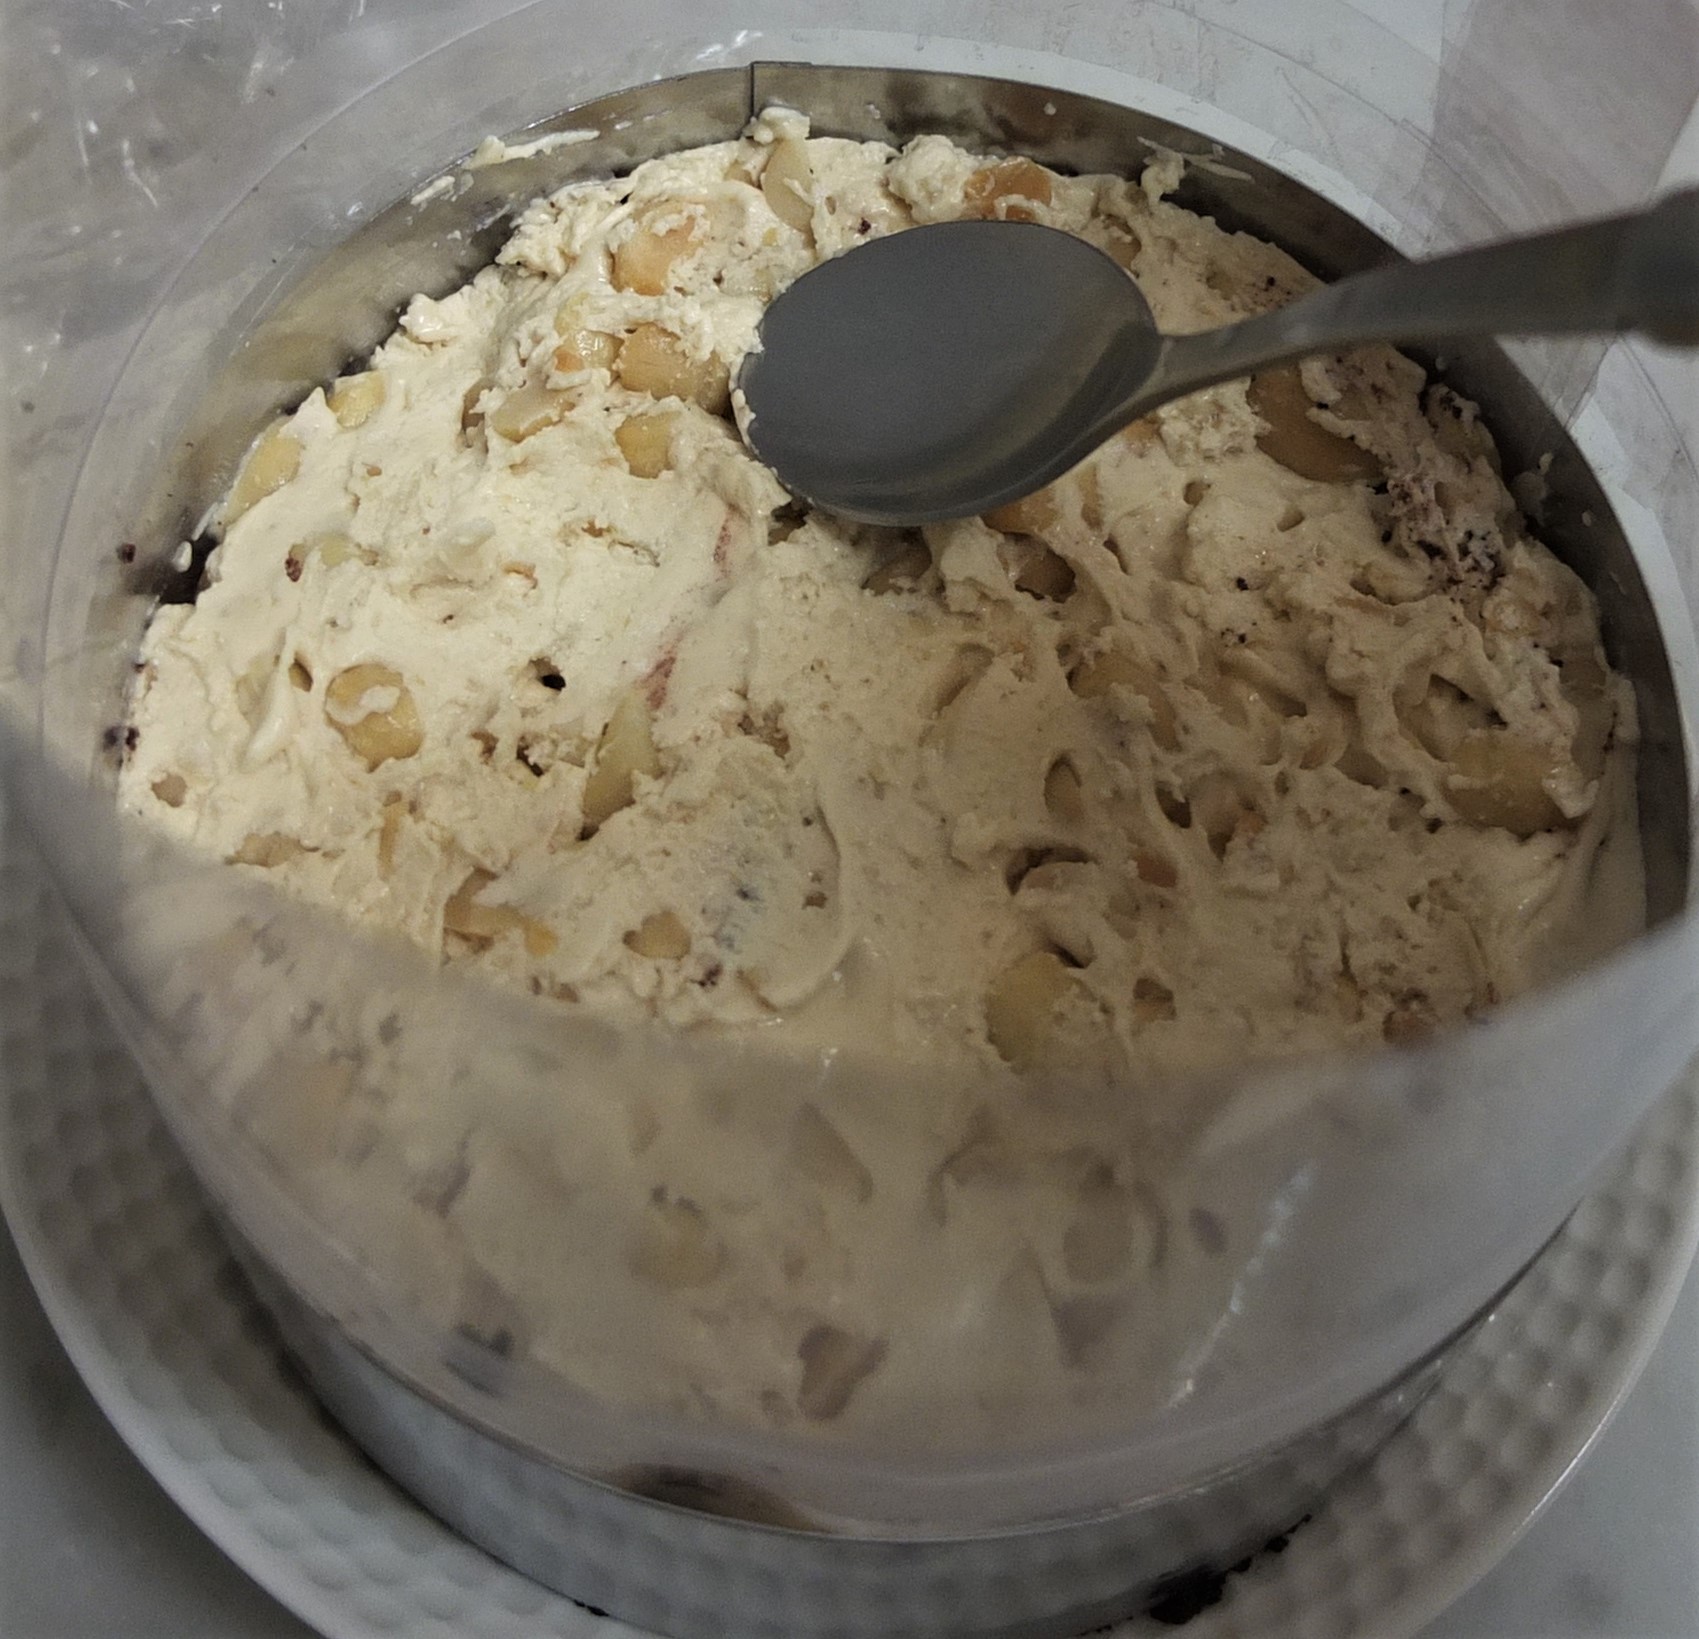
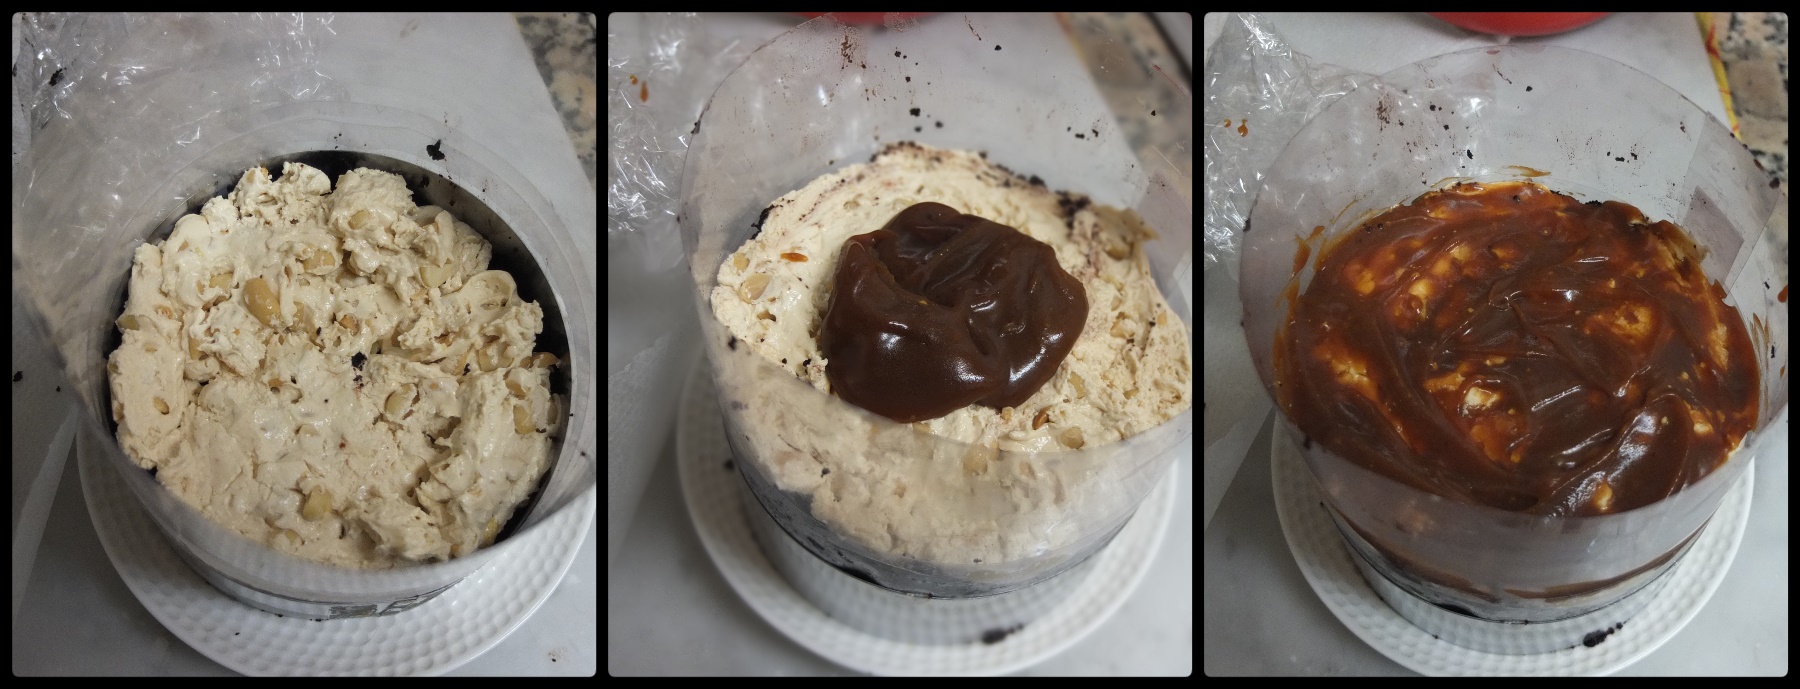
NOUGAT
Small cake
- 28g/2 tbsp unsalted butter
- 100g/1/2 cup less 2 and 1/2 tsp caster/superfine sugar, like golden unrefined (or 100g/1/2 cup granulated sugar)
- 32g/ml evaporated milk (unsweetened)
- 100g/3/4 cup marshmallow fluff
- 32g/2 tbsp peanut butter
- 1/2 tsp pure vanilla extract
- 110g/3/4 cup salted peanuts (then chop roughly)
Mini cake
- 21g/1 and 1/2 tbps unsalted butter
- 75g/1/3 cup caster/superfine sugar (or 75g/1/3 cup less 2 and 1/3 tsp granulated sugar)
- 24g/ml evaporated milk
- 75g/a good 1/3 cup marshmallow fluff
- 24g/1 and 1/2 tbsp peanut butter
- a good 1/3 tsp pure vanilla extract
- 83g/a good 1/3 cup salted peanuts (then chop roughly)
Method

ASSEMBLING THE LAYERS
- Cake ring – 14cm/5.5in diametre (6cm/2.4in or 4.5cm/2.4in high) or for the mini cake: 12cm/4.7in diametre
- 2 lengths of acetate strip (6cm/2.4in wide) taped together horizontally, to make an acetate strip 12cm/4.8in wide. Adapt according to the size of your cake ring and acetate strip.
- Sellotape
- Cake base or plate
Note: the remaining sponge could be used for cake pops or truffles.
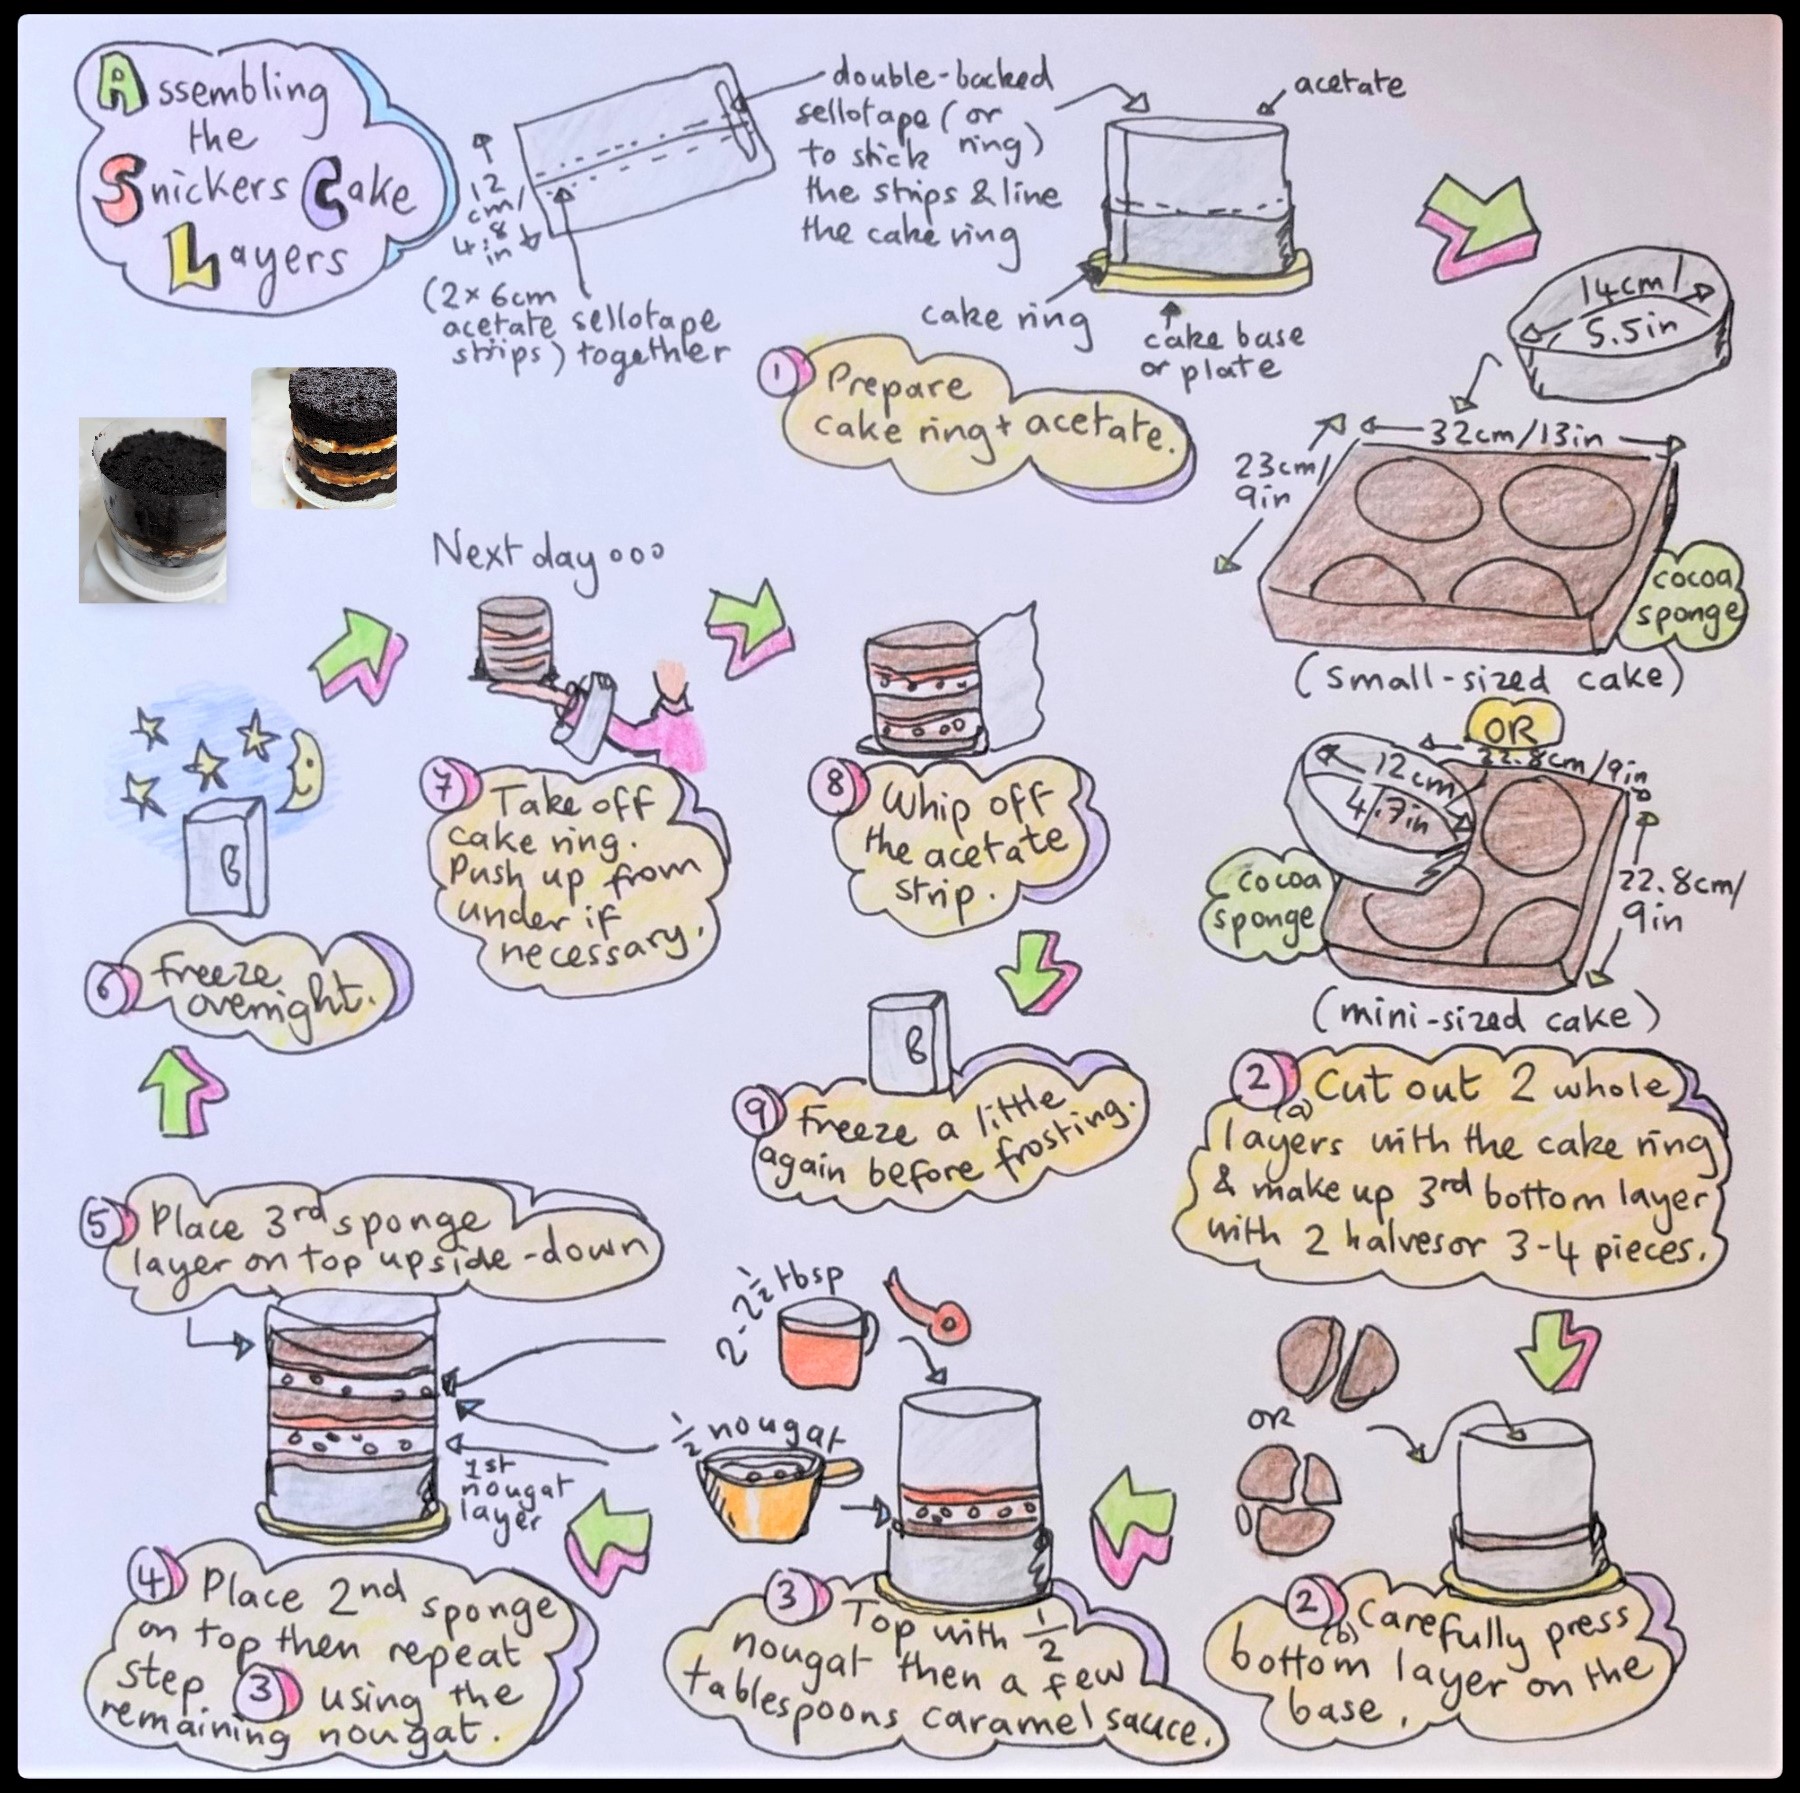

Freeze till next day…
DAY 2
Whip off the acetate strip and freeze a little longer (flatten any caramel sticking out with your finger).
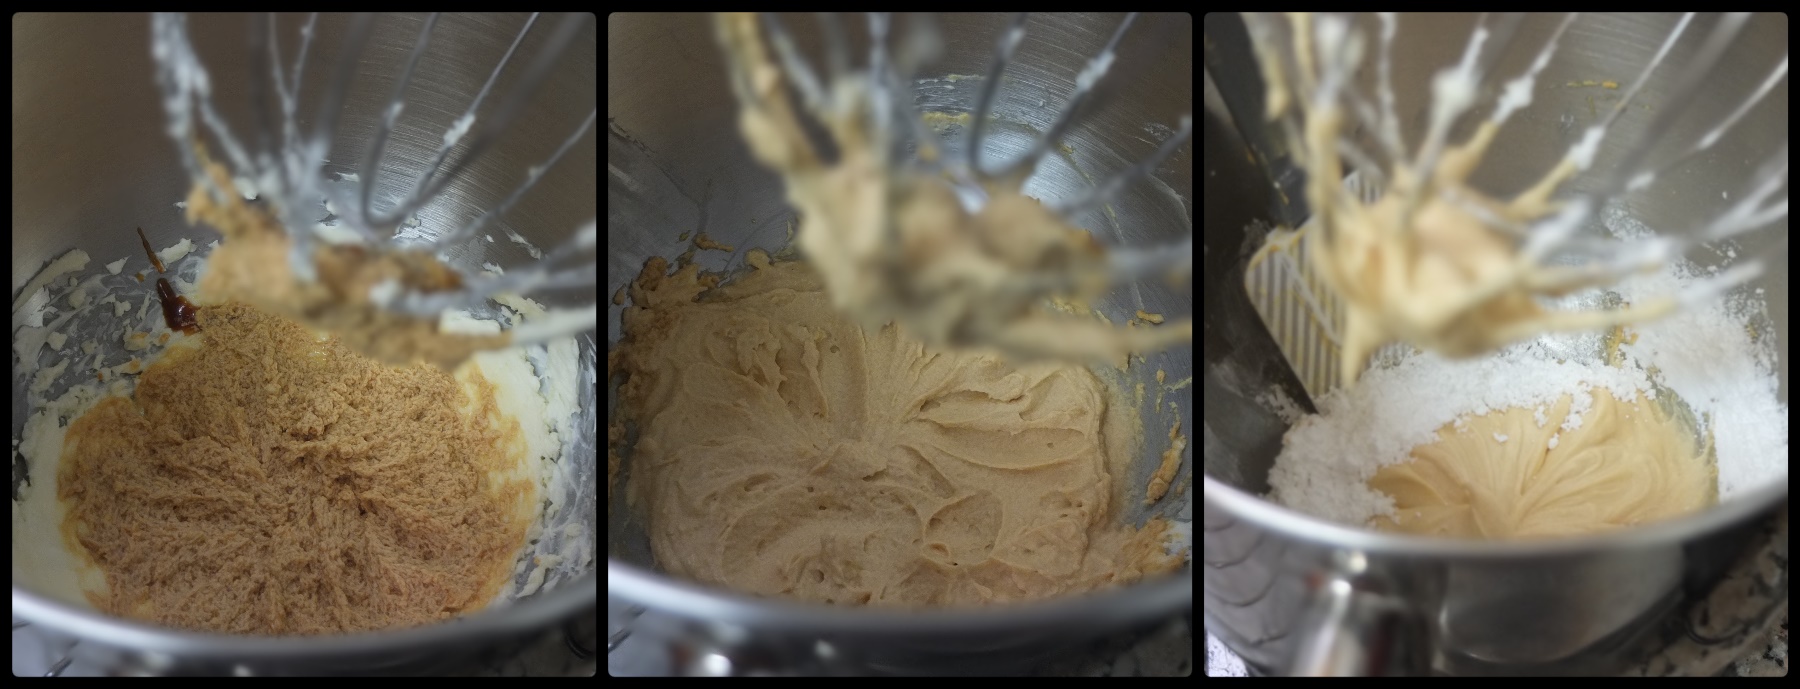
CARAMEL BUTTERCREAM
Small and mini cake (I actually used the same quantities for both cakes)
- 56g/4 tbsp unsalted butter, at room temperature
- 57g/1/4 cup cream cheese (like Philadelphia), at room temperature
- 30g/ml caramel sauce
- 125g/1 cup icing/powdered sugar
- Whisk the soft butter and cream cheese 5 mins on stand mixer, or by hand for a little longer.
- Add the caramel sauce and whisk to combine.
- Gradually add the icing sugar on low speed.

- Whisk on medium-high speed a few more minutes until light and fluffy.
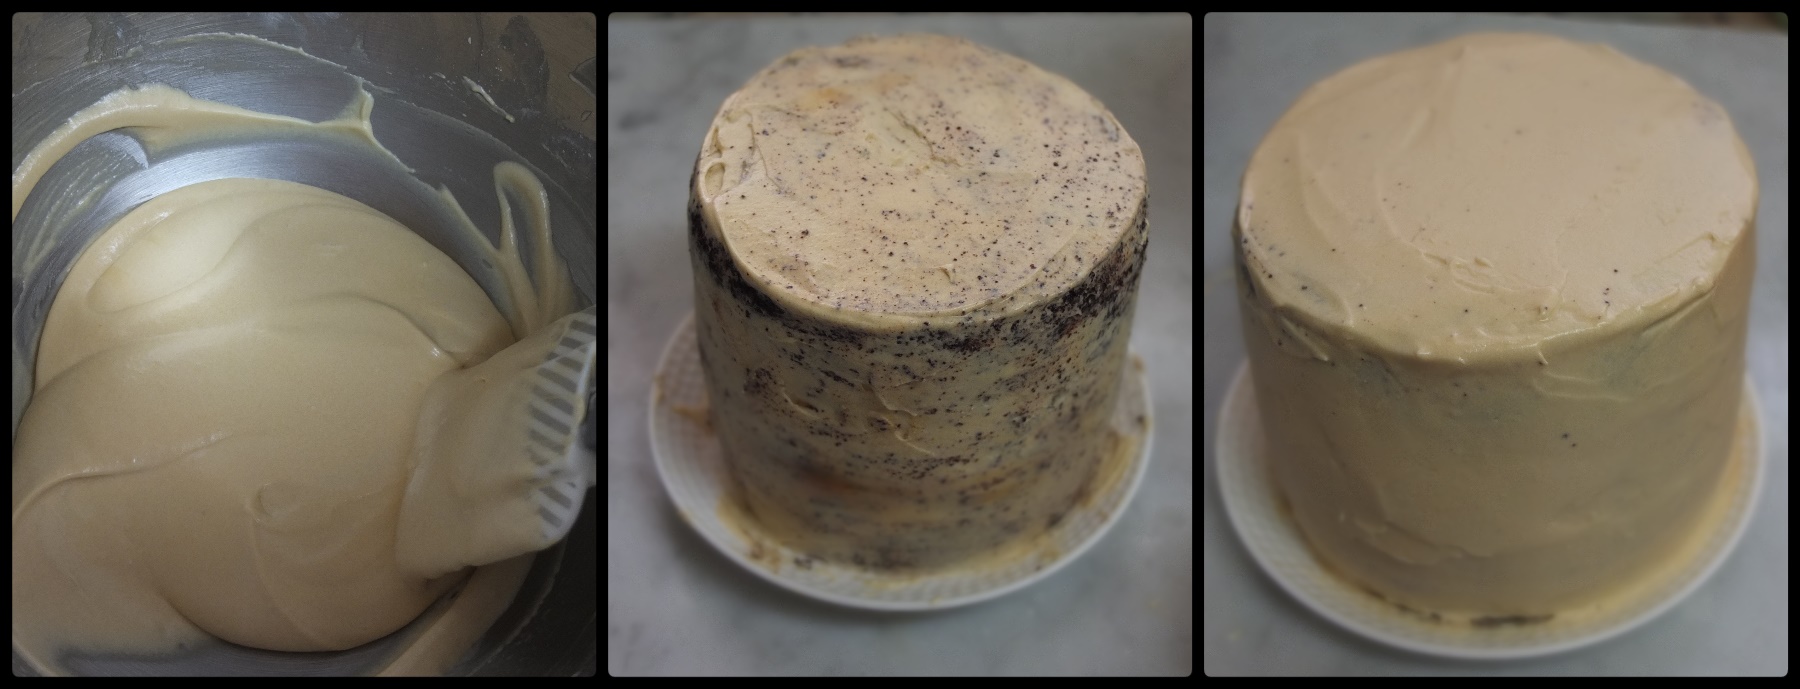
- Spread a thin crumb coat of buttercream on the cake with an offset spatula knife or scraper.
- Freeze 30 mins – 1 hour.

- Spread a second coat of buttercream. Freeze 1 hour before piping the drip.
CARAMEL DRIP PIPING

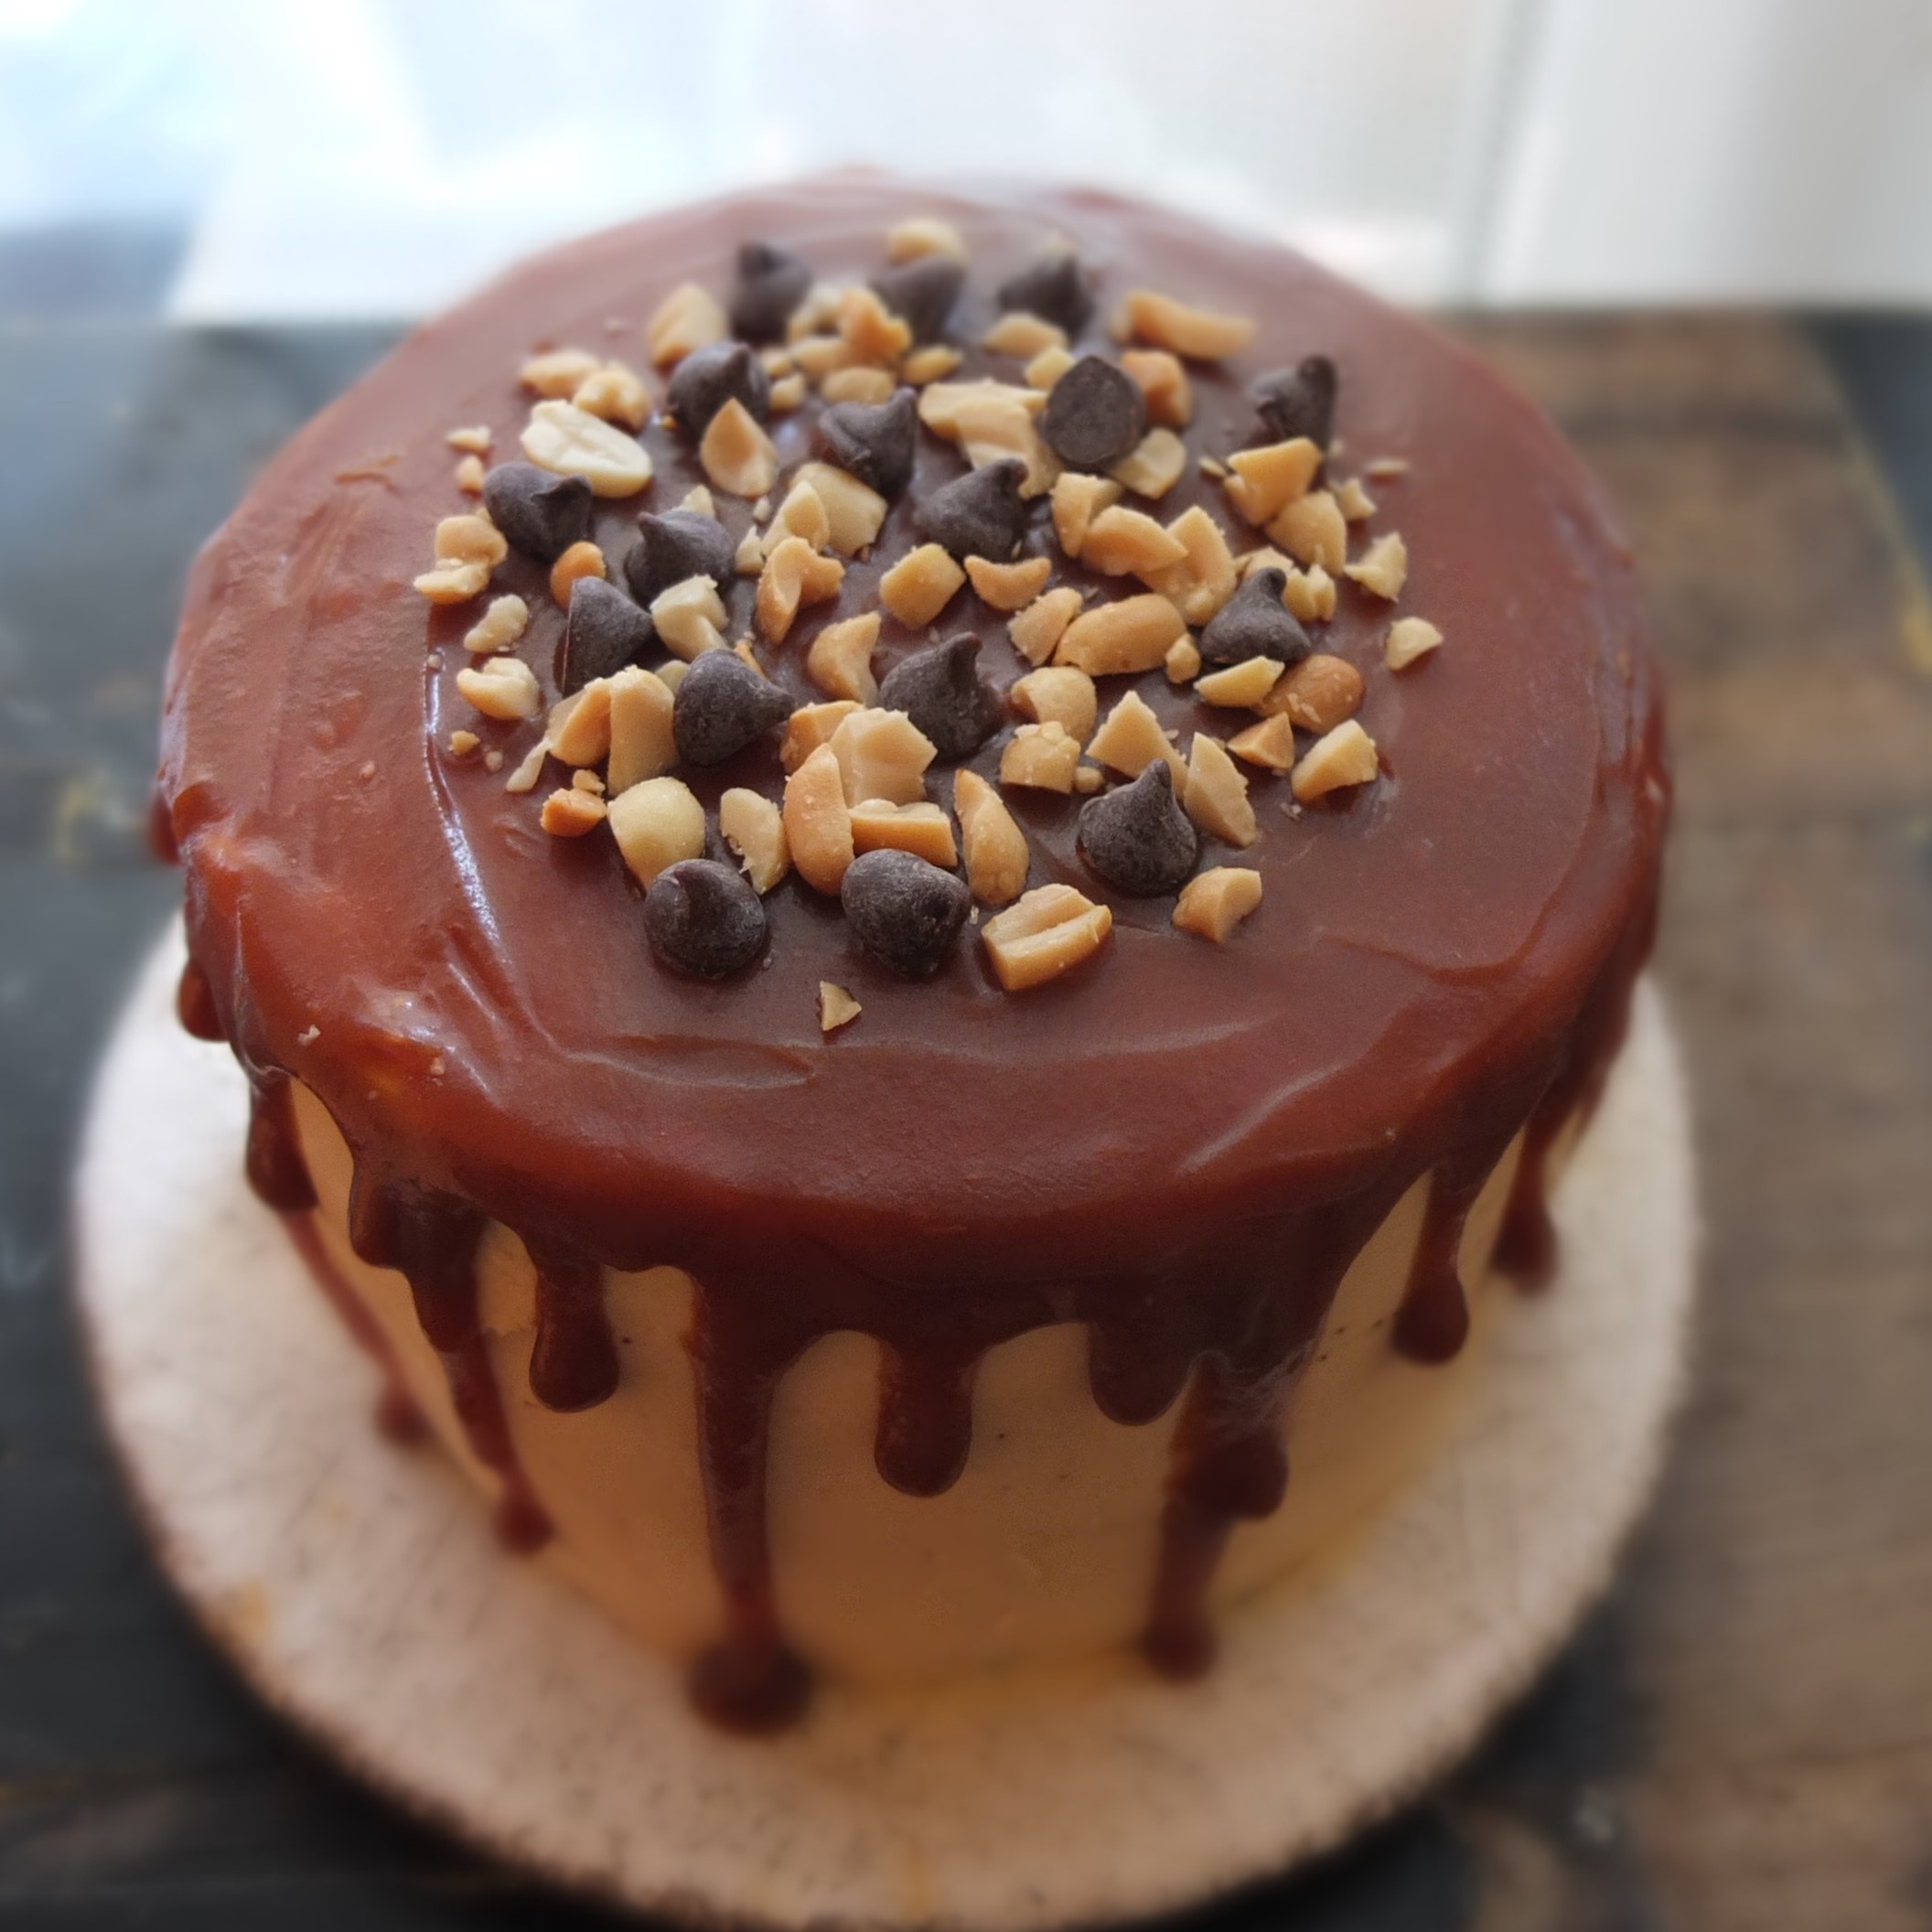
Snickers layer cake
Use a disposable piping bag fitted with a small plain nozzle. You can practise on an upside down glass jar first if you like, to see how the drips develop. Pipe on the top of the cake around the edge, pausing and pressing a few seconds at intervals to make the drips. Don’t worry if the drips are very little, they take a while then start running down. And don’t worry if the drips hit the plate, it’s also an artistic effect. With practice you’ll get a feel for creating your perfect drip. It also helps if your caramel is thick but not too thick (see cake above) but the runnier look with a more liquid caramel and puddles is perfectly okay (see cake below). Anyway no-one’s going to say ‘no’ to a slice! 😉
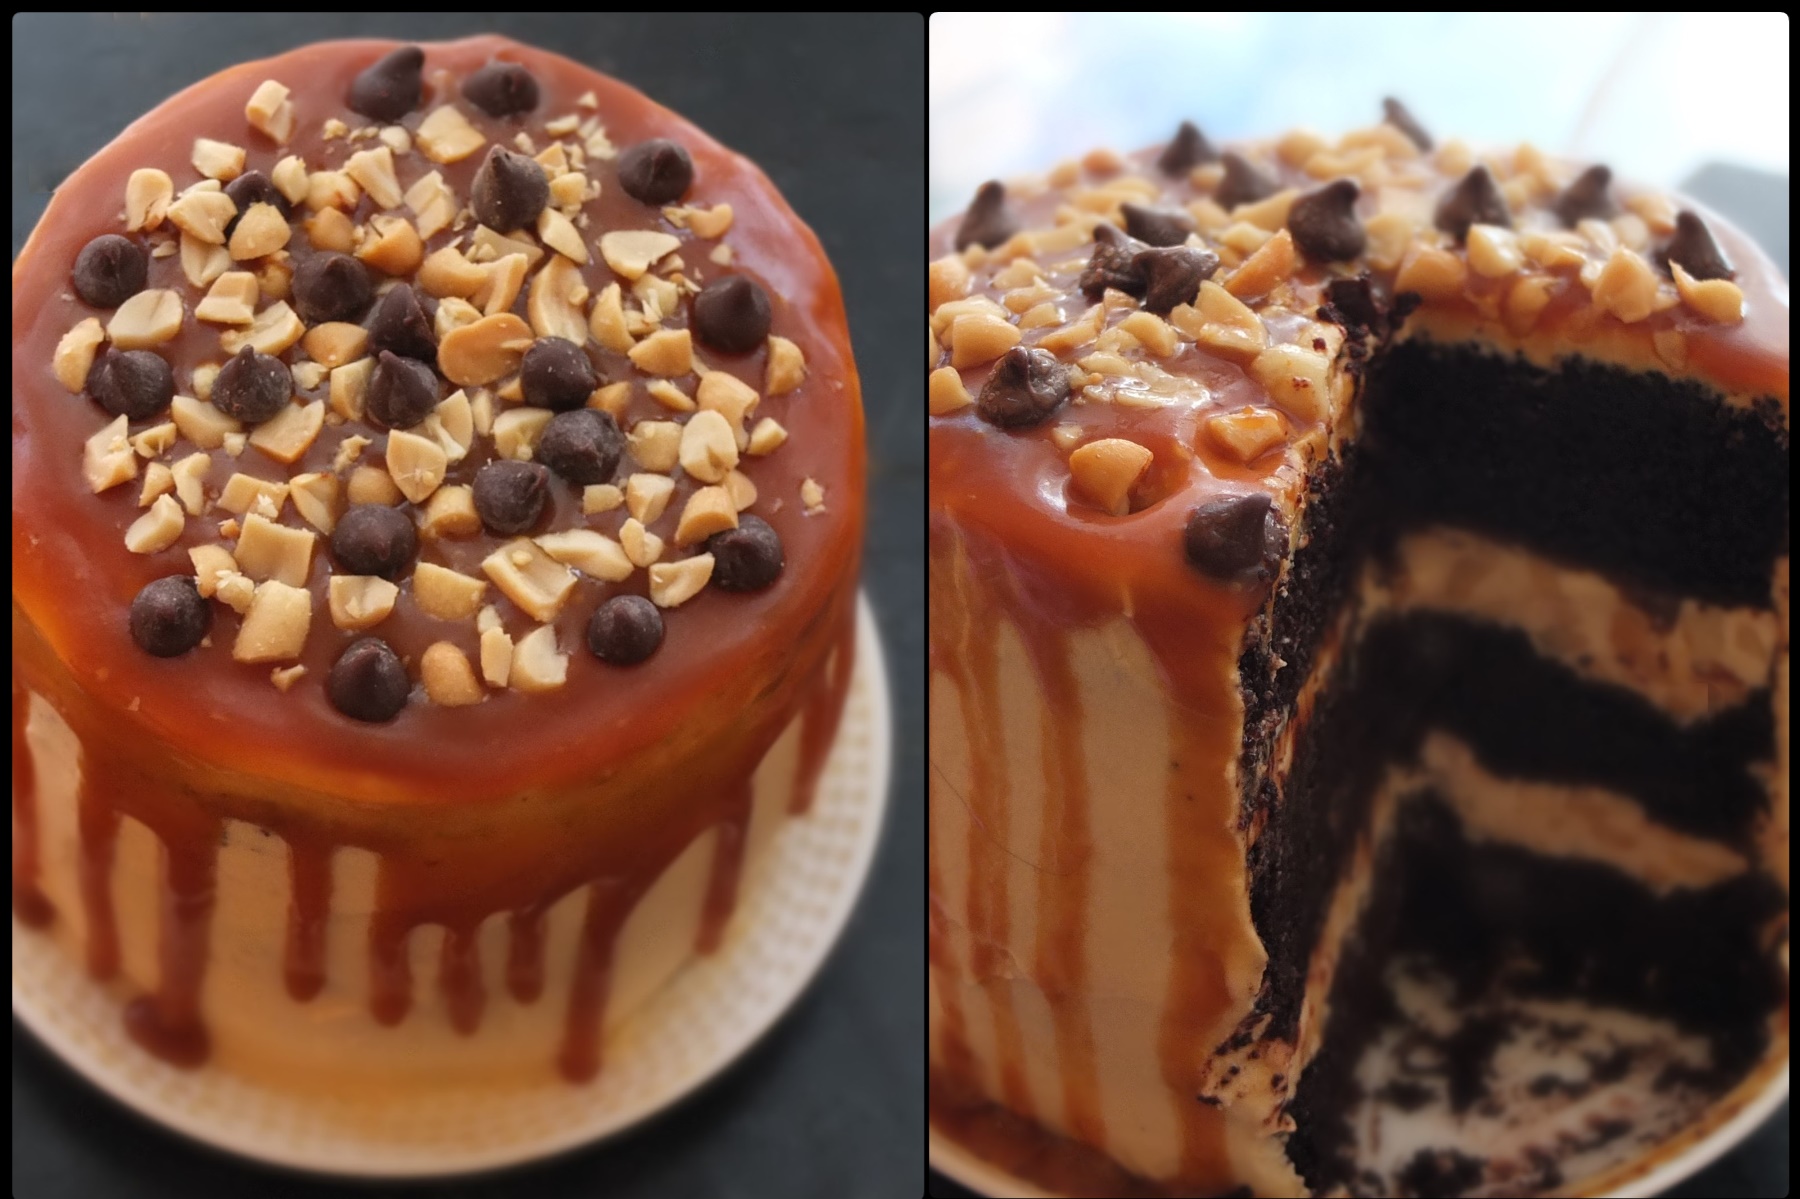
Swirl a thin layer of caramel on top and gently spread with an offset spatula knife or butter knife. Don’t make your caramel layer too thick. If you have caramel left try finding other uses for it… like licking the spoon.
Sprinkle with chopped salted peanuts plus some chocolate chips if you like…
Eating and storing
This cake keeps well in airtight tupperware: in the fridge up to 3 or 4 days; in the freezer up to 1 month. It freezes really well and if you go on a picnic take frozen slices with you so they’ll defrost by the time you eat them (don’t wait too long!).
Took it on a picnic to Collserola twice and both times my friend truly appreciated his slice with that intense silent undistracted enjoyment that all bakers love to watch. 🙂
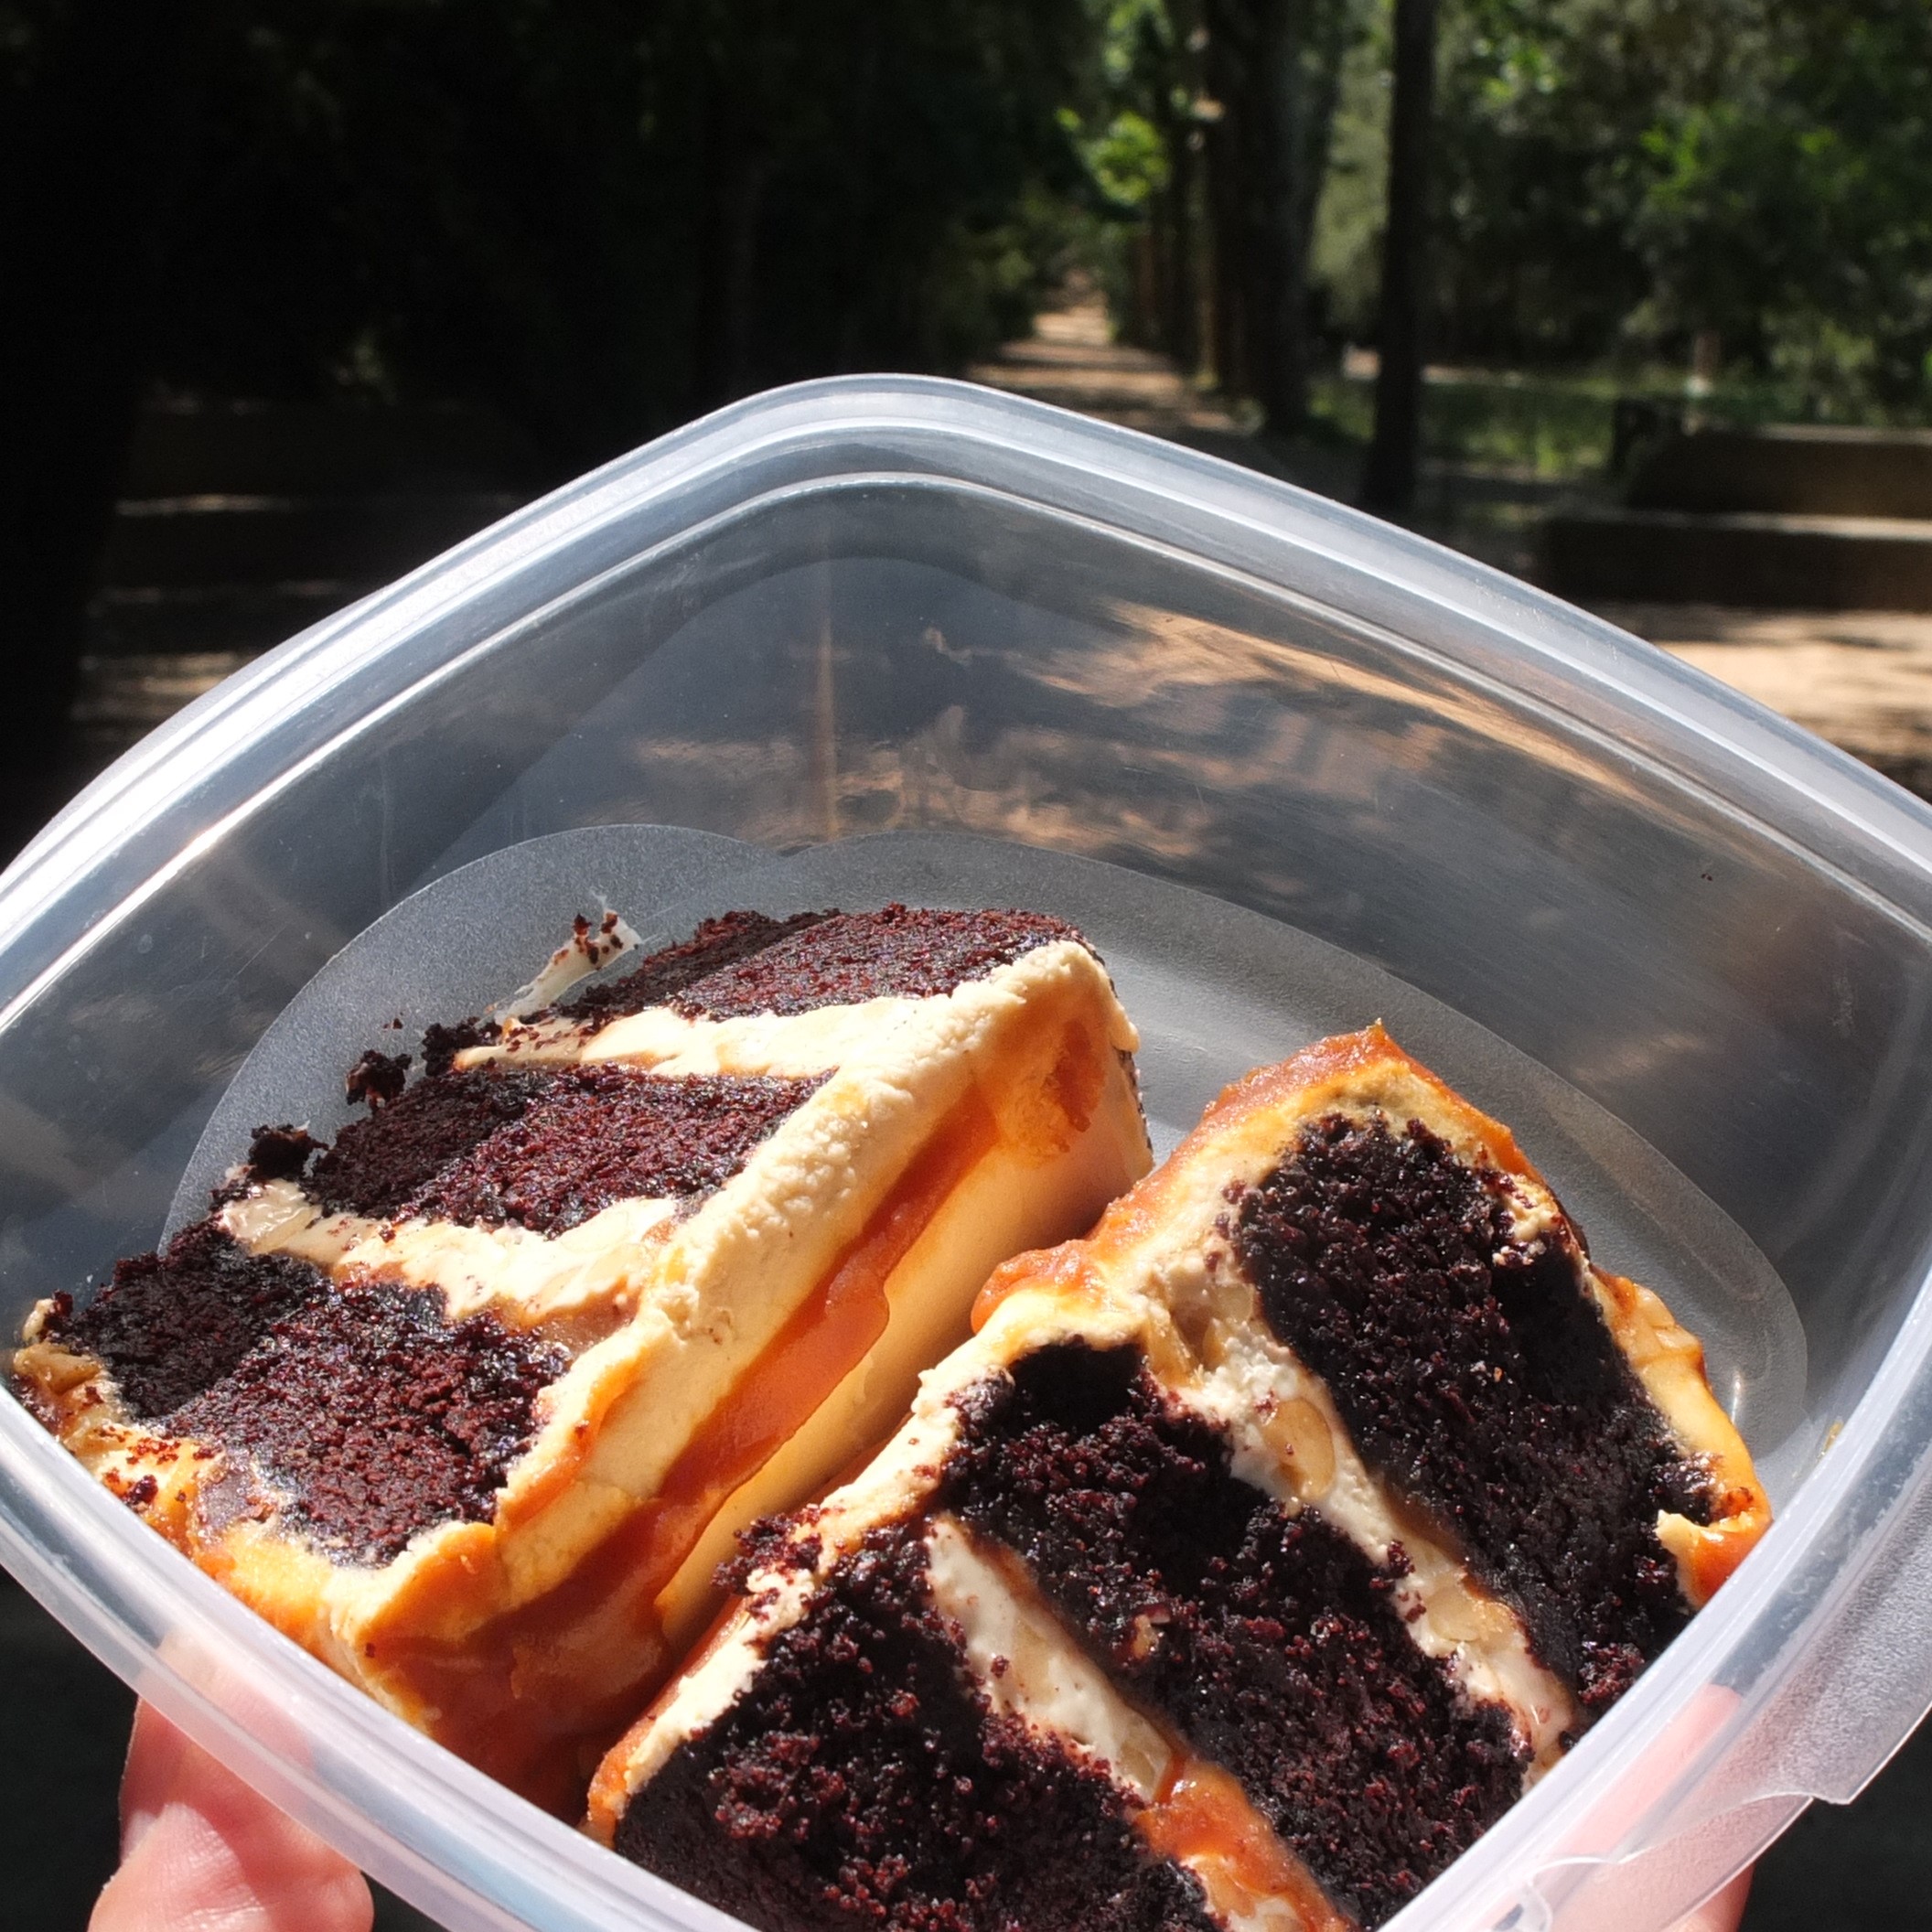
Snickers cake – the perfect picnic dessert! 😉
Actually two slices are usually needed because it’s so good!

Snickers layer cake
Do have some glutenfree Snickers layer cake! Will be making some more anyway… tee hee.
A few slices of Snickers cake!
A sweet farewell to you dear reader! Wishing you a yummilicious week ahead with some happy baking, no baking and eating! 🙂 Lili x

I do enjoy the smaller cakes. They’re so dainty. Great post! Thanks
LikeLiked by 1 person
Thank you Kimberly, happy you enjoyed tthe post and cake! 😍 Agreed, smaller cakes are the way to go…and lower calorie! 😄lol. x
LikeLike
I’m going crazy over the look of this cake, makes my heart beat faster haha 😀
LikeLiked by 1 person
😅Thank you Kreso, you must be in love with the cake! 😉
LikeLiked by 1 person
Like this recipe! Beautiful final shot!
LikeLiked by 1 person
Thank you Dasha! 😍 Happy you like it! The final shot is one of my favourites too and makes quite a nice screensaver… 😉
LikeLike
Oh it looks beautiful, and I LOVE your drips! I bet it didn’t last long, and was so good!
LikeLike
Pingback: Snickers layer cake recipe! Small or mini version, gluten free or not… :) | homethoughtsfromabroad626