
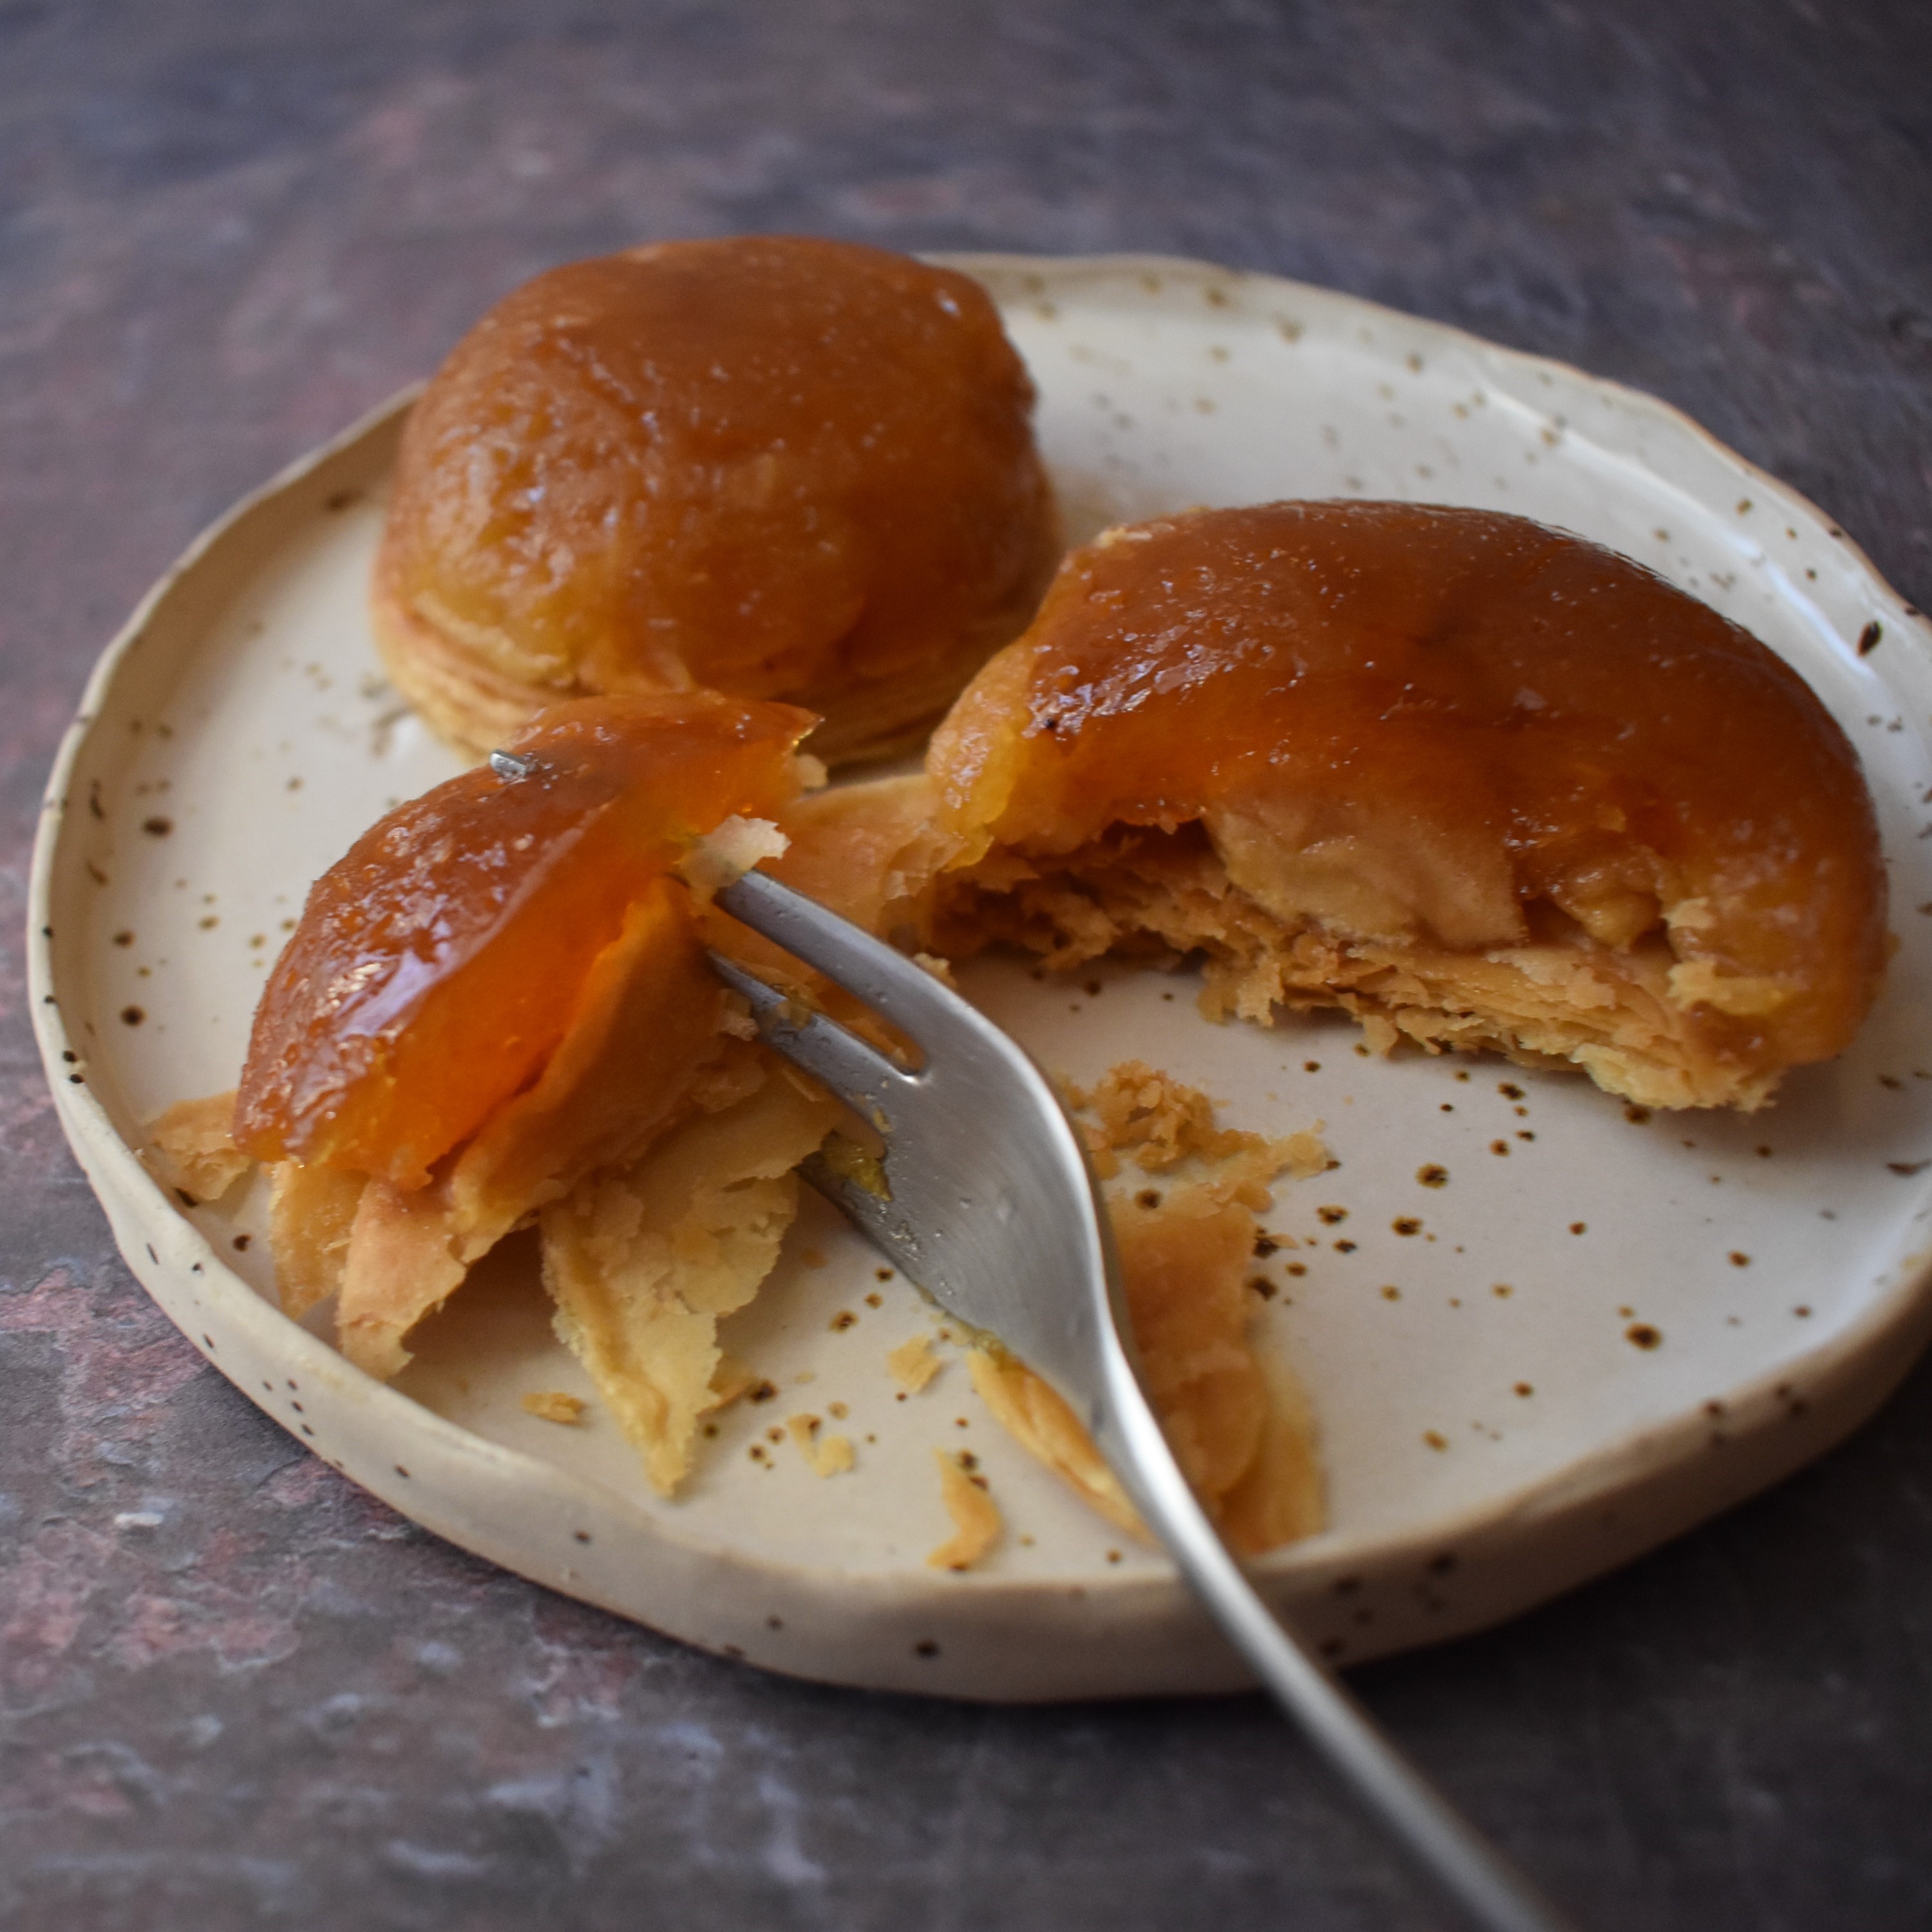
These tartes tatin are a doddle to make and pretty much foolproof with the right apples! The puff pastry base and apple domes are baked separately, a technique currently used in many French pâtisseries, so you don’t have to worry about soggy bottoms or underdone pastry. The apple domes are baked in caramel-coated silicone moulds. The puff pastry rounds are done on a baking tray so are flaky when combined with the apple and served to your delighted taste-testers, aka family and friends. 🙂 These mini domes are fairly relaxing and quick to put together plus the quantity of sugar is reduced so they’re not too sweet and you can really taste the apple – the star of the show. You just need suitable apples, a little lemon juice, sugar (or birch xylitol for the added sugar-free version), pectin NH and homemade or shop-bought puff pastry, optionally vegan or glutenfree. Tada! A light and absolutely delicious classy French dessert on your table, perfect for autumn: apple tatin domes! 😋

Autumn apple tatin domes
Added sugar-free version
This version uses xylitol caramel. They look pale and perhaps not as attractive, but guilt-free and equally delicious, if not more so! Yay!

Added sugarfree Autumn apple tatin domes
THE RECIPE – for 6 individual domes
Choosing the ingredients
Made with pink ladies and standard caramel, these came out a little messy but as yummy as always.

Autumn apple tatin domes
My ‘best’ ones combine my fave reinette apples and classic sugar caramel, plus homemade inverted puff pastry. Perfect.
Autumn apple tatin domes
In the photo below you’ll see again how sugarfree xylitol caramel results in paler tarts. The good news is they’re still absolutely delicious. I almost preferred them to the sugar caramel ones!
But choose your apples carefully!

You’ll see a couple broke apart, because they were made with unsuitable apples!!!
I’ve labelled them so you can see. My favourites are reinettes (see other photos) but Pink Lady apples are good. Luckily even the others that fell apart were delish – just less presentable, ahem.
Equipment
Silicone mould with 6 domes (it’s this mould, if you’re interested) or some other silicone mould with different shapes (rectangle, flat round, etc) of similar size. You could do a large round or rectangular tatin, but it could be trickier to unmould nicely.
Timings
- Prepare apple domes (10-20 mins); bake 45-50 mins
- Prepare puff pastry rounds (10-20 mins); bake 10-20 mins; allow to cool a little or 1 hour
- Place domes on pastry; optionally caramelise (2-5 mins); serve
Caramel
- 100g/1/2 cup less 2 and 3/4 tsp caster sugar or 1/2 cup granulated sugar
Make caramel – see my dry caramel recipe here for photos and more detail.
Melt sugar over low-medium heat (adding it in 3 goes, letting it melt in between additions). Don’t stir at all but you can swirl the pan a little. It should reach a nice amber golden colour and smell like caramel. It’s okay if it’s a little darker but don’t let it burn or go black.
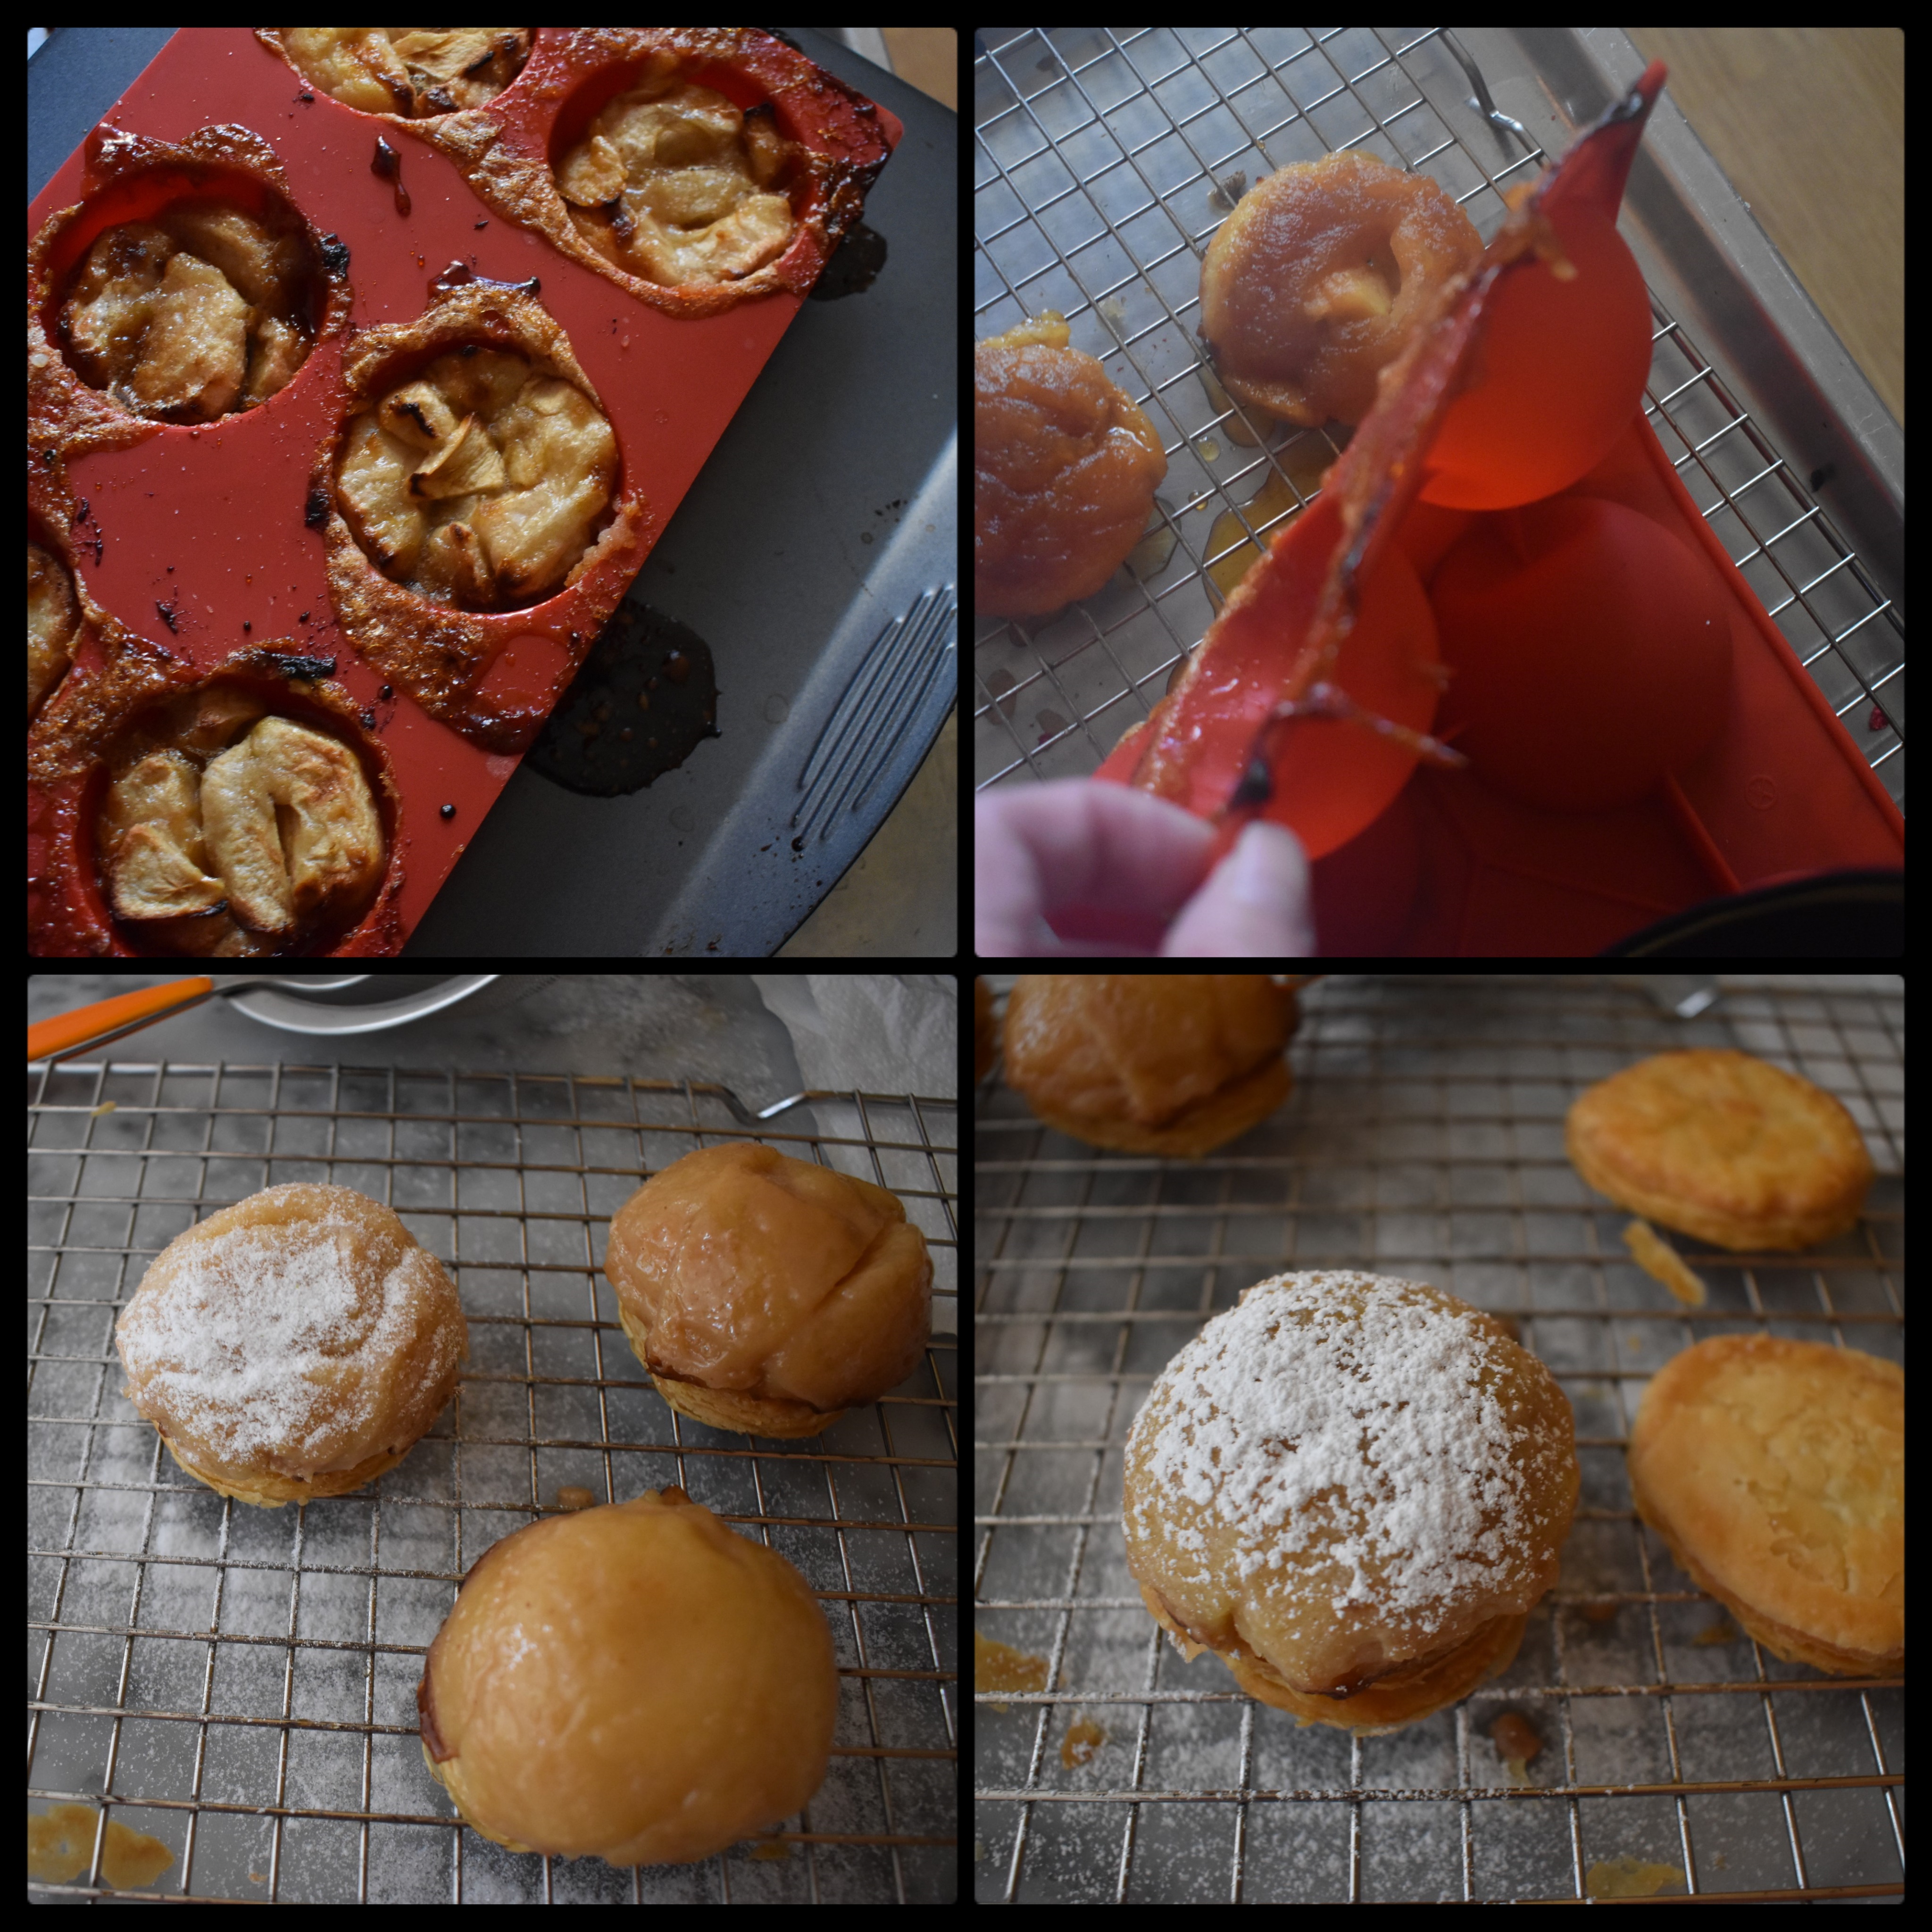
Brush inside of silicone moulds to coat fairly thinly with caramel before adding apples.

Alternative xylitol caramel – sorry, it’s not vegan but you could try with vegan butter and cream
- 56g/1/4 cup unsalted butter (good-quality French-style)
- 54g/1/4 cup ground birch xylitol
- 118g/ml liquid whipping cream (35%)
- 1/4 tsp fine sea salt, to taste
- Brown the butter by heating in small heavy-based saucepan on low-medium heat for 3-8 minutes or so. Stir occasionally and take off heat when butter is golden brown and smells ‘nutty’ (don’t let it burn).
- Stir in xylitol, cream and salt. Simmer over very low heat 15 minutes (uncovered) until thicker. Note: if it starts splitting (separating), take off heat a few minutes and vigorously whisk in a teaspoon or two warm water until mixture becomes smooth again.

- Pour into clean airtight jar/container and allow to cool then store in fridge up to a week. It will thicken in fridge.

Use to coat silicone domes as you would with sugar caramel.
Apple domes
- Preheat oven to 160ºC/320ºF fan oven or 180ºC/355ªF static oven
Ingredients
- 3 to 5 apples (depending on size of apples)
- 12g/2 and 1/2 tsp pectin NH (should be on Amazon – people also use it for making jam)
- 50g/1/5 cup + scant tsp caster sugar or 40g/4 tbsp less 1 tsp ground birch xylitol
- 1 tsp freshly-squeezed lemon juice
- Silicone moulds coated with sugar caramel or xylitol caramel
Method
- Peel and core apples. Add lemon juice in a bowl. Cut apple into quarters and place in bowl, stirring to cover in lemon juice so they don’t brown.
- Whisk pectin NH and sugar or xylitol together in small bowl to combine well.
- Stir mixture into apple slices to coat.
- Arrange apple slices in moulds so there’s very little space between slices. Pack in well, as they’ll reduce in size in oven.

- Bake 45-50 minutes until apple domes are cooked and golden (or with xylitol caramel ones, pale golden). If necessary, cover with foil during last 15-20 minutes.
- Allow to cool a little then carefully unmould. You can optionally sieve a little icing sugar over domes and place under grill or use blow torch to caramelise.
- Allow to cool to warm or completely cold before placing on puff pastry bases.
Puff pastry bases
Start preparing while apple domes are in oven, towards end of their baking time.
- 200g/7oz puff pastry (optionally vegan) – see my homemade inverted puff pastry recipe here
Once your apple domes come out, check how much they’ve shrunk and what size puff pastry bases are needed. Add on about 5mm all around (adding about 1cm to the diametre – but the size depends on your pastry and rolling) because the puff bases usually shrink too when baked. I recommend experimenting by first making test ones for yourself, family and friends to see what size puff pastry rounds works for you.
- Raise oven heat to 180°C/355°F fan oven or 200ºC/390°F static oven
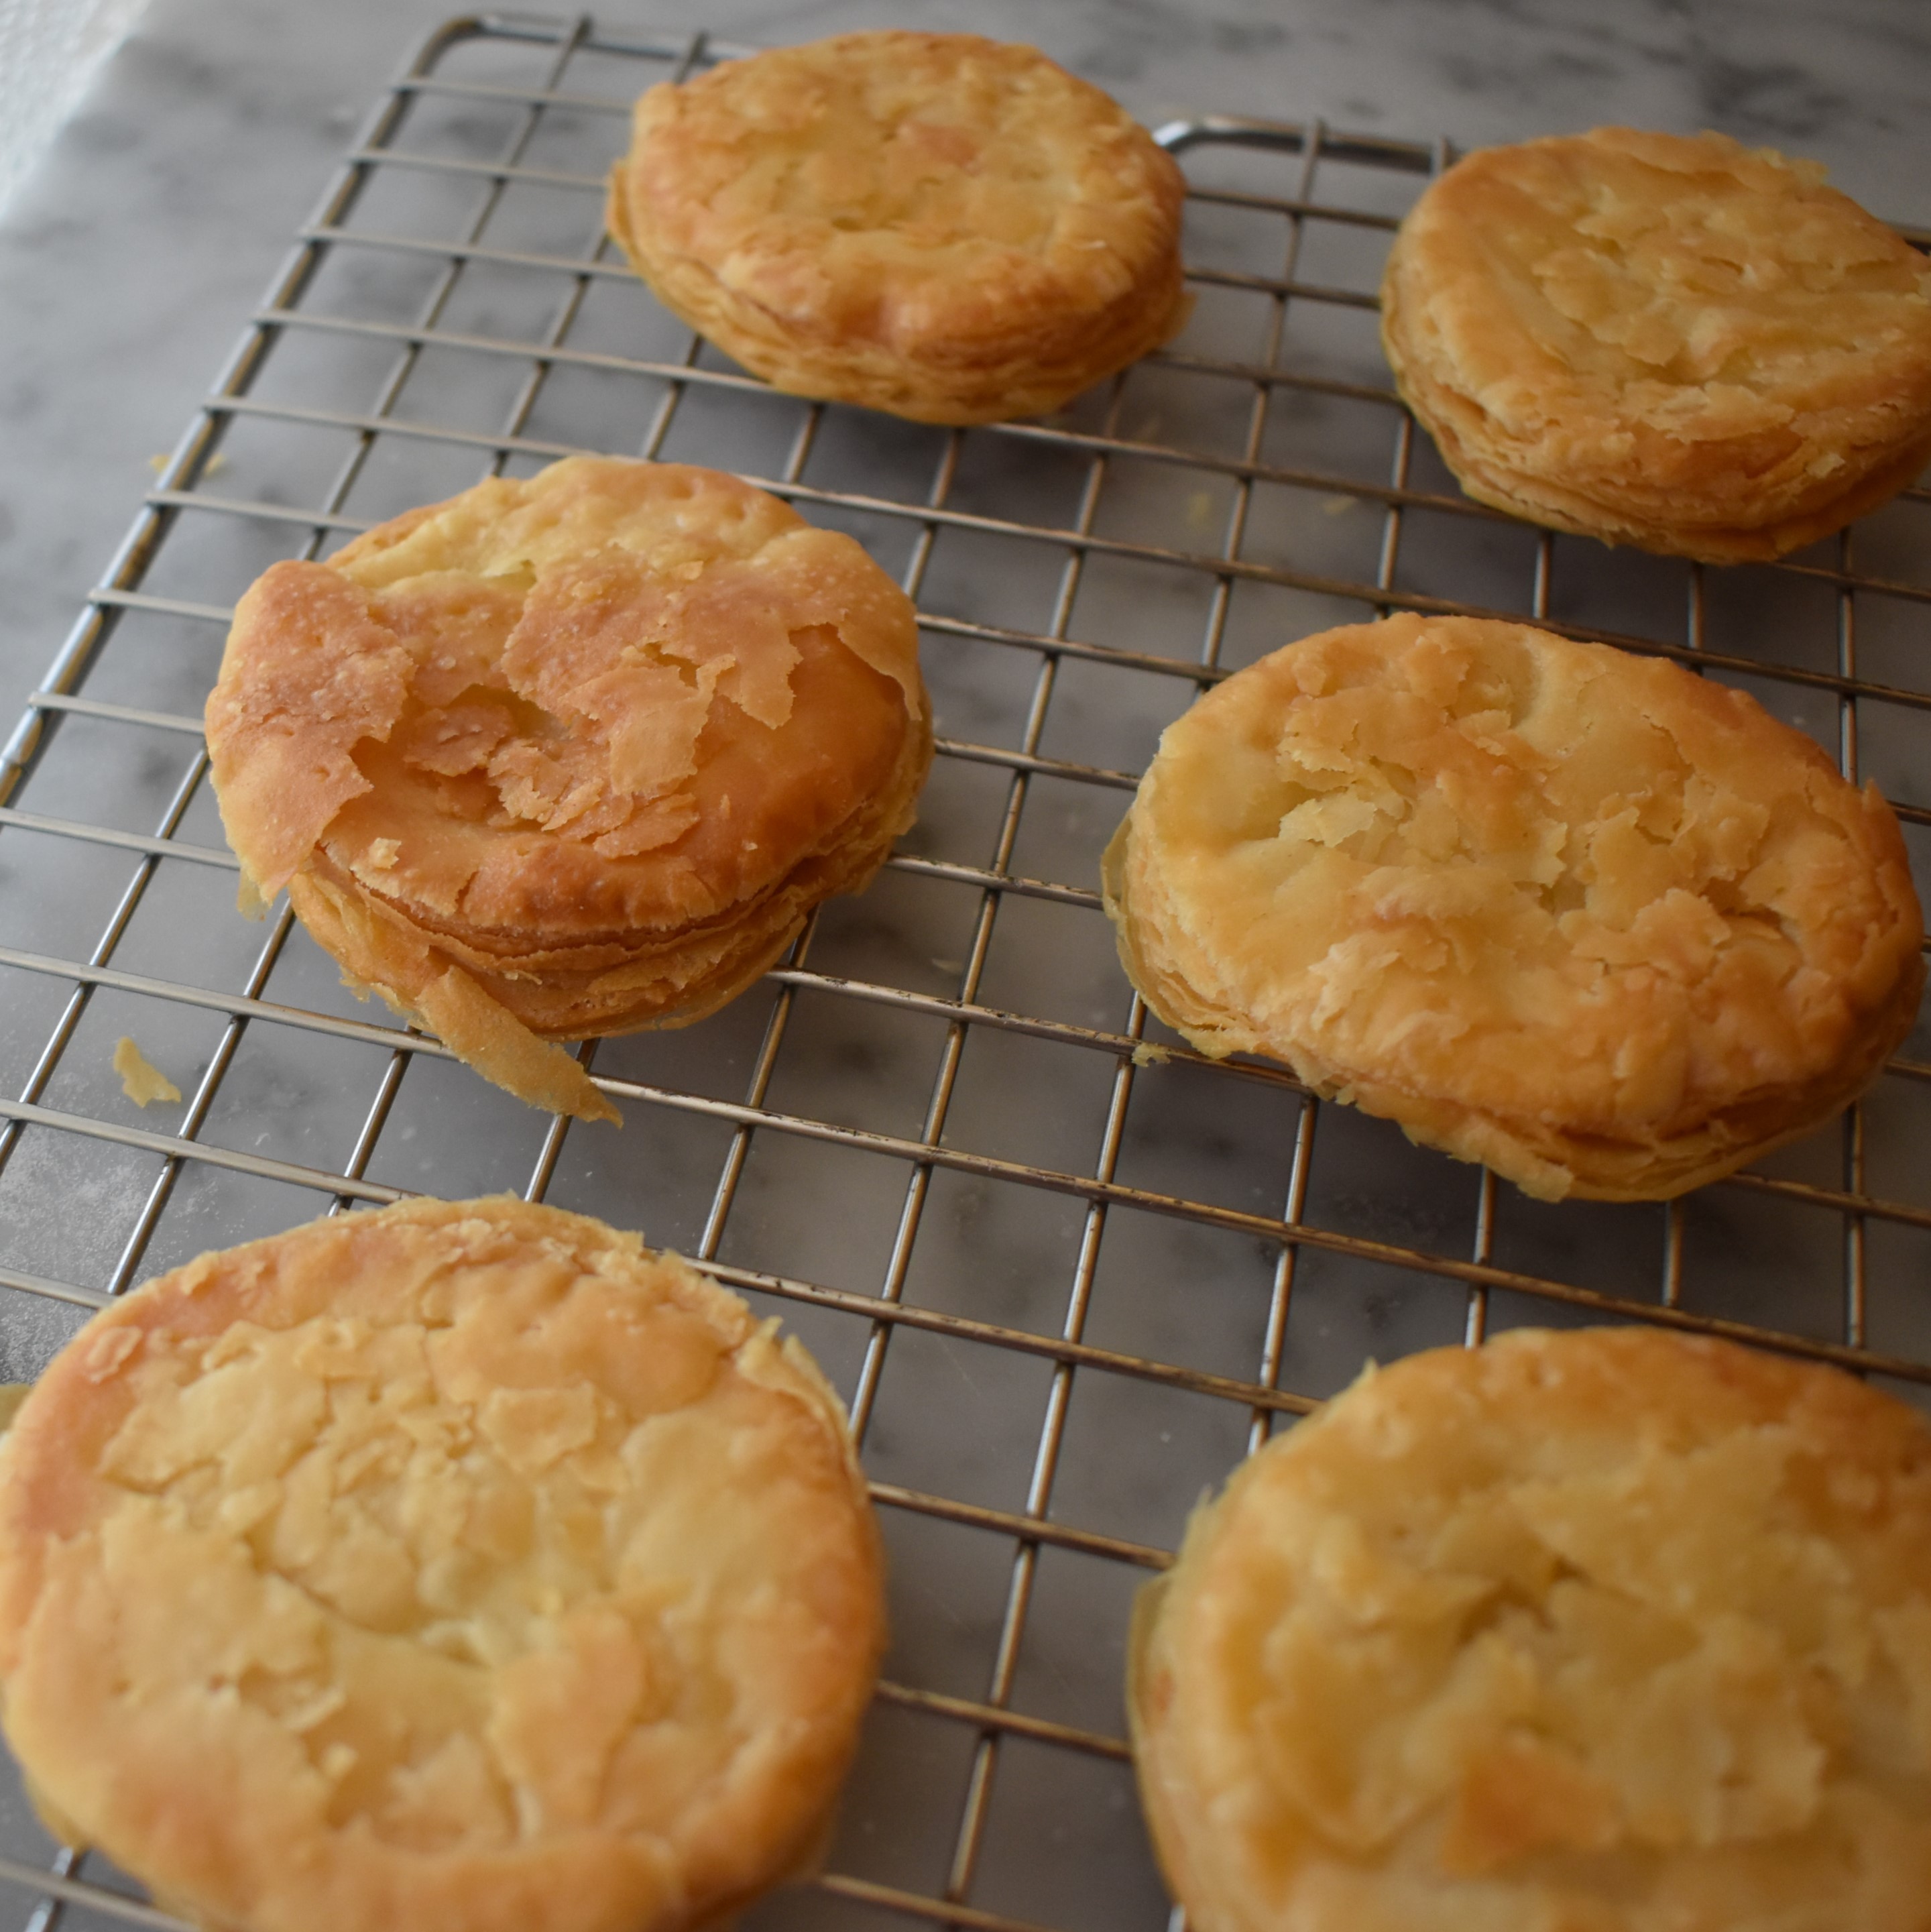
- Roll out puff pastry to about 2.5-3mm thick.
- Cut out 6 rounds or other shapes (about 1/2 to 1cm wider diametre than your silicone mould, to allow for pastry shapes shrinking). You can make 1 or 2 extra rounds in case.
- Place on baking tray lined with baking paper and prick all over with fork.
- Place baking paper on top of the rounds and another baking sheet on top of the paper.
- Bake in oven about 10 to 15 minutes.
- Uncover and bake 3-5 more minutes if needed to get light golden brown puffed rounds.
- Allow to cool a little or completely before topping with apple domes.
Eating and storing
Eating these treats when a little warm is often recommended in pâtisseries but they’re also delicious cold. So either serve warm or store apple domes in airtight container in fridge for later. Keep puff pastry rounds in an airtight sealed glass mason jar at room temperature. Stored separately in this way, these will be best on the first day but keep nicely up to 3 days. Place domes on the puff just before serving. Warming a few minutes in an oven should also refresh them. Yum yum yum…

Such a lovely autumn (fall) treat. Hope you’ll be tempted by the apple, give them a go and have your very own little tarte tatin domes!

Thanks for dropping by dear reader and hope you’re enjoying your mellow Autumn (or Spring). Wishing you a lovely month with some extra yummy baking and eating! 🙂 Lili x
P.S. Sorry about the lack of recipe illustrations, but I’ve started at a new language school teaching kids in the classroom again and am busy creating flashcards, posters and games!!! lol. Great fun with coloured cardboard, scissors, markers, glue, etc. 😉

Thank you for sharing!
LikeLiked by 1 person
You’re very welcome and thanks for stopping by! 🙂
LikeLiked by 1 person
They look yummy! I’ve never heard of a reinette apple. I’ll look them up.
LikeLiked by 1 person
Thank you Deborah! 😍 Reinettes are my favourite apple, apparently of European origin but hopefully you can find some.
LikeLiked by 1 person
I am always reluctant to make tatin for fear of soggy pastry once you flip it, especially with any leftovers, so I love your choices of baking separately, and in individual portions. The little confections look delicious!
LikeLiked by 1 person
Thanks so much Irene! 😍 Yes, baking the usual tatins is riskier and you’re always wondering how they’ll turn out! 😄 I do really like the relaxing method of baking the 2 elements separately.👍
LikeLike
Wow this looks amazing 😻
LikeLiked by 1 person
Thank you so much Zeba! 🙂
LikeLiked by 1 person
I am really impressed by the way you made this wonderful recipe. Everything is so nicely described that really helped me. Looking for more such yummy recipes in future too.
LikeLiked by 1 person
Thank you so much! That’s very kind. 😍 Happy you like the recipe. 🙂
LikeLike