
You temper chocolate if you want it to stay shiny and not develop a white bloom with time or in the fridge. So you’d usually temper for decorating cakes or making special chocolates.
Tempering chocolate is quite straightforward but you need to be precise with your temperatures and use good-quality chocolate. Also be prepared to get a bit in a chocolate mess until you get used to manipulating the chocolate with your metal scraper and spatula! 🙂
There are different ways to temper and I’ve included 2 similar versions here based on the spreading system. It’s not difficult unless you’re living in a very hot humid place where the room temperature is above the temperature you’re actually aiming for! Like here in Barcelona during the summer. Here are the techniques:
Important:
- before you start make sure none of your utensils or the work surface are wet. Water should never touch the chocolate.
- remember you need to follow the temperature curve precisely. If at any point your temperatures go too high or too low then start the whole process again from the beginning.
- use a sugar thermometre – it can be standard but probe is better to take the temperature of the chocolate when it’s spread out. The most convenient for chocolate work is the laser thermometre.
Use system 1 or 2. I recommend reading the two versions as they both include helpful tips. You can also watch this youtube video, Thomas Schnetzler (Lindt) – How to temper chocolate for some very clear instructions.
SYSTEM 1 – FOR DARK CHOCOLATE (adapted from the Cordon Bleu Basics book)
STAGE 1 – melt chocolate (broken into small pieces) very gently on a bain marie to 46-48°C/114-118°F (between 45°C and 50°C is acceptable)
Insert a sugar thermometre and make sure the chocolate doesn’t get too hot, taking off the heat if necessary (if the chocolate goes over 60°C your chocolate starts losing its integrity). Even off the heat your chocolate will keep melting as you stir.
STAGE 2 – bring half the chocolate to the lower temperature of 28°C/82°F by spreading and gathering with a spatula knife or metal scraper. This temperature must be exact (with not more than 1° difference)
STAGE 3 – bring the temperature of the chocolate back up by adding your cooled chocolate to the remaining half in the bowl (which is still warm). And stir. It must reach a temperature of 31-32°C/88-90°F. If it goes higher than 33°C/91°F then you need to start the whole process again from the beginning.

SYSTEM 2 (adapted from Christophe Felder’s Pâtisserie book)
STAGE 1
Gently melt the chocolate over a bain marie to the temperature indicated for your type of chocolate:
- Dark chocolate, 55°C/131°F
- Milk chocolate, 50°C/122°F
- White chocolate, 45°C/113°F
STAGE 2
Once it reaches this temperature pour two thirds of the chocolate onto a surface like marble and use a metal spatula to spread then gather up the chocolate.
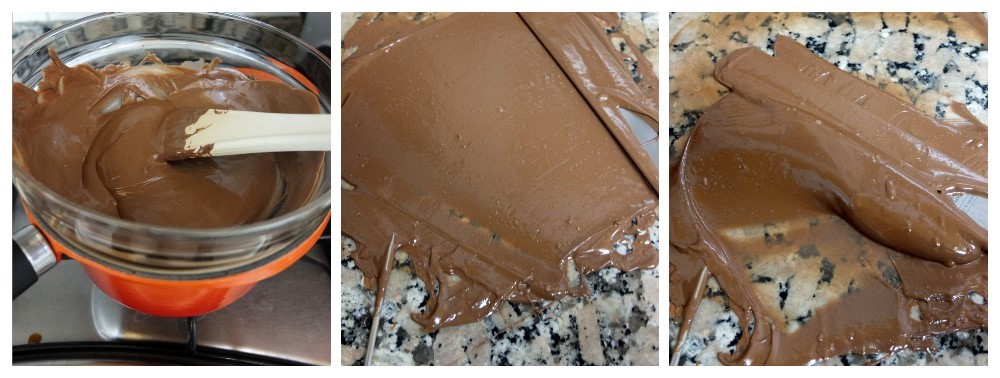
According to Christophe Felder, you should manipulate the chocolate till it reaches a temperature of 28 to 29°C/82 to 84°F. Thomas Schnetzle says it should be cold to the touch and like a chocolate custard.
STAGE 3
Then you return the cooled chocolate to the rest of the warm chocolate in the bowl and stir together. You must now have these temperatures (check with your sugar thermometre):
- Dark chocolate, 31-32°C/88-90°F
- Milk chocolate, 29-30°C/84-86°F
- White chocolate, 29-30°C/84-86°F
If necessary, stir on the bain marie for 1 or 2 minutes to bring the chocolate back up to the correct temperature (or wait till it cools to the correct temperature before using). Always check with the thermometre. If you’re a few degrees out you won’t get the required shiny snappy chocolate result.
Once ready then use immediately and quickly before it hardens! You can tell your tempering has worked if it’s nicely liquid when dipping your chocolates but afterwards your chocolates are hardening rapidly and not staying soft for too long. If it hasn’t worked you need to repeat the whole process.
P.S. Apparently it helps if you use couverture chocolate.

this was super helpful. I have been intimidated by tempering chocolate, but this makes it seem like an approachable endeavor!
LikeLiked by 1 person
So glad this could help you Bekkah and hope you have fun tempering chocolate now. 🙂 I know what you mean – I used to think ‘aaargh’ before tempering but it is actually quite nice to do! Let me know how it goes… 🙂
LikeLiked by 1 person
Pingback: Healthier chocolate-covered salted date caramels | lili's cakes
Pingback: Special chocolate mendiants recipe | lili's cakes
Pingback: Healthy chocolate-covered matcha marzipans and date caramels! | lili's cakes
Pingback: Week (30) of cakes, healthier sweeties and tempering… | lili's cakes
Pingback: La Feuille d’Automne recipe, Lenôtre’s classic dark chocolate mousse and meringue cake | lili's cakes
Pingback: Healthier masala chai tea bag shortbread biscuits (cookies) dipped in chocolate recipe! Plus Christmas cookies! :) | lili's cakes
Pingback: ‘Mazing mandarin mousse cake recipe! Bûche, round entremets or verrines …! | lili's cakes
Pingback: The smaller Feuille d’Automne recipe! Lenôtre’s classic dark chocolate mousse and meringue cake! | lili's cakes