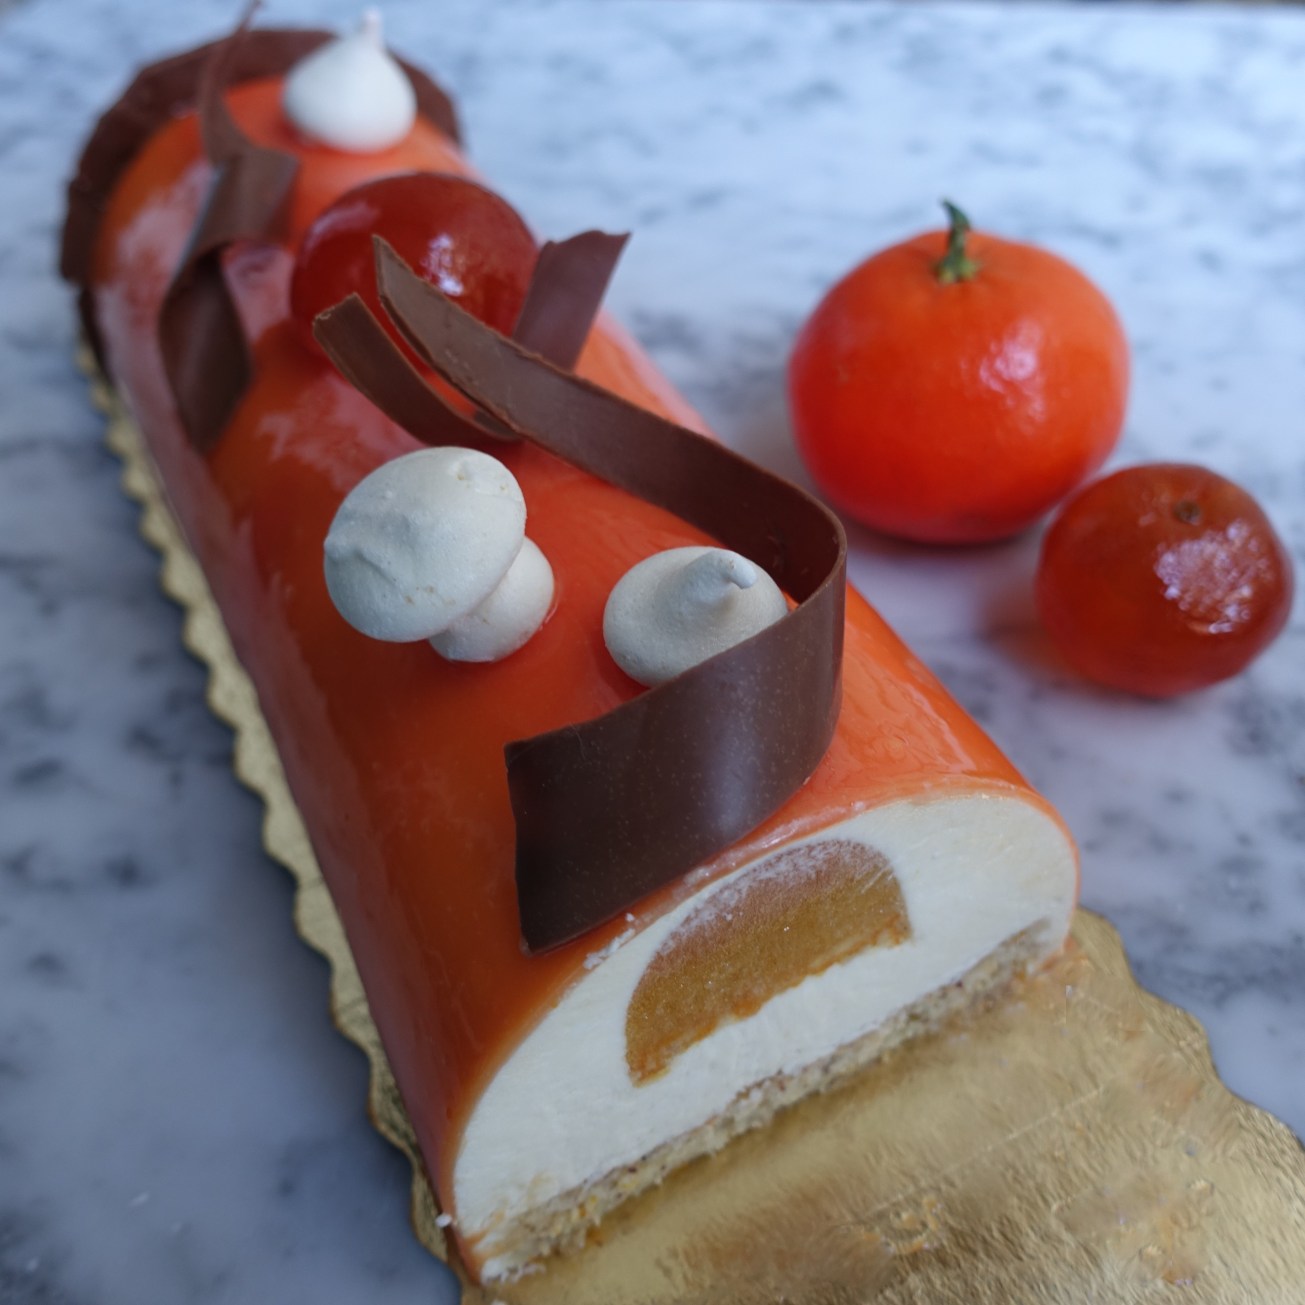
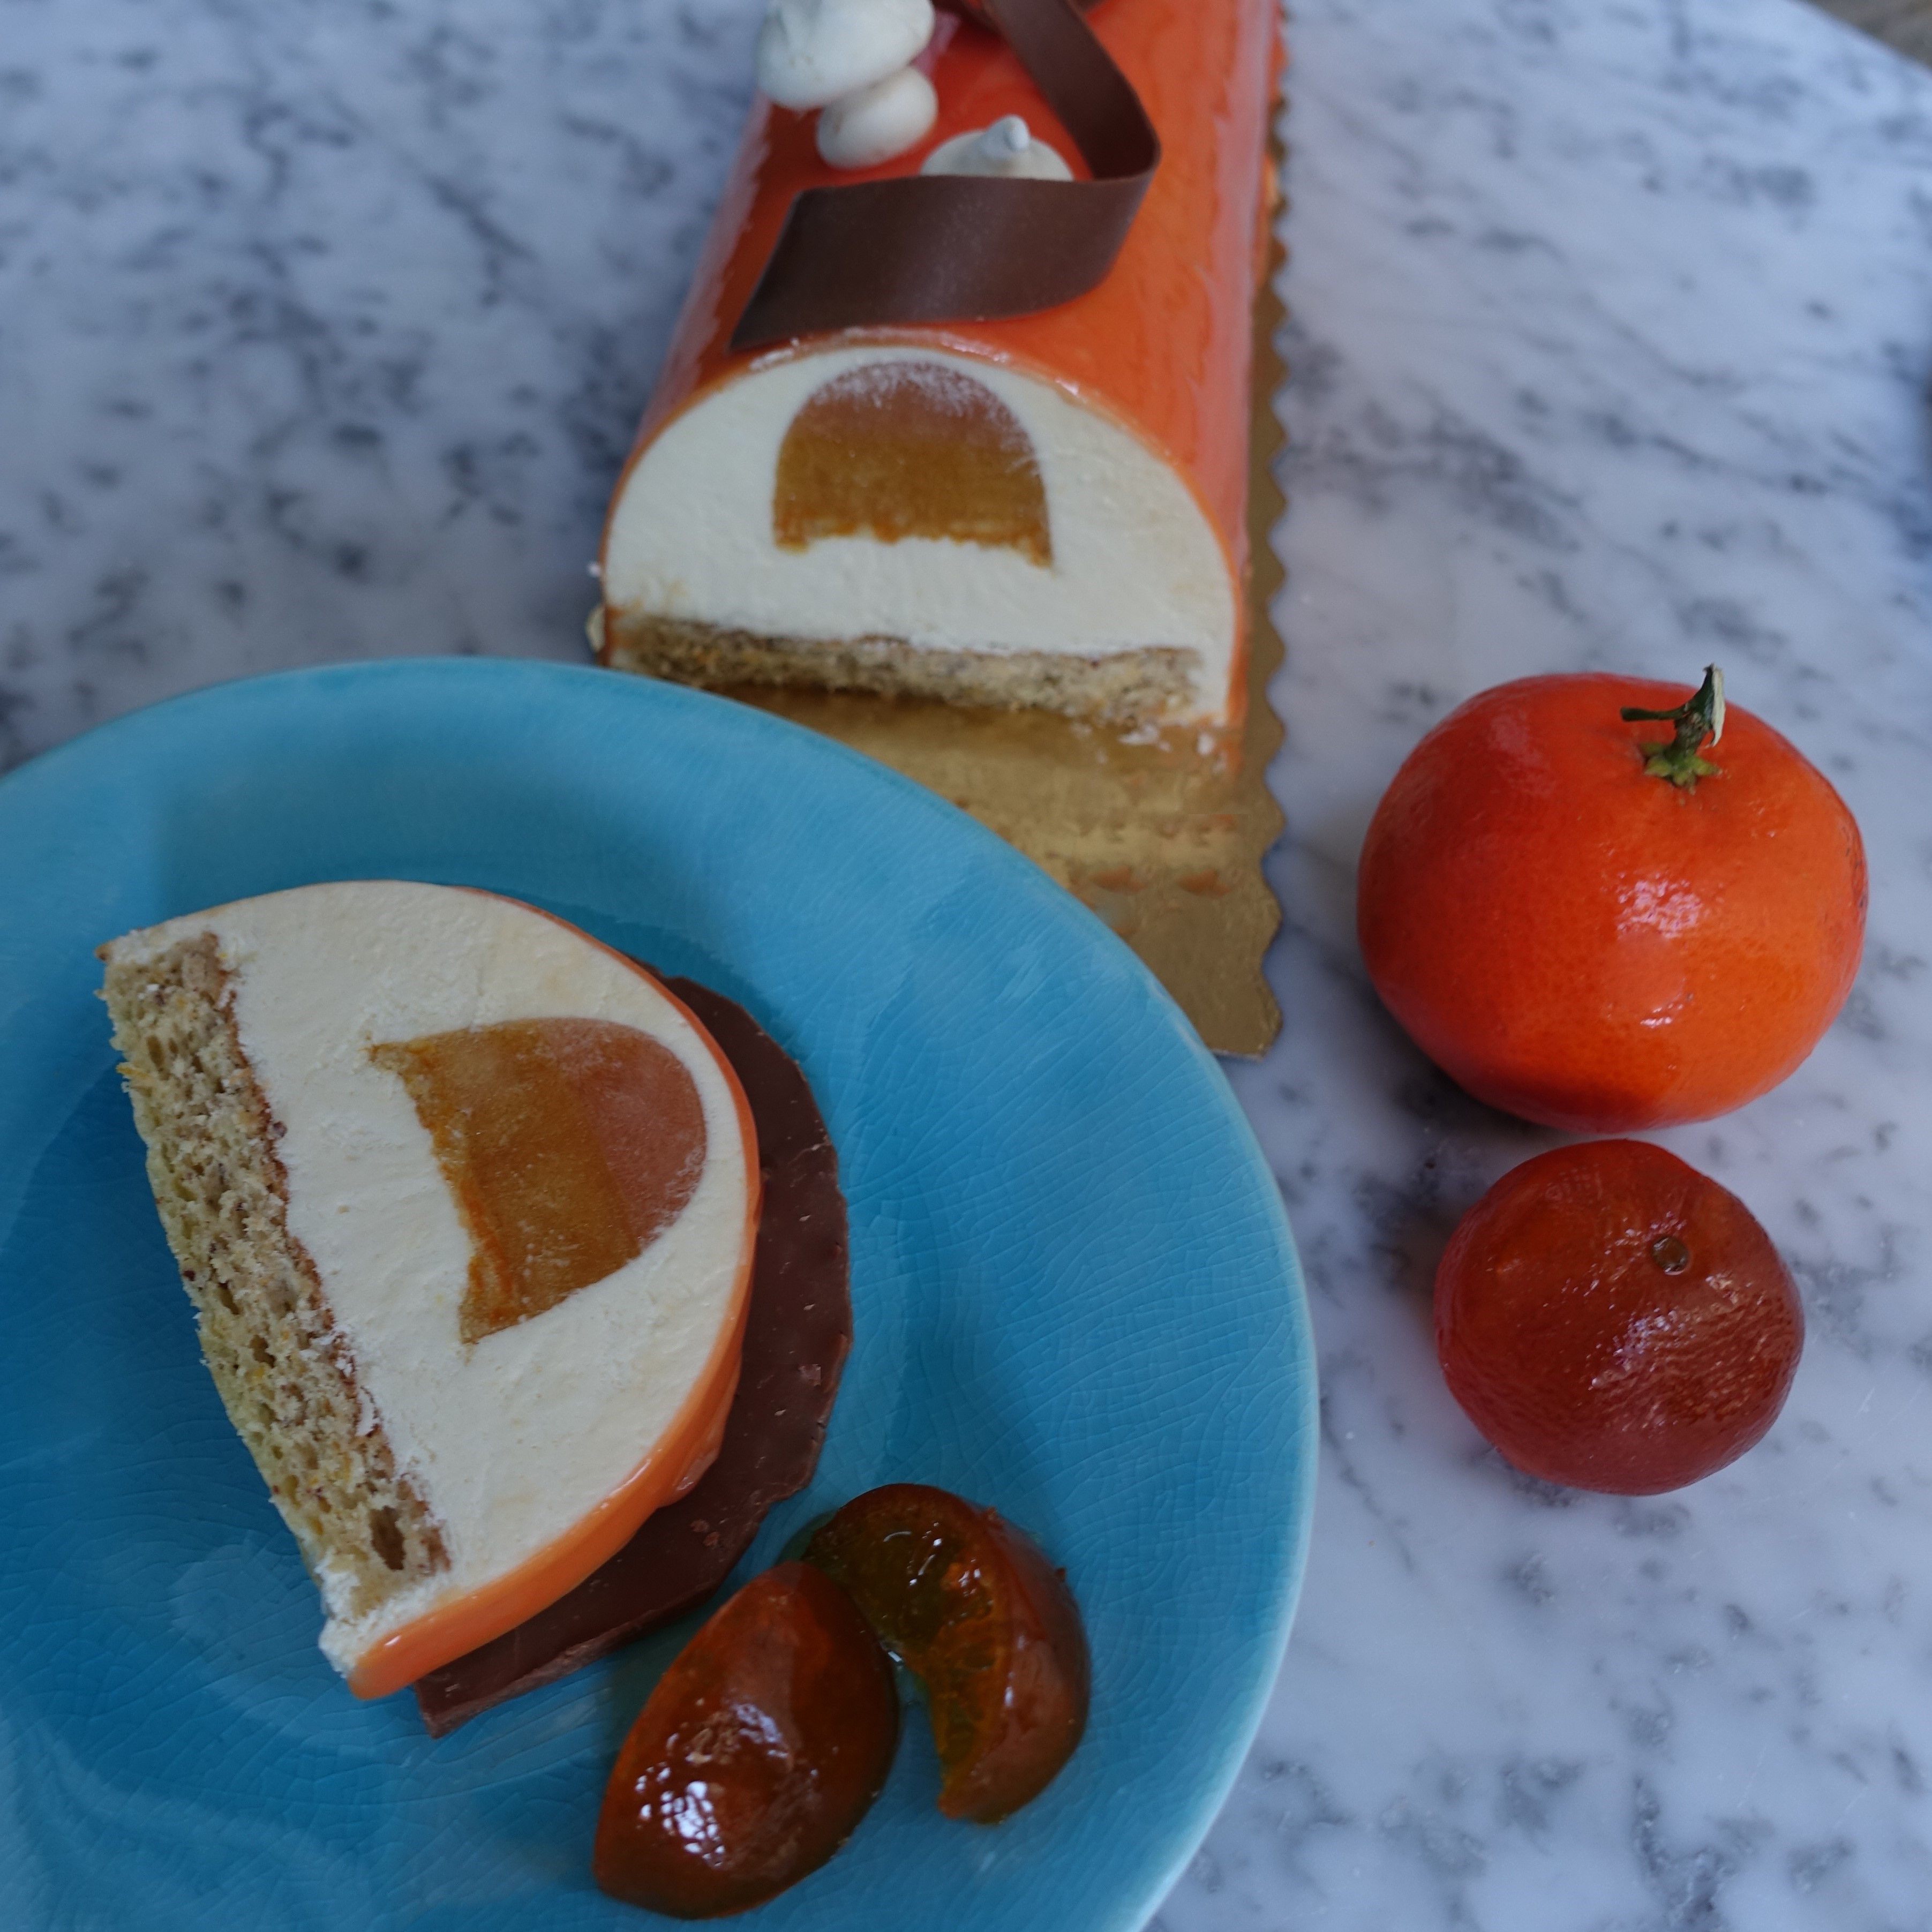
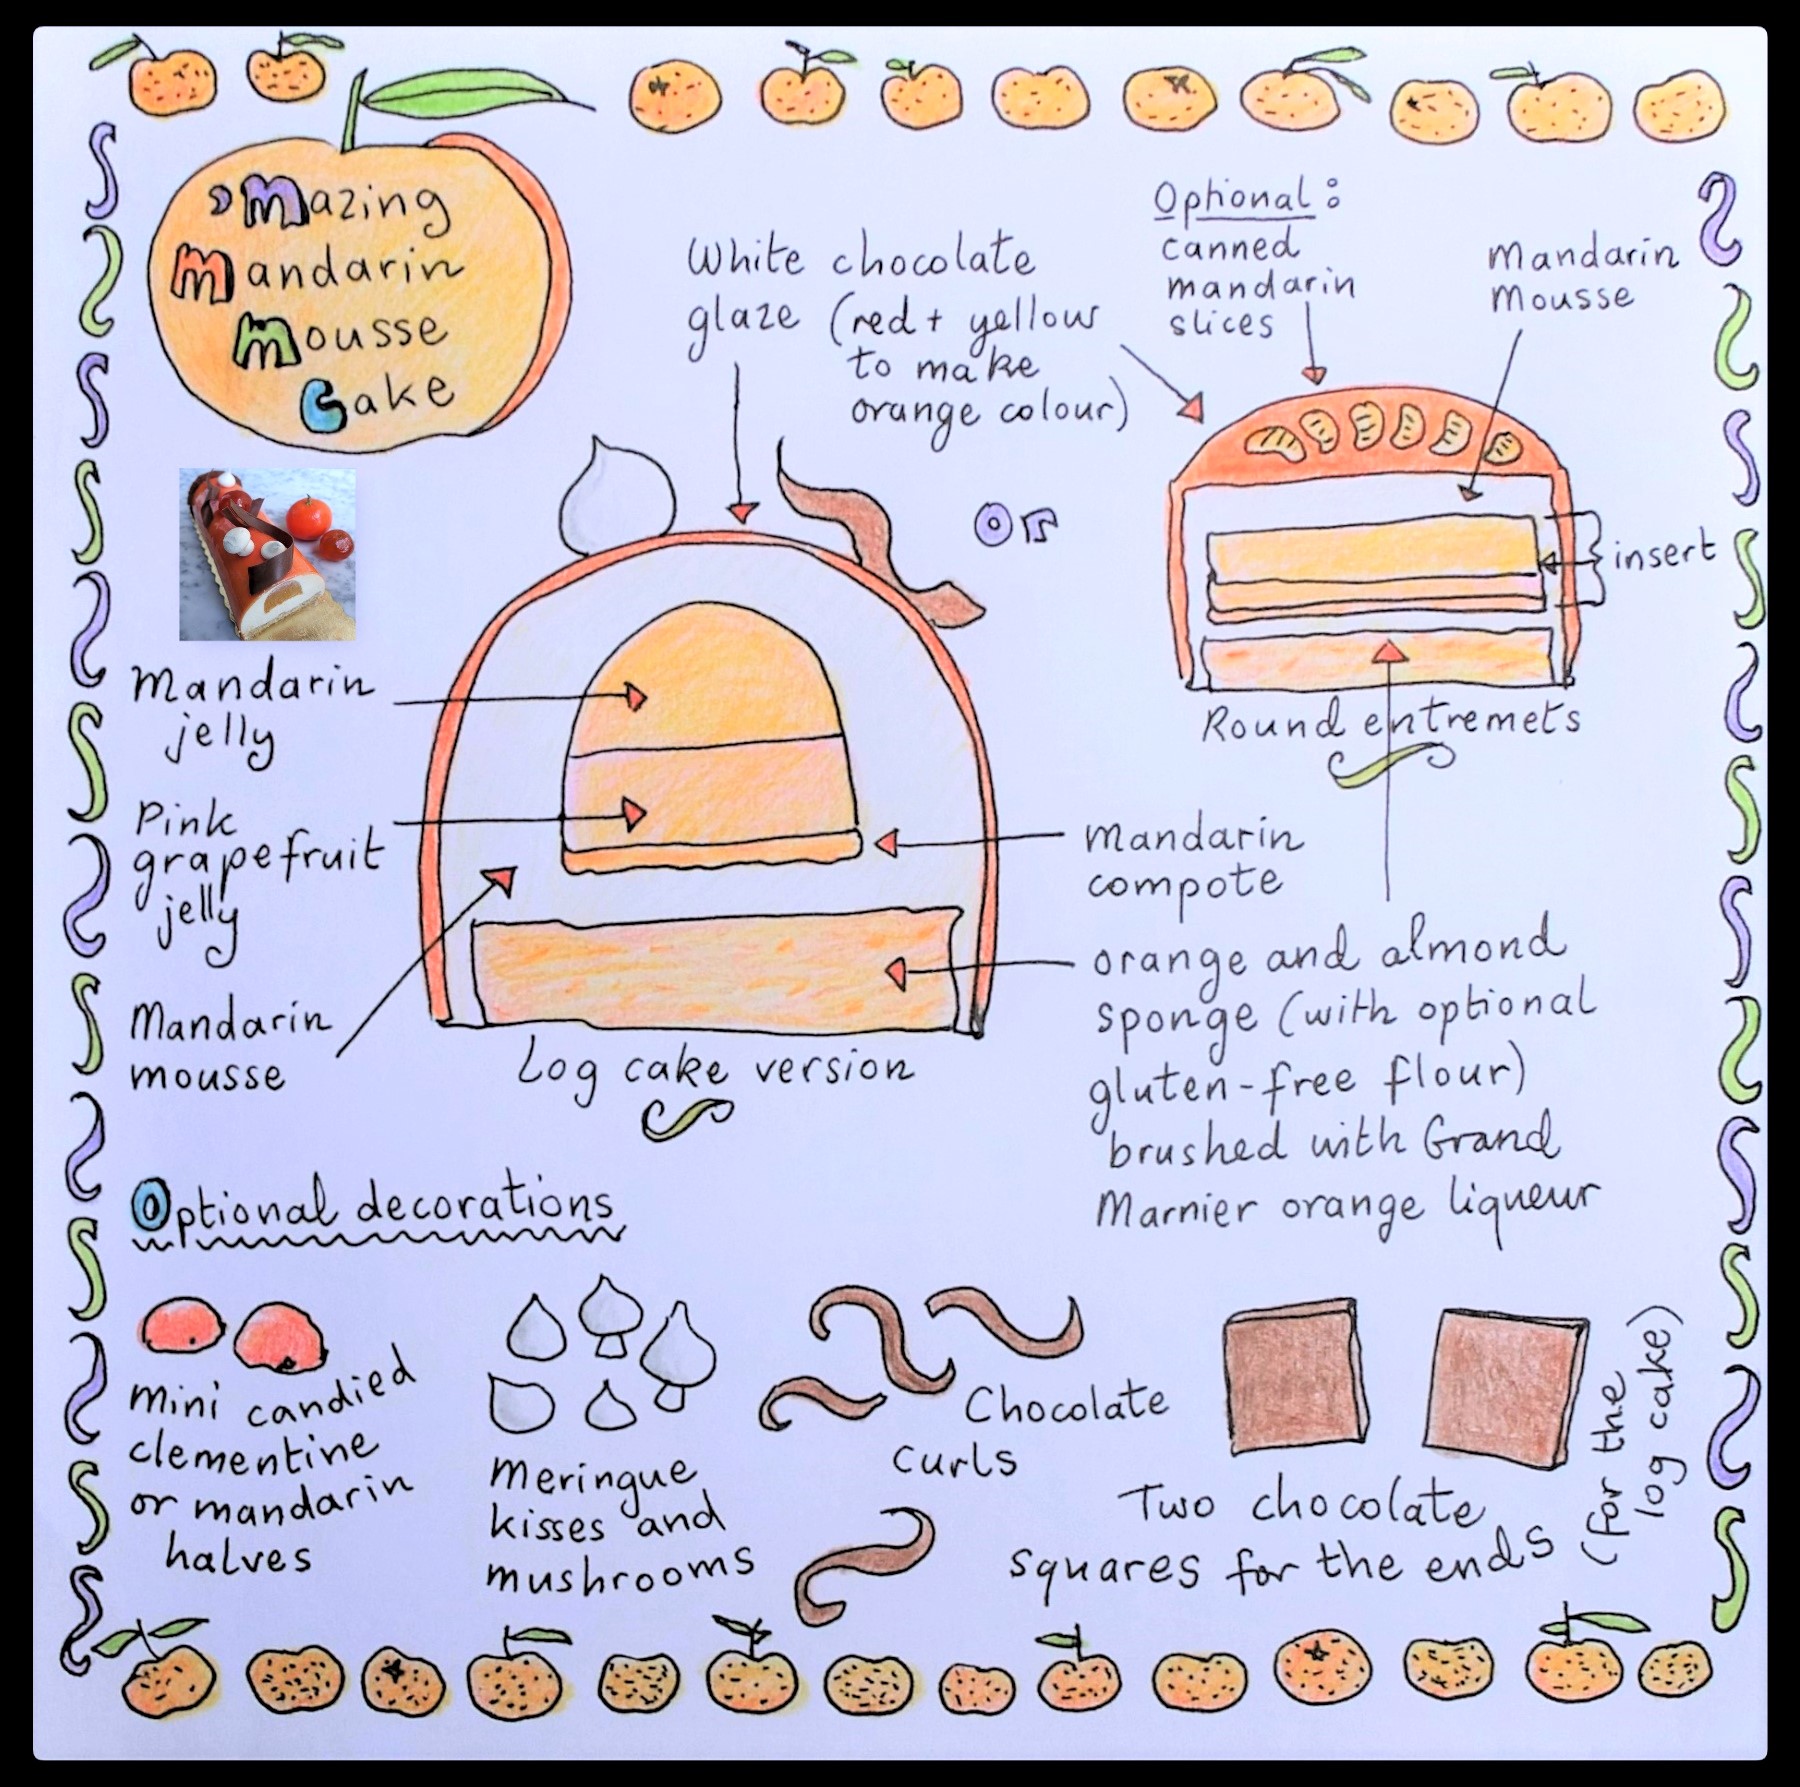
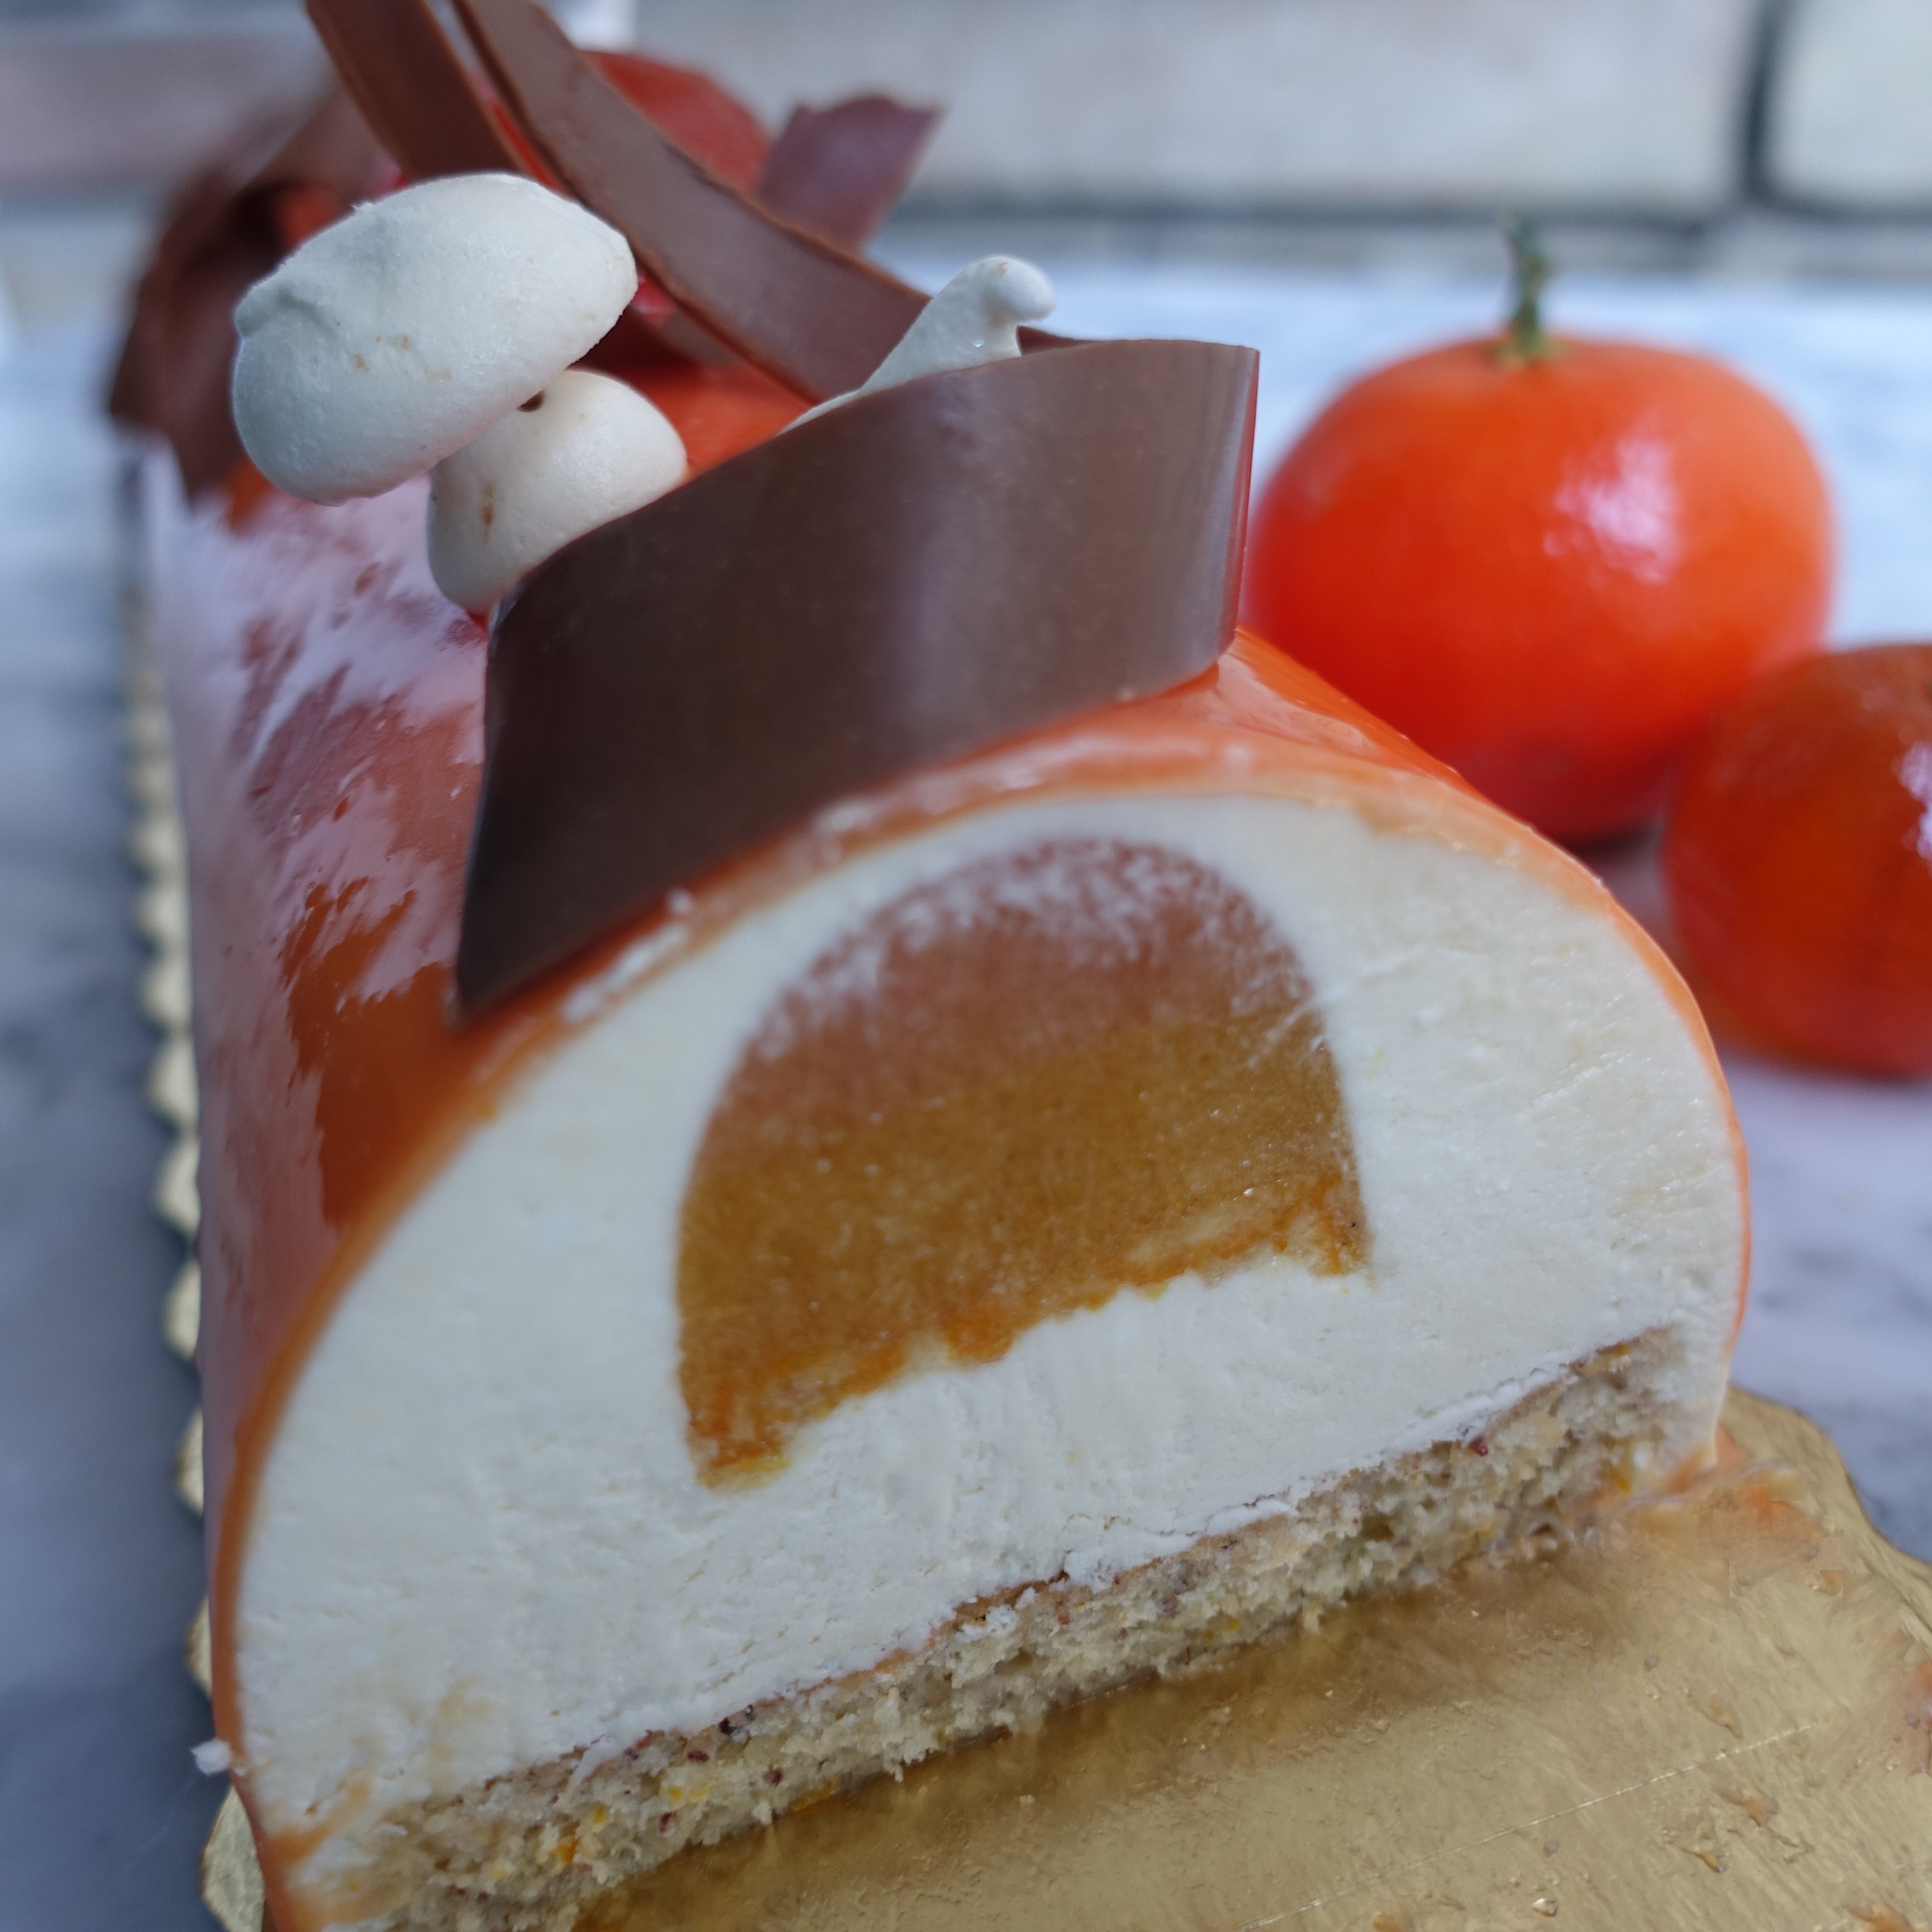
AOur favourite cake over the New Year holidays, I’m finally recording and sharing the recipe here so variations of it can be made all year round! This mandarin bûche or log cake is light, fruity and delicious. It stores well in the freezer from which slices can be extracted when cake cravings occur. Tee hee. The insert‘s a thin layer of mandarin compote combined with fresh mandarin and pink grapefruit jelly layers. The light creamy mandarin mousse rests on a base of moist orange almond sponge, optionally gluten free and brushed with Grand Marnier orange liqueur. The white chocolate glaze is surprisingly simple to make and pour over the cake for a glossy orange finish. Finally there are optional decorative touches like chocolate curls and meringue mushrooms or kisses. It’s totally worth making this mousse cake whether shaped as a log, round entremets or simple verrines (trifles). The elements are fast and simple to prepare, most of them in advance. I actually find this kind of dessert easier to make than layer cakes that need piping and smoothed buttercream! With entremets you pour elements in moulds and when frozen long enough they come out all nice and smooth. Really simple. So do consider giving this style of French cake a try if you haven’t yet. Would love a slice of ‘mazing mandarin mousse entremets right now! Interested?
THE RECIPE
This entremets is an adaptation of the passionfruit and raspberry charlotte log cake recipe from a Meilleur du Chef workshop last December. This mandarin version has no Charlotte ladyfingers but a gluten-free, orange and almond sponge for extra moisture and flavour plus a healthy mandarin compote.
Variations and adapting
Here are some previous prototypes and ideas if you’d like to adapt the recipe.
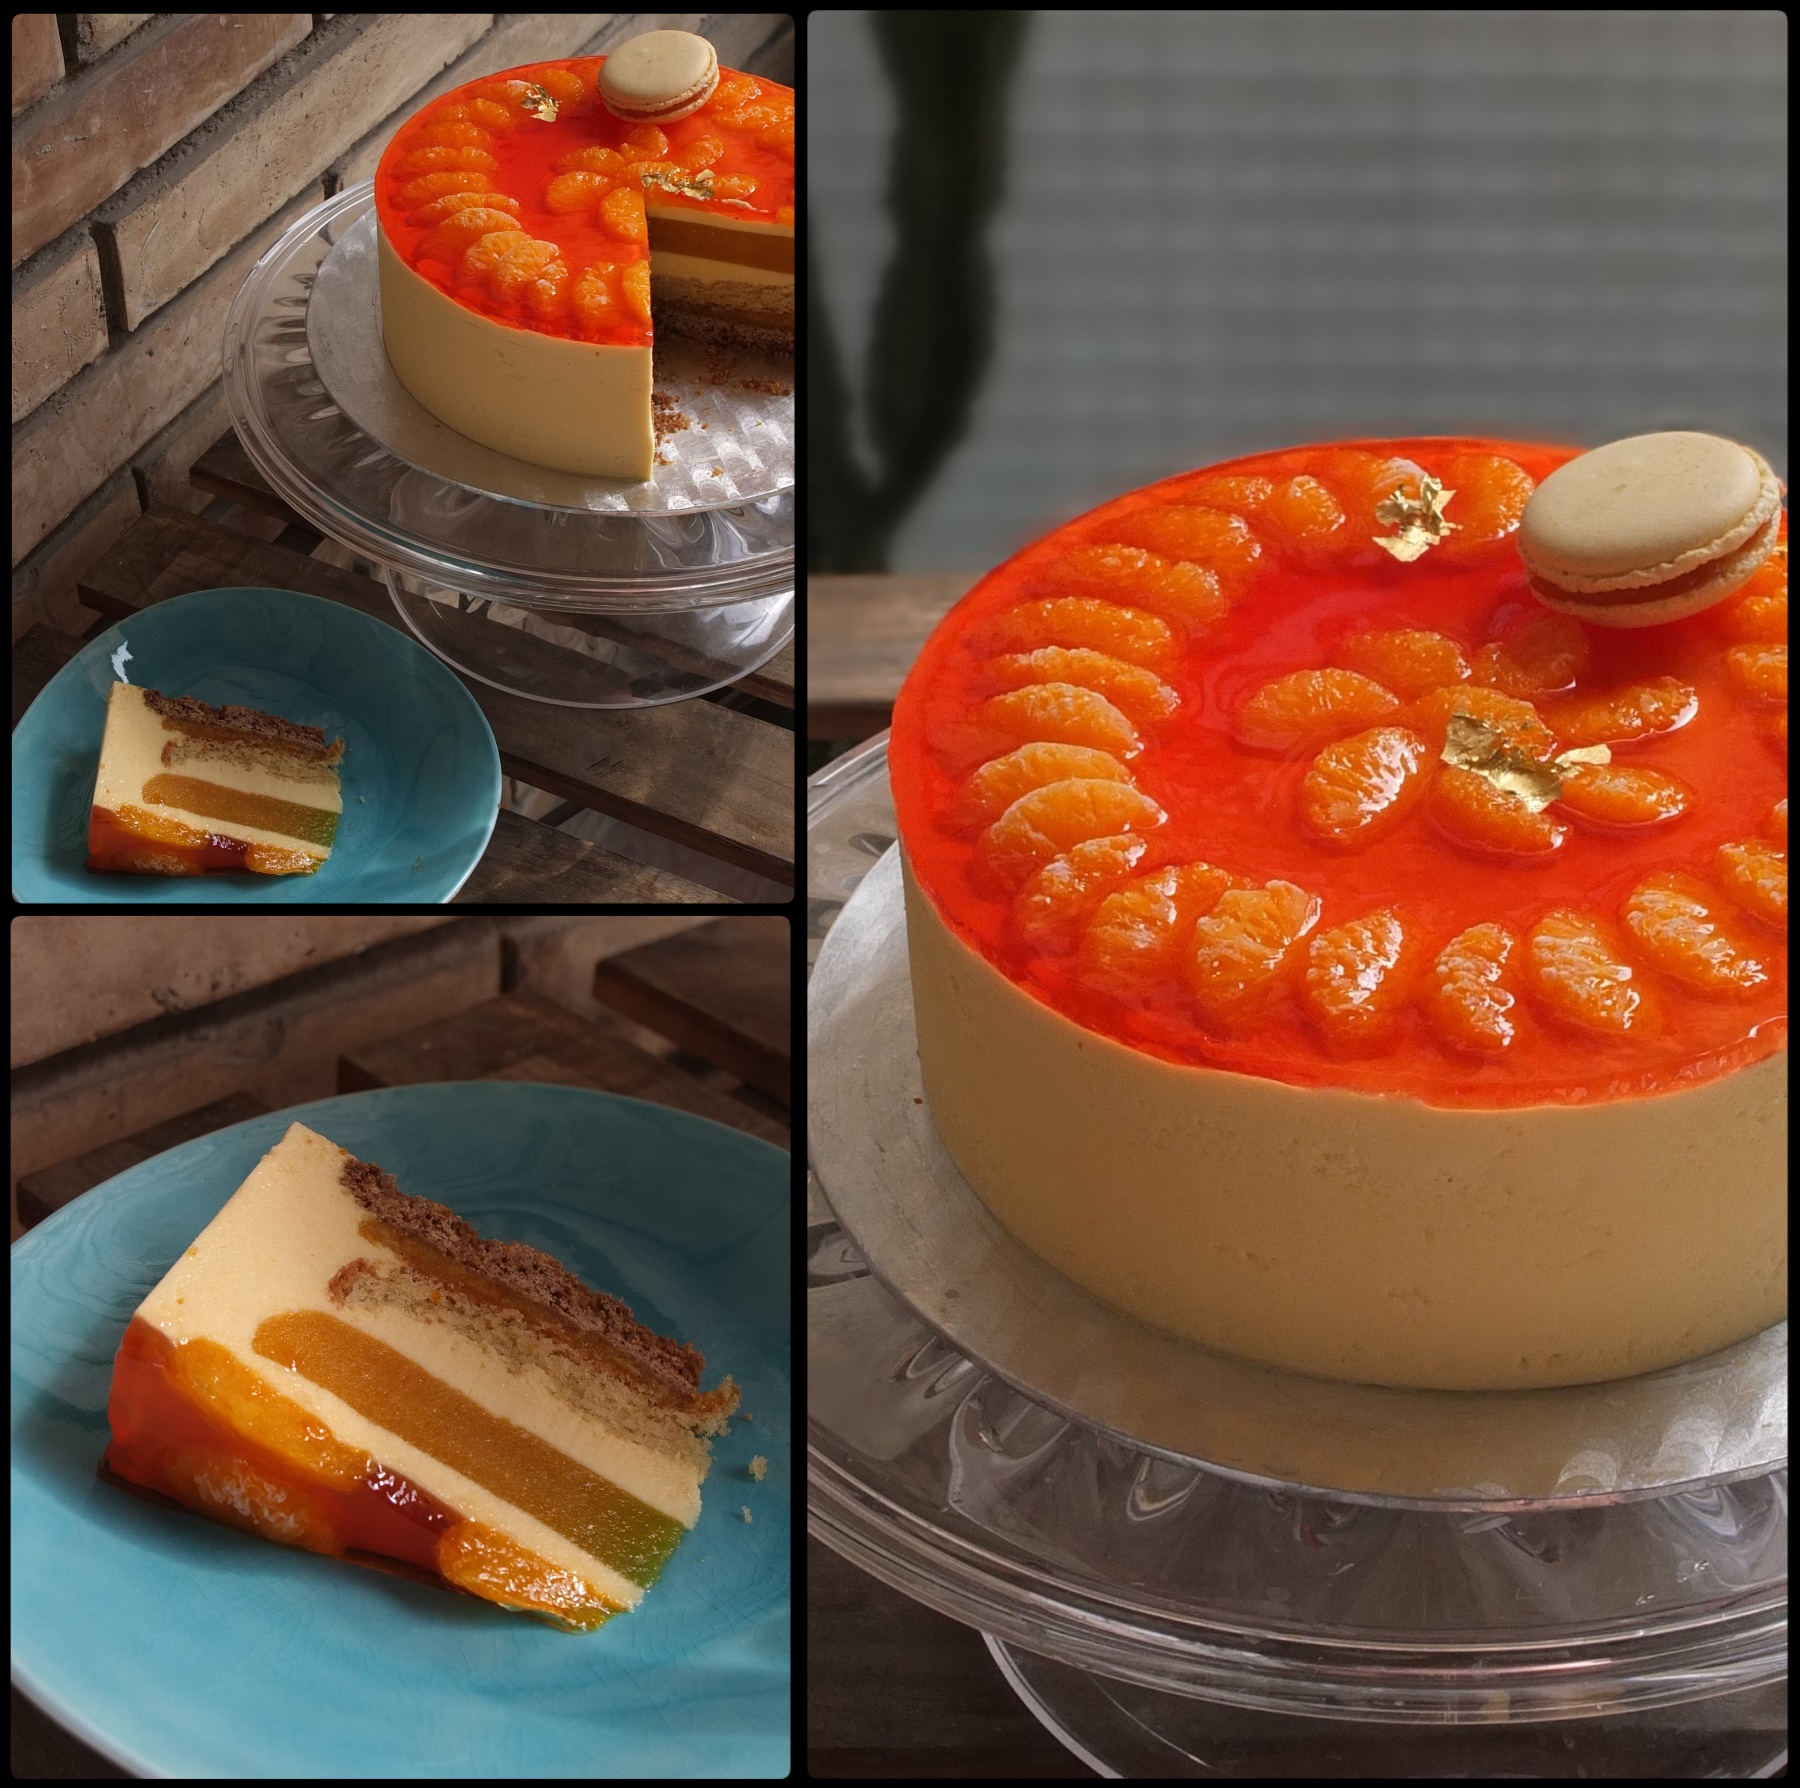
Healthier round entremets: natural yoghurt replaces some of the cream, making it lighter and pure maple syrup substitutes some sugar in the insert. The base is layers of sablé breton shortbread, mandarin compote plus almond and orange sponge. The sablé breton loses crispness after a day or 2 so eat quickly or freeze! There’s a single thicker mandarin jelly layer. The orange-coloured neutral glaze is studded with drained canned mandarins…
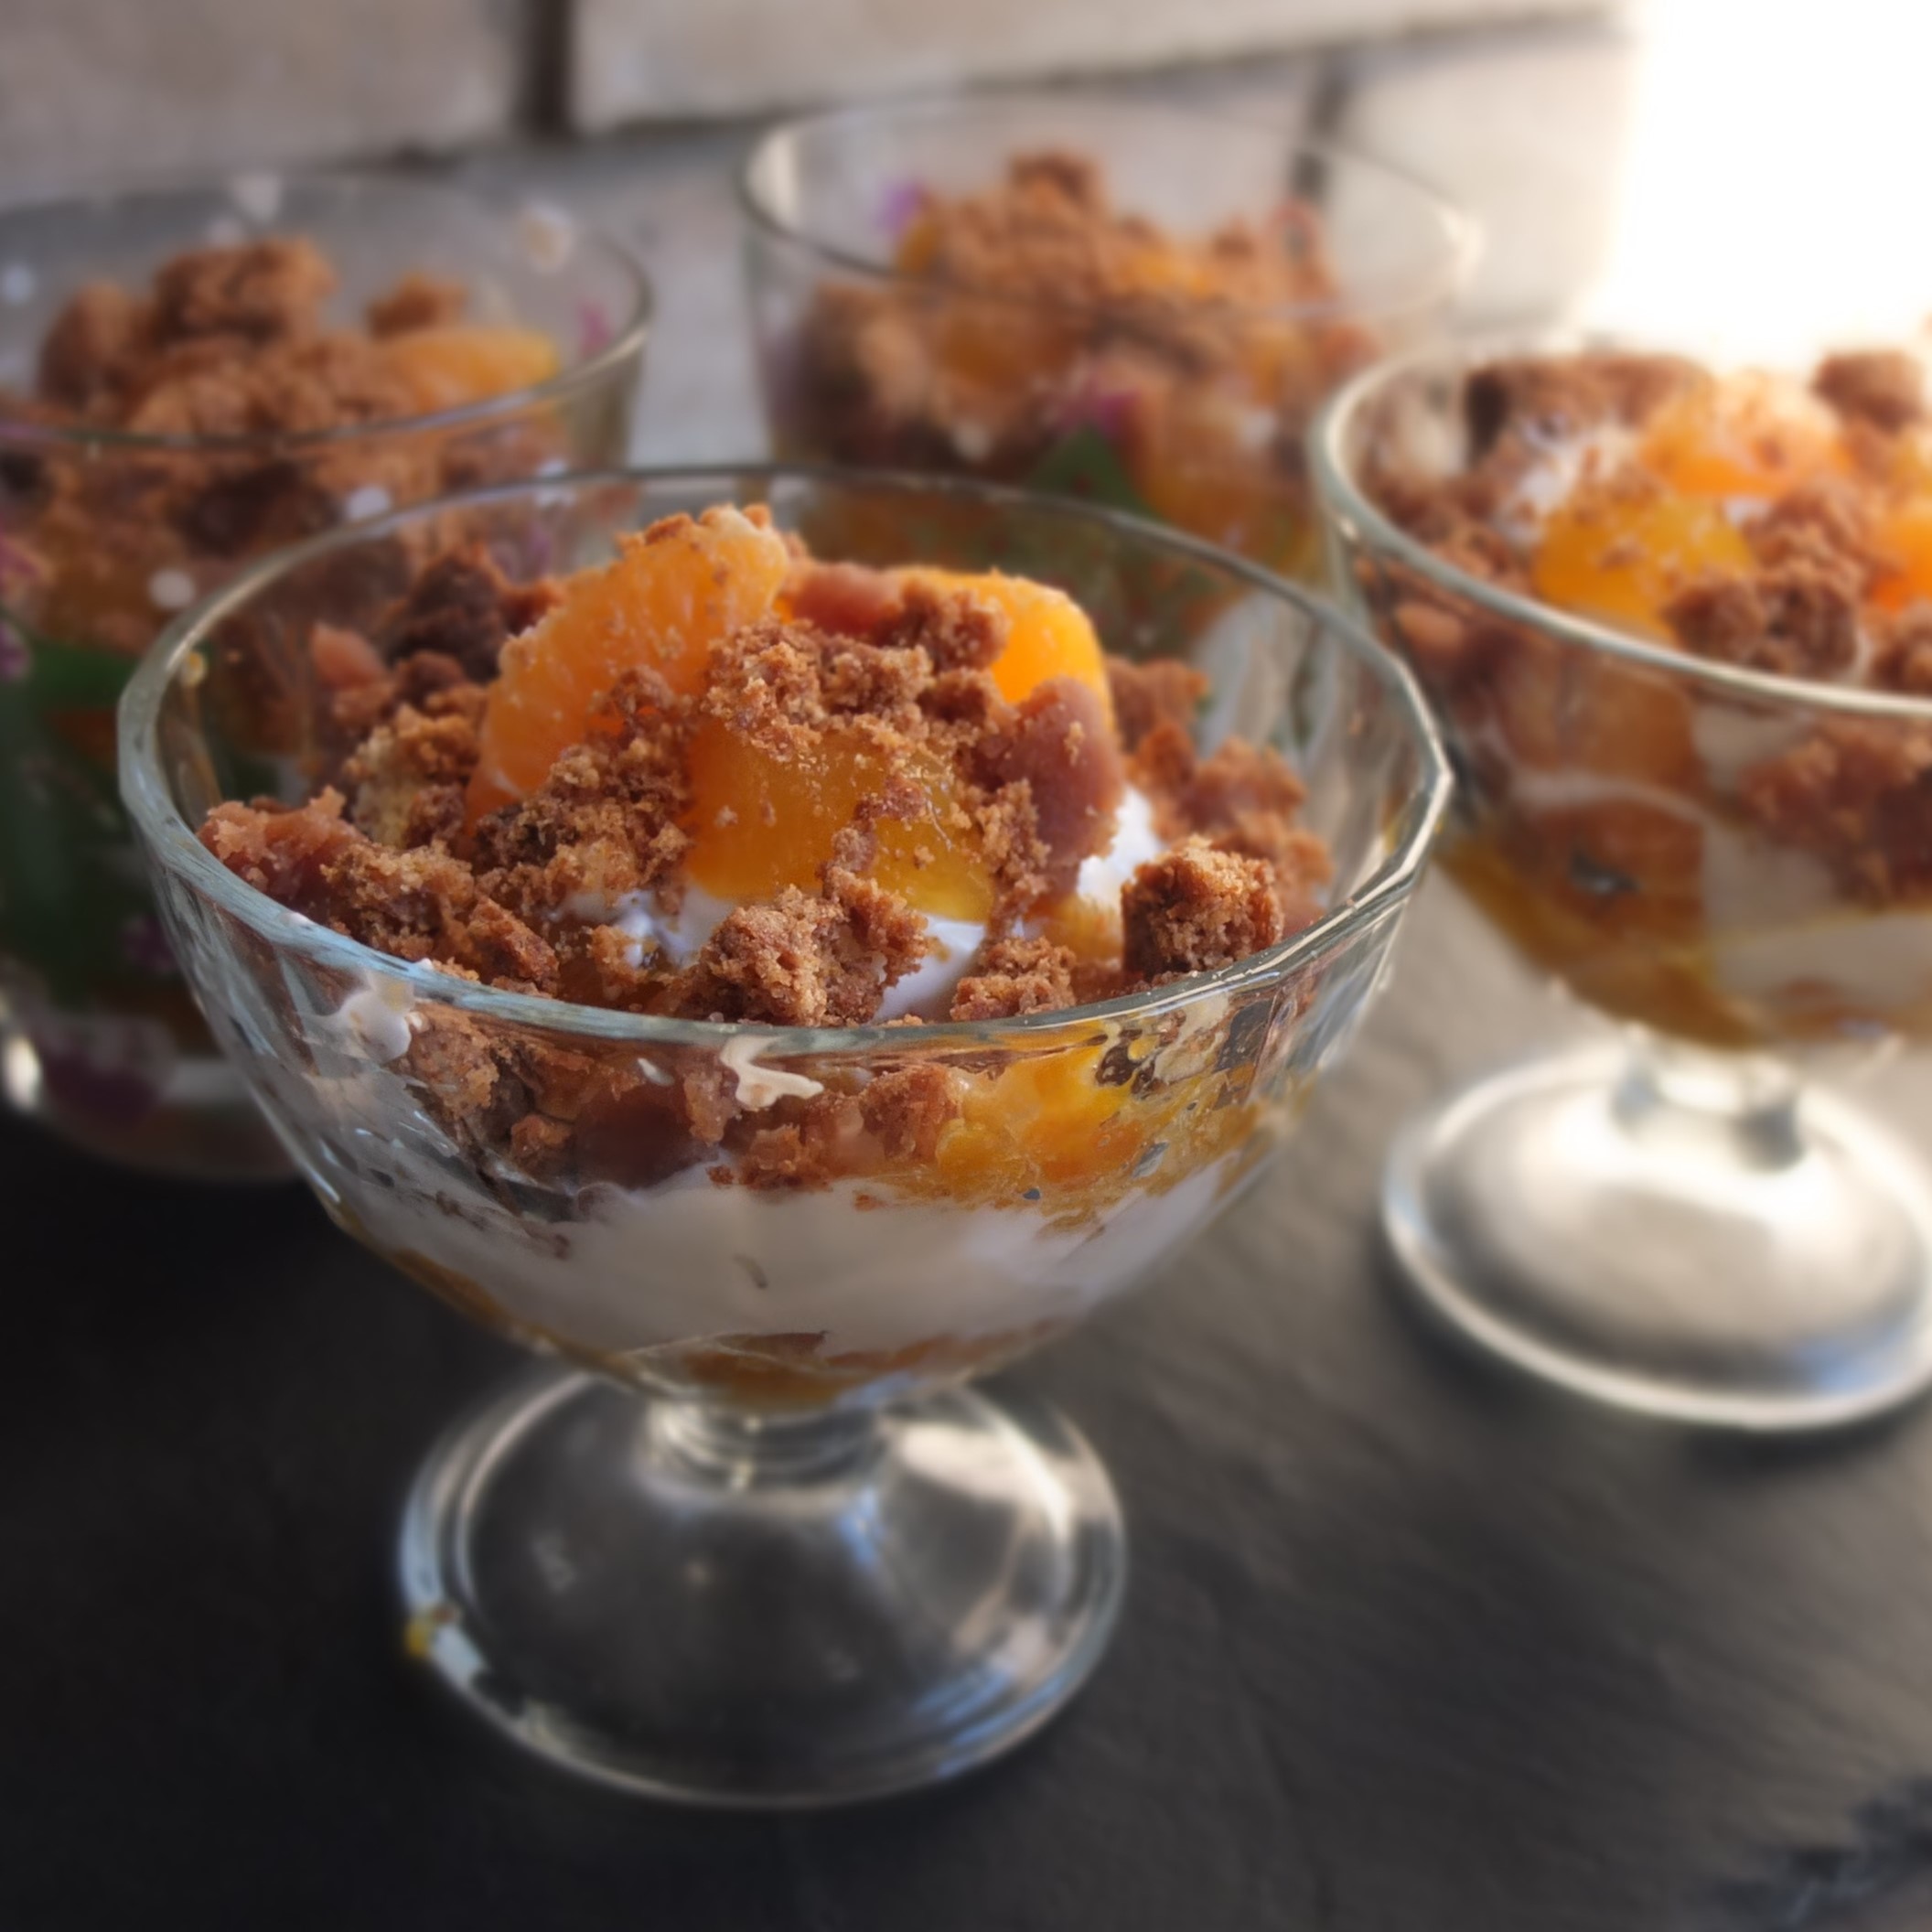
Verrines (or trifles): make these to use less equipment, save time or finish leftover elements! Mine were slightly messy but absolutely delicious with the crumbled shortbread, pieces of mandarin jelly, sponge, canned mandarins and greek yoghurt. They were happily gobbled up… yum yum. 😉
Back to the cake. Play with the layers and adapt as you wish. To save time make the insert with just mandarin purée, use shop-bought bitter orange marmalade instead of compote and don’t make the chocolate decorations (the rectangles at each end are optional).
You can vary the fruit purées and flavourings. This recent version has a ginger and cinnamon sponge, blackcurrant-raspberry mousse and an insert of blackcurrant and apple jelly with fresh apple pieces for an amazing flavour combo!
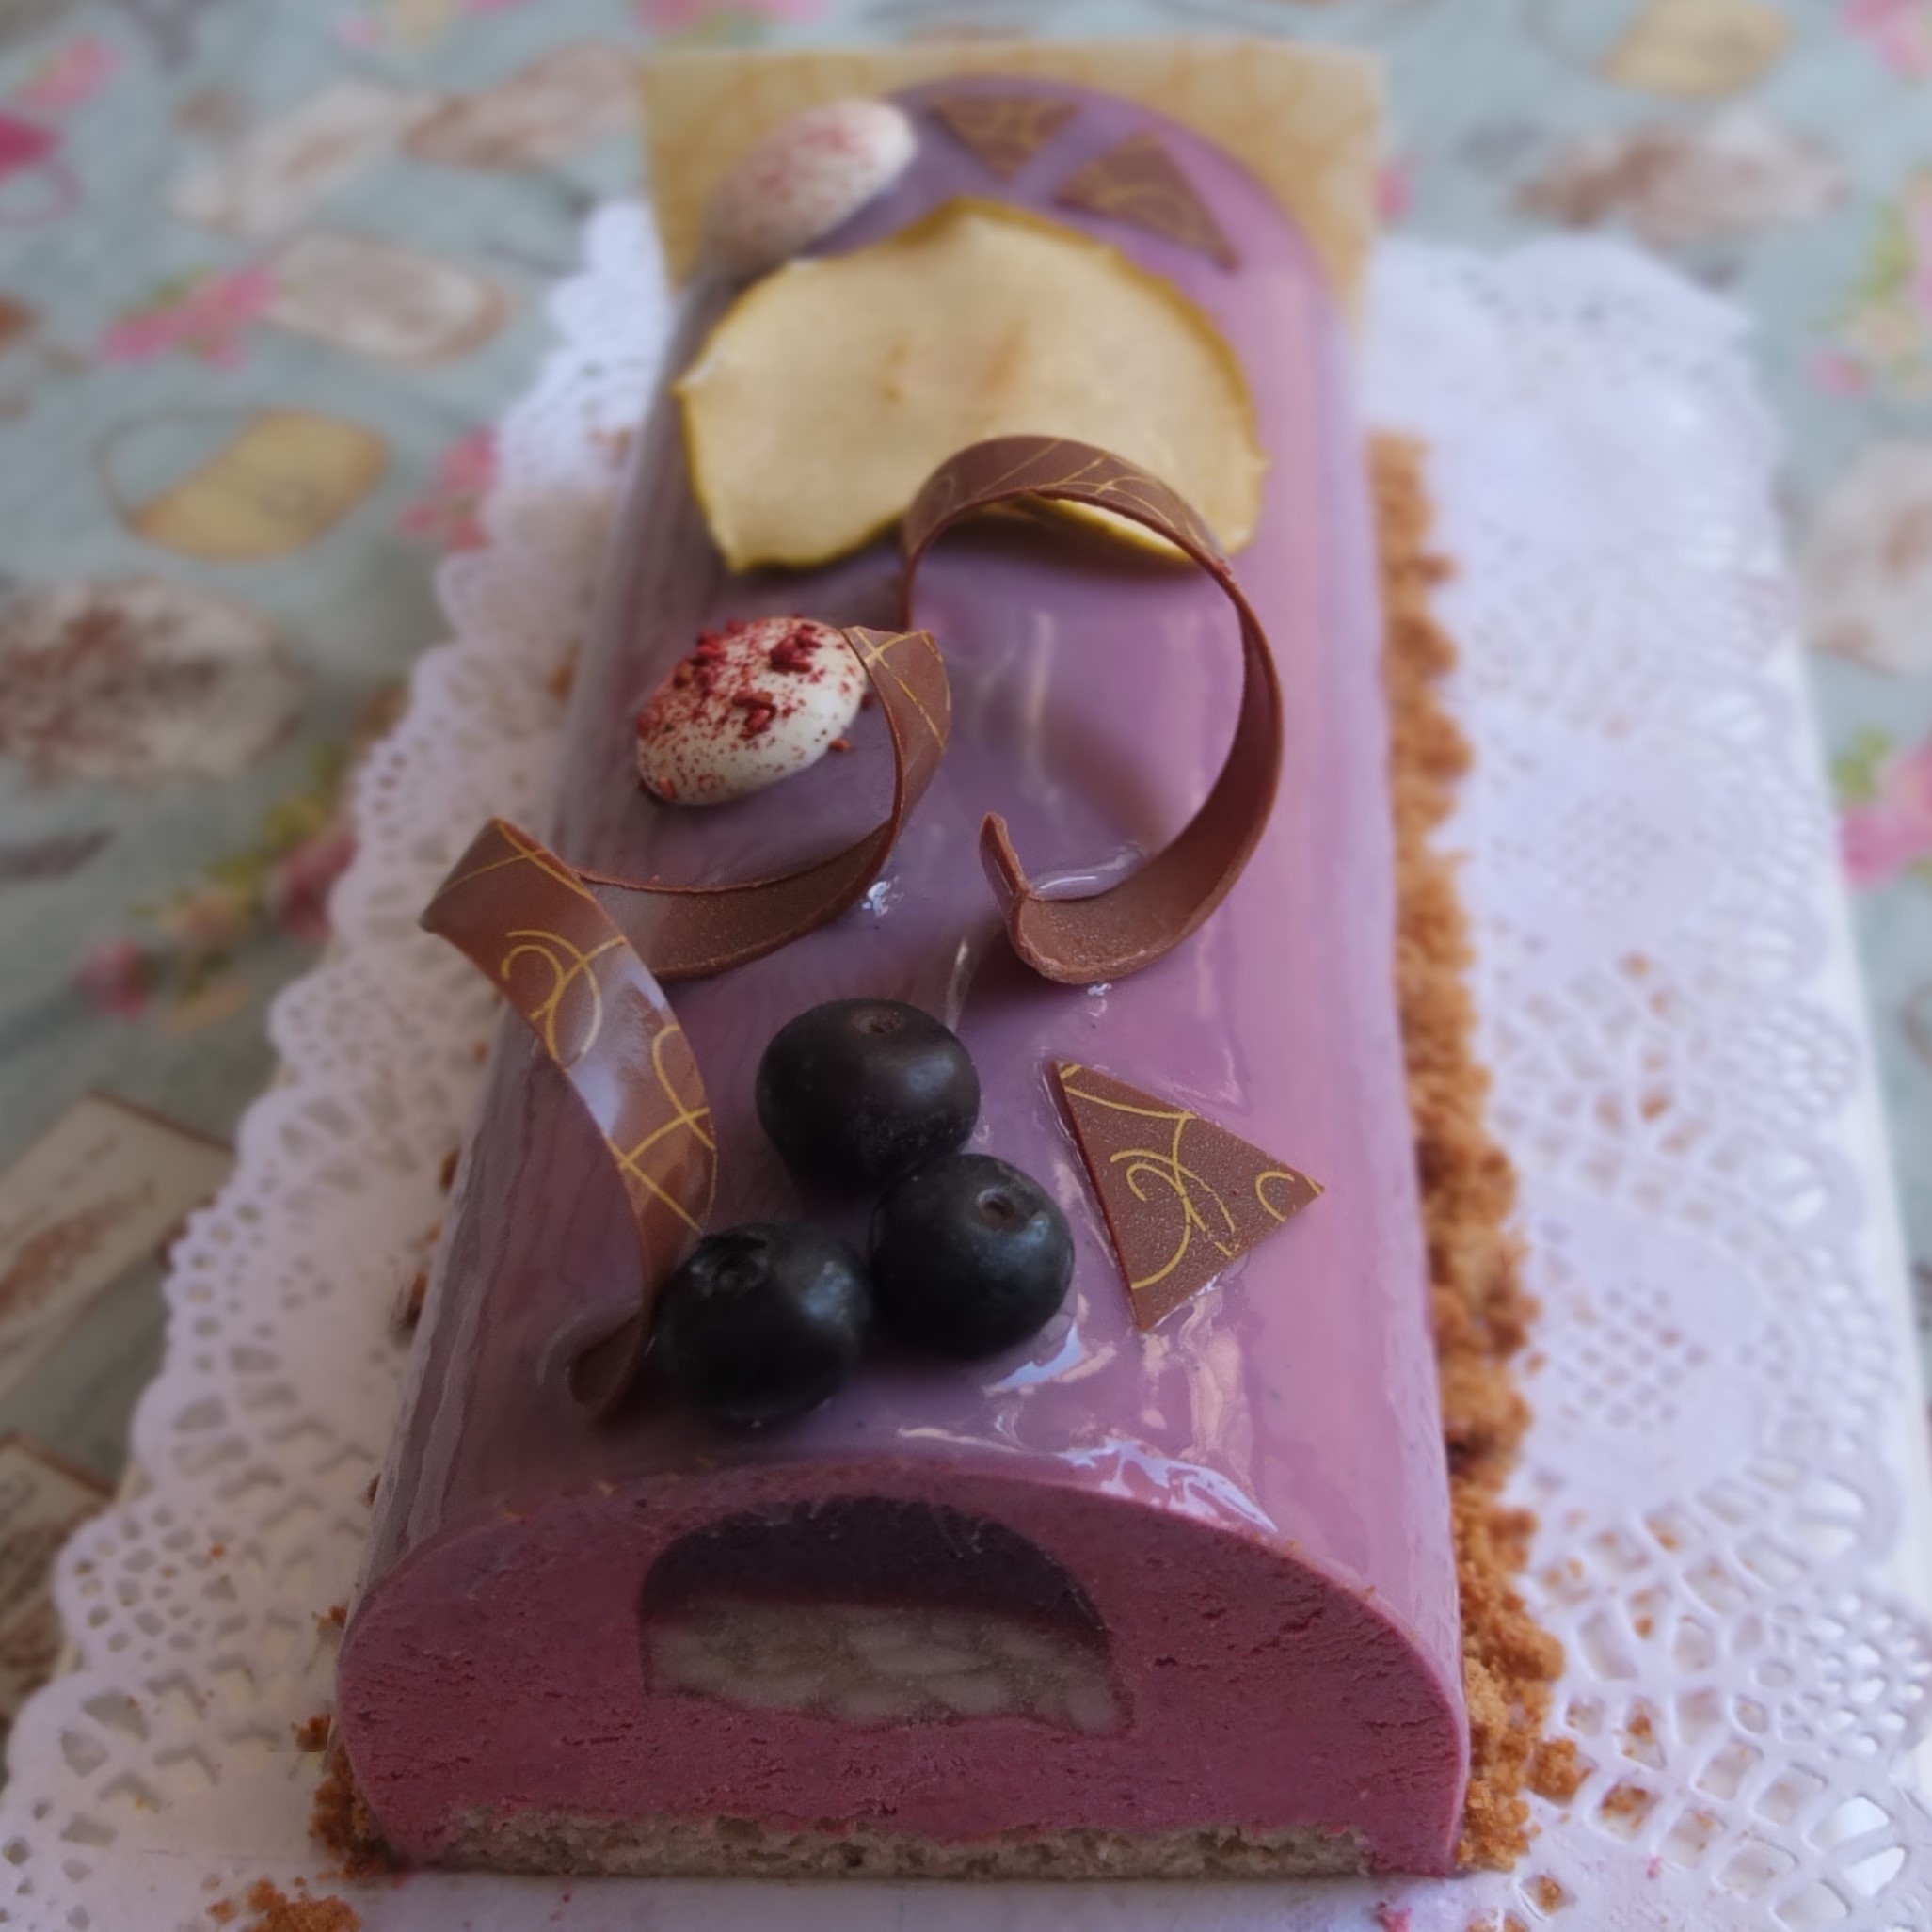
Purple Wonderland berries and apple bûche
And love this light refreshing mandarin cake …
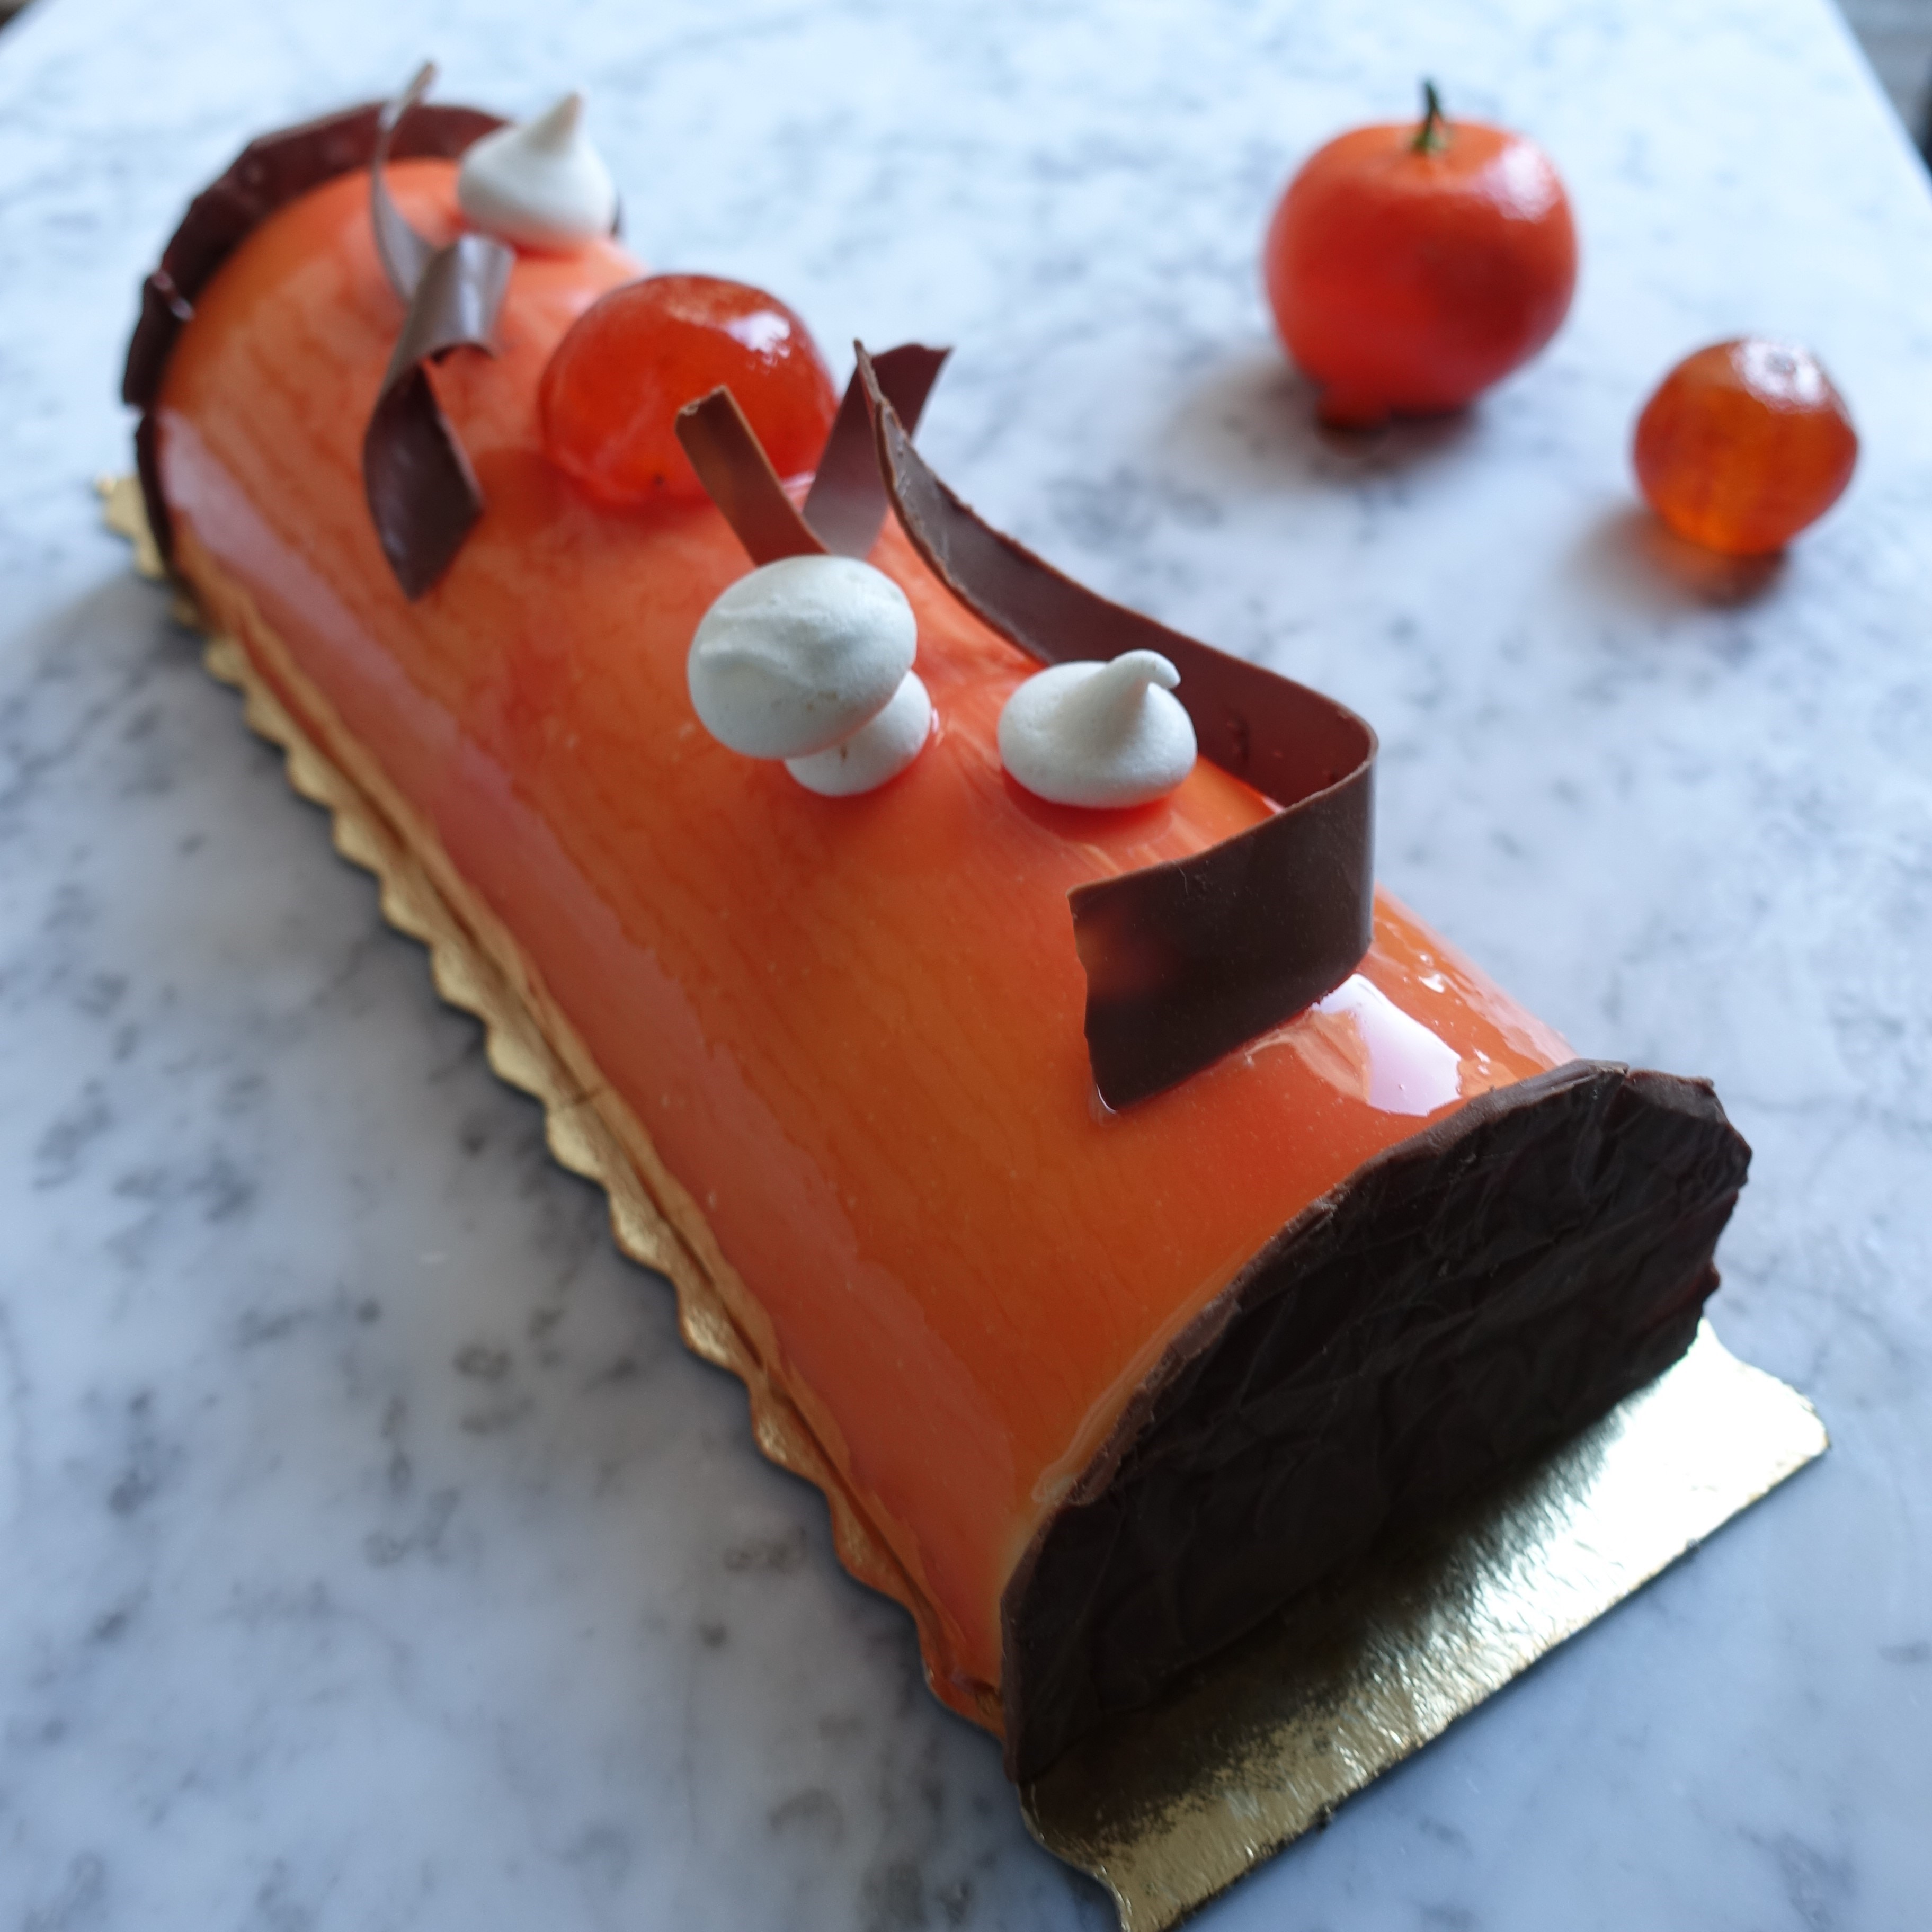
‘Mazing mandarin citrus mousse logcake
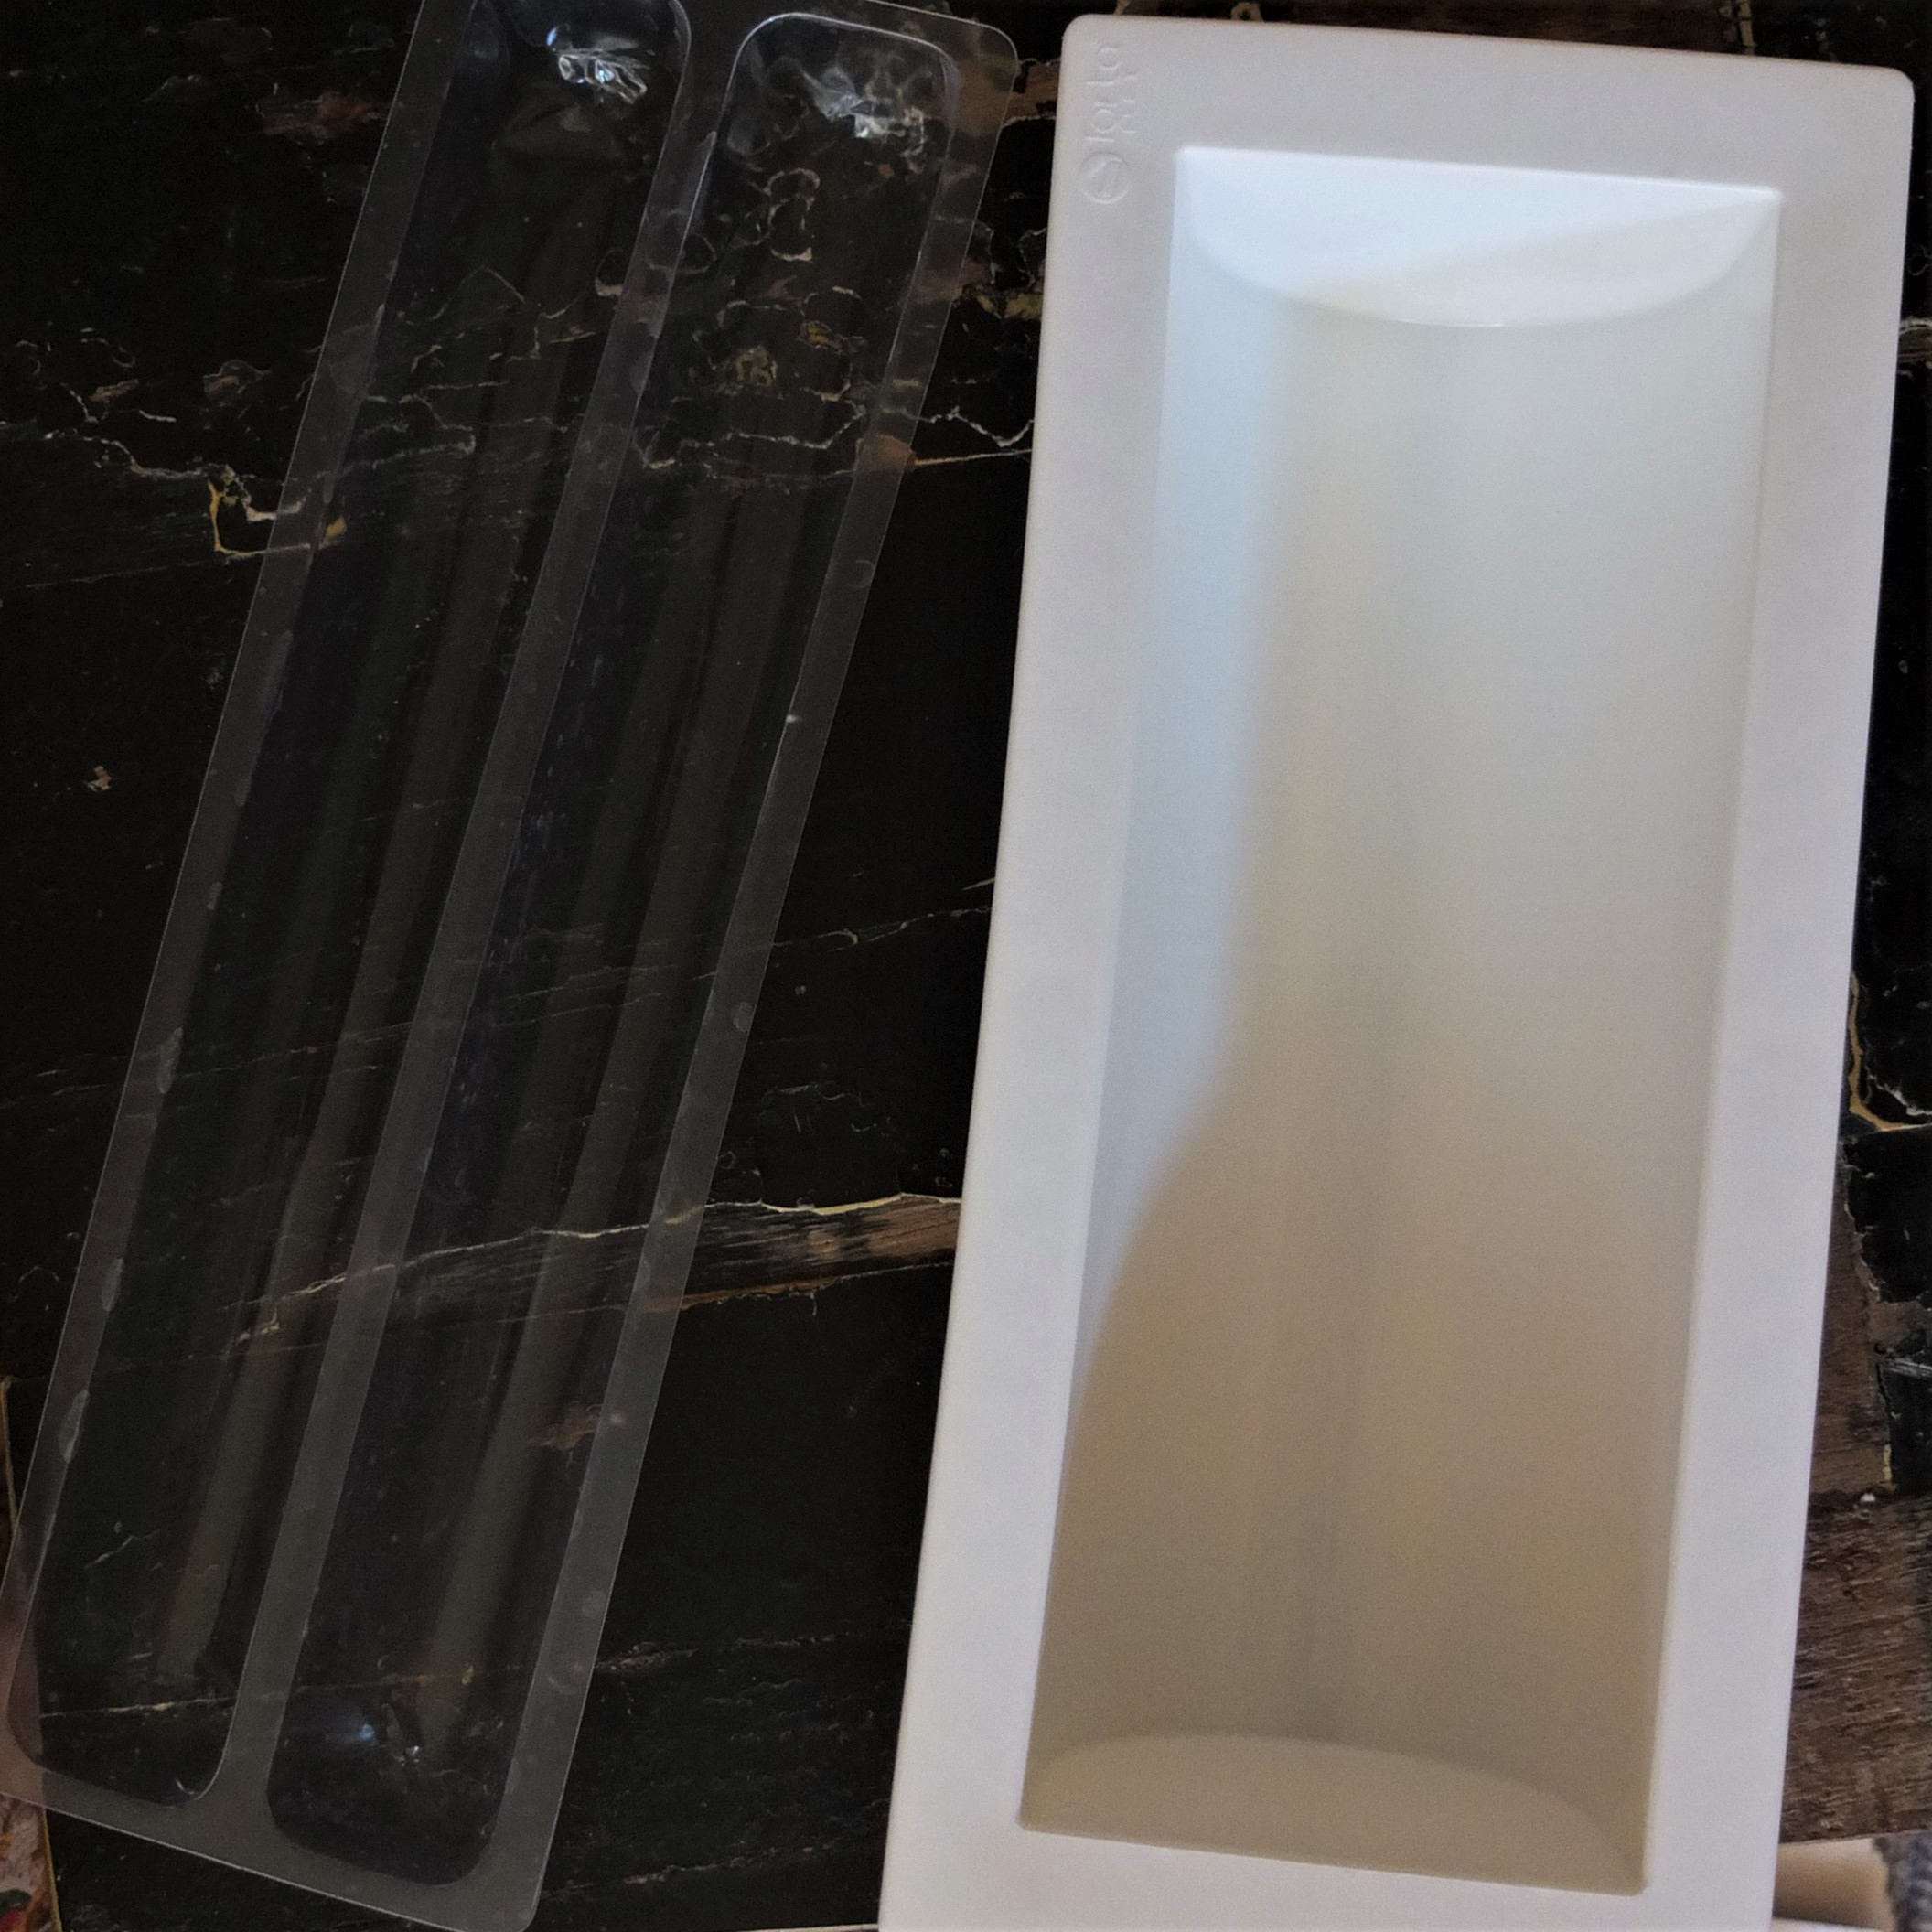
Equipment (the log cake moulds are from le Meilleur du Chef – follow links below)
- Log cake: silicone log mould and plastic mini insert log mould.

- Round entremets: cake ring (18cm/7in diametre and 6cm/2.4in high); acetate strip (6cm/2.4in wide); cake tin or ring for sponge/insert (16cm/6in diametre)
Timings
- Day 1 or up to 2 weeks earlier: insert; mandarin compote; orange and almond sponge (freeze if storing more than 2 days); optional meringue kisses/mushrooms; chocolate decorations.
- Day 2: make mousse. Place mousse, insert and sponge layer in mould, freeze.
- Day 3 (up to 1 week later also works): make glaze, unmould, glaze/decorate, serve after 6 hours.
This bûche is quite approachable as making elements is spread over several days or weeks and each element takes just 10 to 20 minutes to make (30 mins for the sponge, including baking).
If you don’t have a log mould you can use a cake ring to make a round entremets. Follow instructions for lining the ring and layering on my apricot mousse cake post.
Here’s what you’re aiming for but you can simplify and make less elements.
DAY 1 OR BEFORE
Mandarin compote (or good-quality bitter orange marmalade)

- 450-500g/16-18oz fresh whole mandarins or clementines
- 80g/4 tablespoons pure maple syrup, to taste (100g/5 tbsp if you prefer a sweeter jam), or honey/sugar if you prefer
- 1/2 vanilla pod, sliced in half horizontally with the seeds scraped out and included (optional)
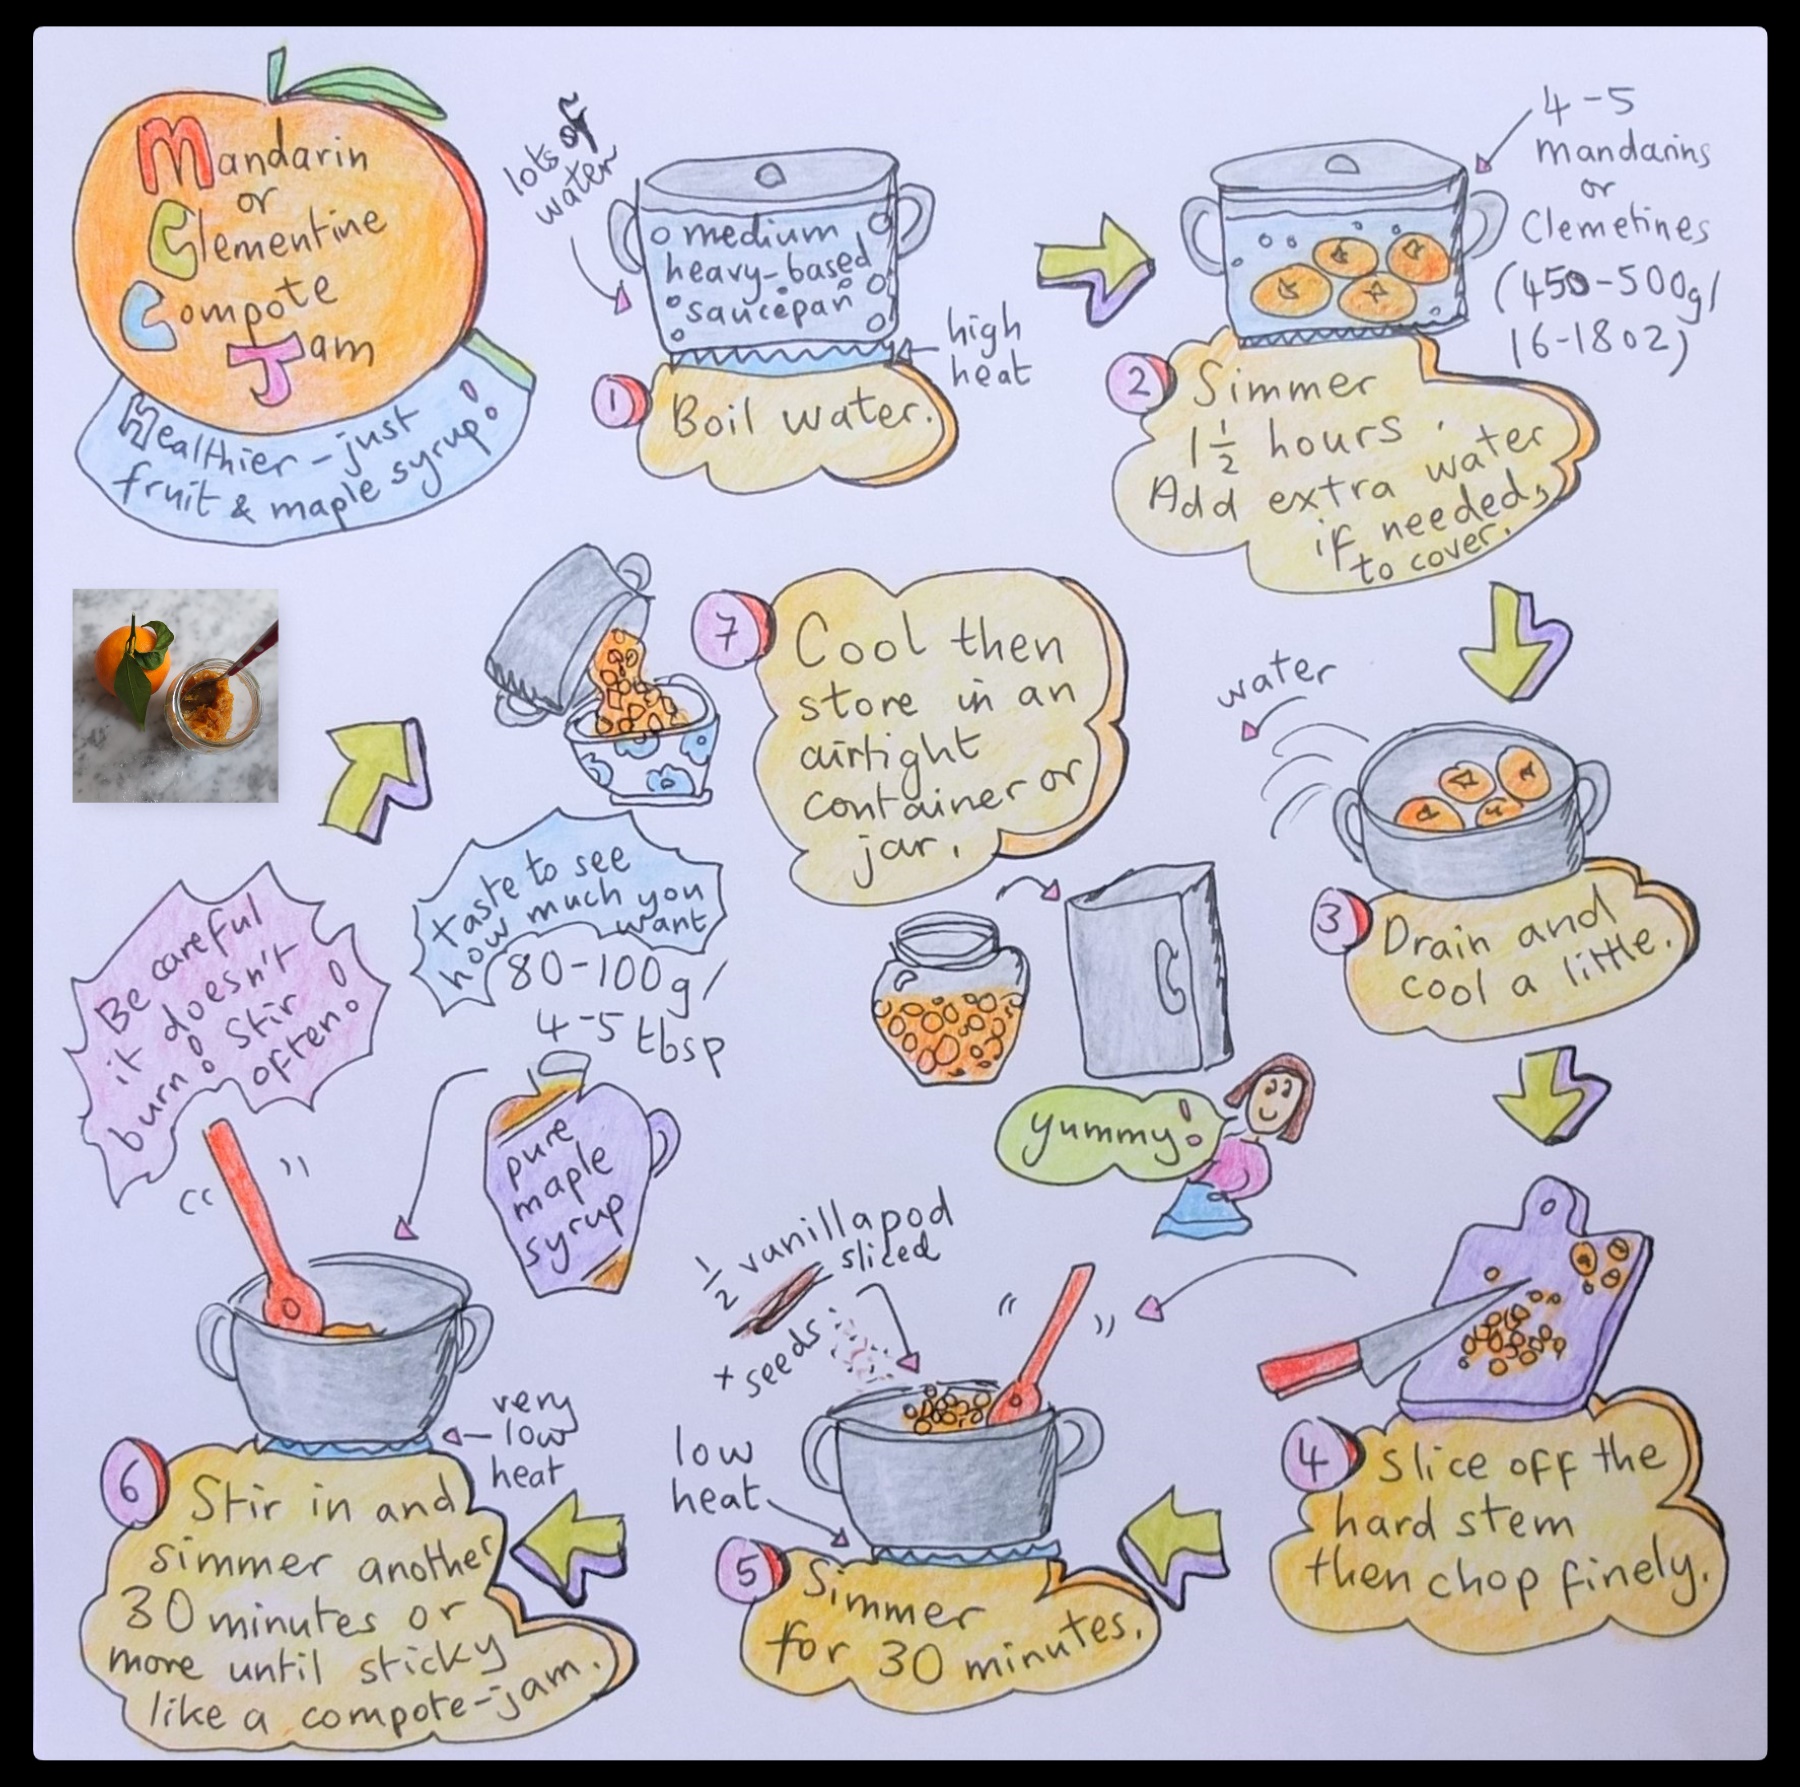
More details and photos are on the mandarin compote page in my basics section.
Insert
Notes: (i) if using Capfruit purée (with 10% sugar) weigh 125g/ml purée and 32g (2 tbsp + 1 tsp) caster sugar; (ii) you can adapt the quantity of sugar to taste or replace some with pure maple syrup – but keep a minimum 20g (1 tbsp + 1 tsp) sugar to whisk with the pectin.
Mandarin jelly
- 112g/ml mandarin juice (or clear purée with no fibrous parts)
- 45g/3 tbsp + 1/2 tsp caster/superfine sugar (use a little under half to whisk with the pectin and the remainder in the fruit purée).
- 3.5g/3/4 tsp pectin NH – can be replaced with 3 and 1/2 sheets (7g) gelatine but use the method for raspberry jelly inserts in the basics section.

Fill the insert mould half-way up or a little over, freeze around 3 hours or overnight to set then make the grapefruit jelly.
Pink grapefruit jelly – quantities as for the mandarin jelly, using the same method. Pour over the frozen mandarin jelly in the insert mould. Fill almost to the top (leaving a few millimetres for the compote). Freeze a few hours or more until set.
Mandarin compote – spread a thin layer of the mandarin compote or jam to the top of the insert mould. Return insert to the freezer to set overnight or up to 1-2 weeks until needed.
There’s just a subtle colour contrast between the three layers (could add a little pink colouring or raspberry purée to the grapefruit layer?) but the combo’s super fresh and delicious.
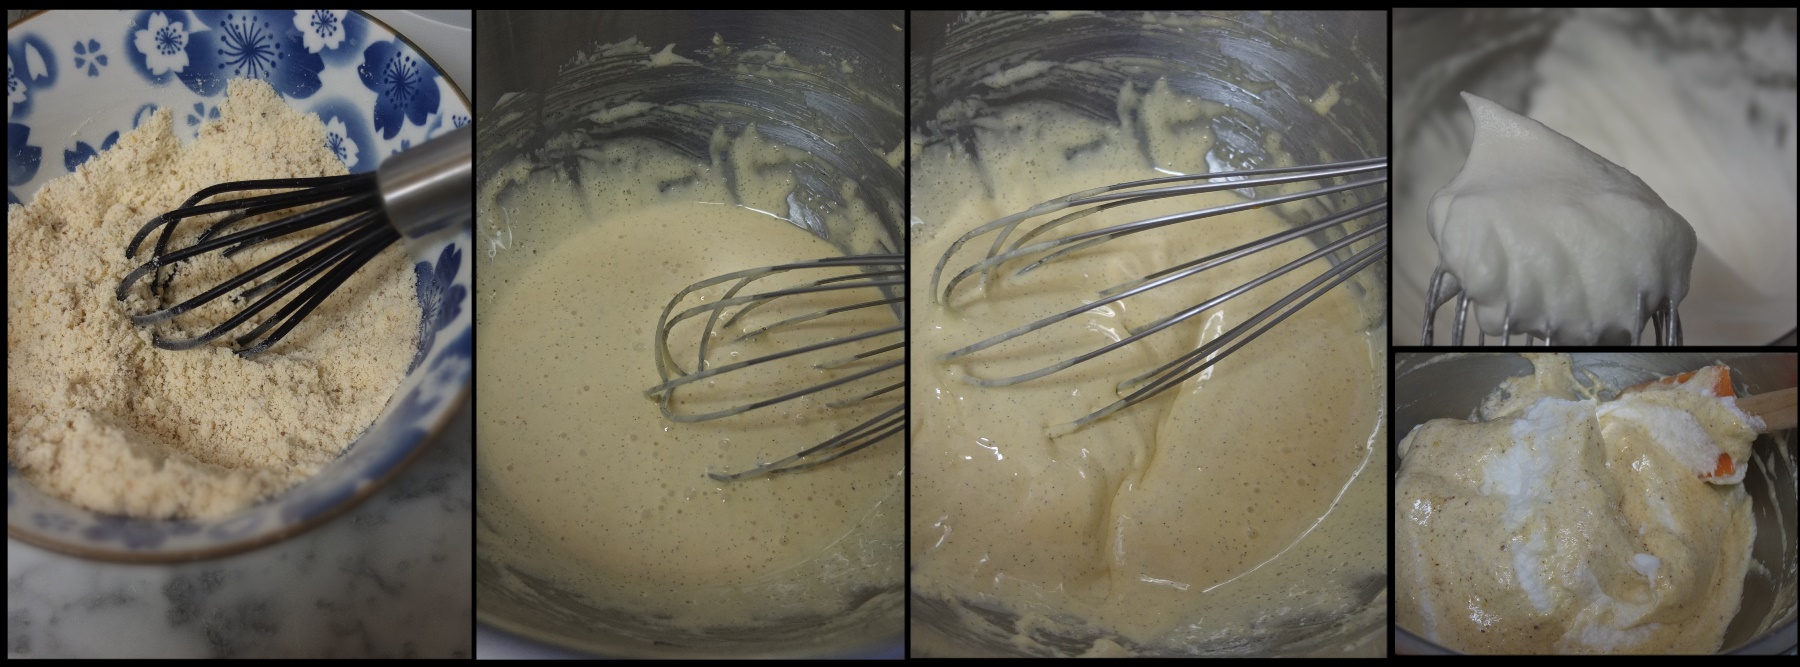
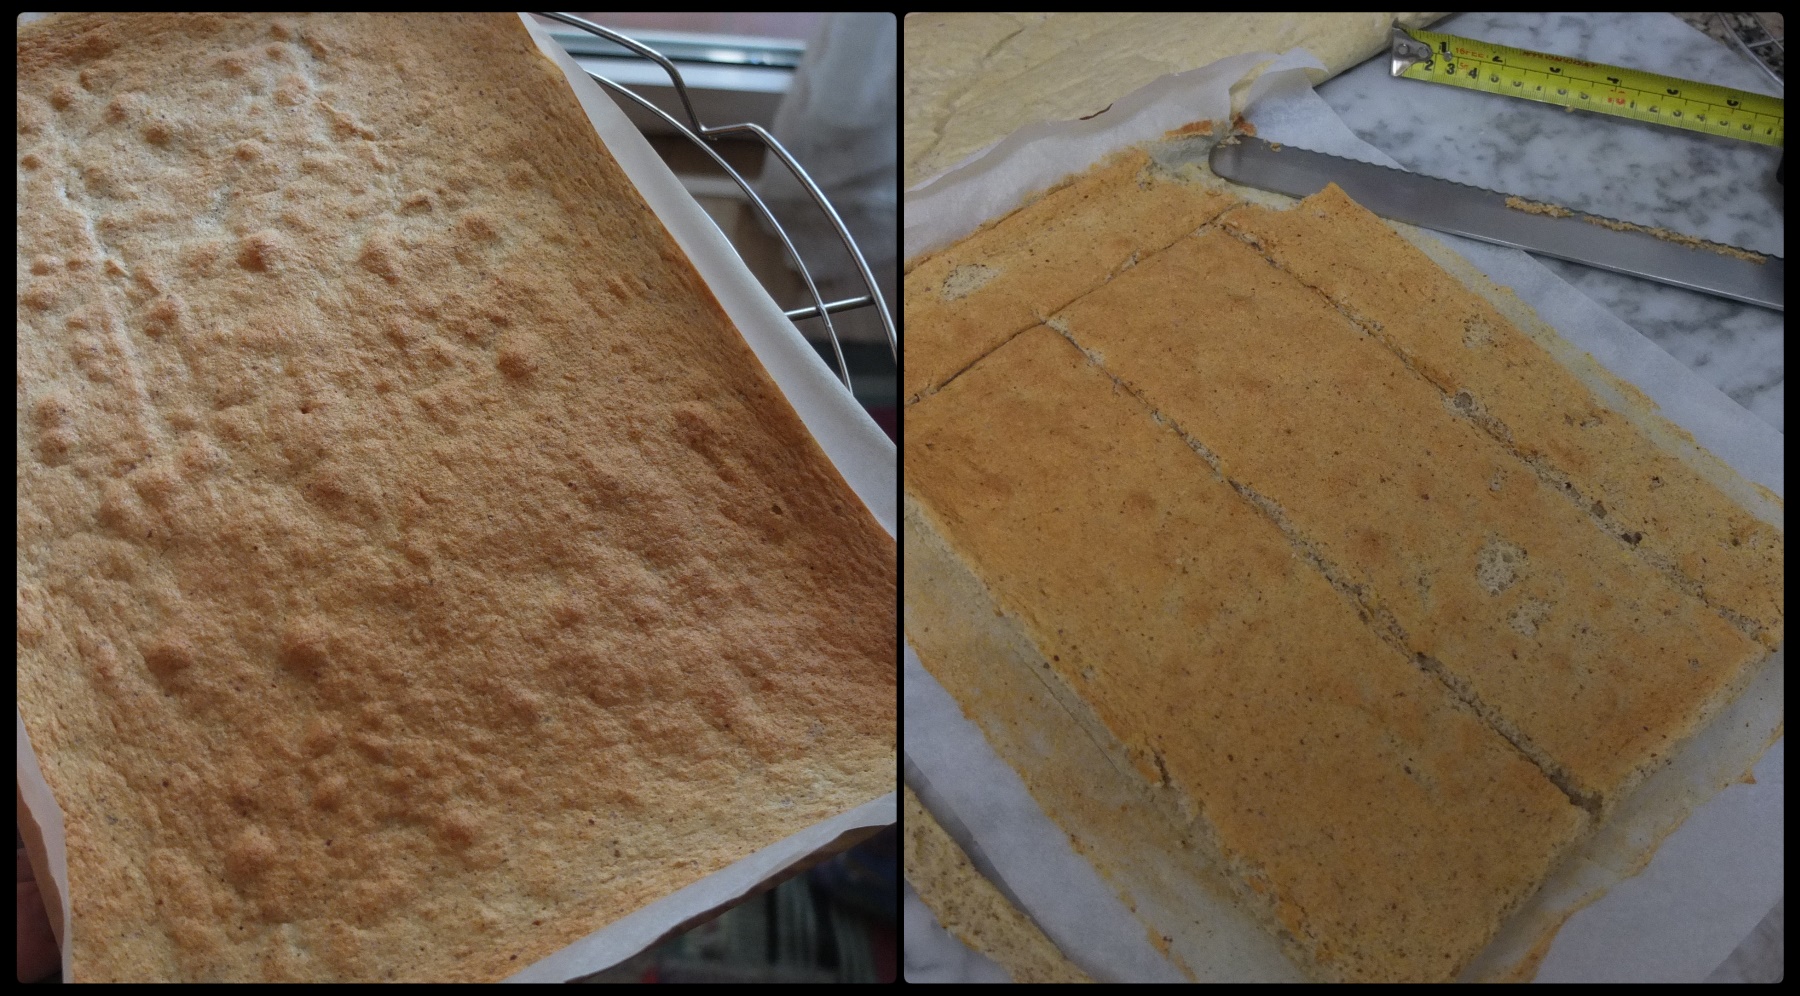
Orange and almond sponge
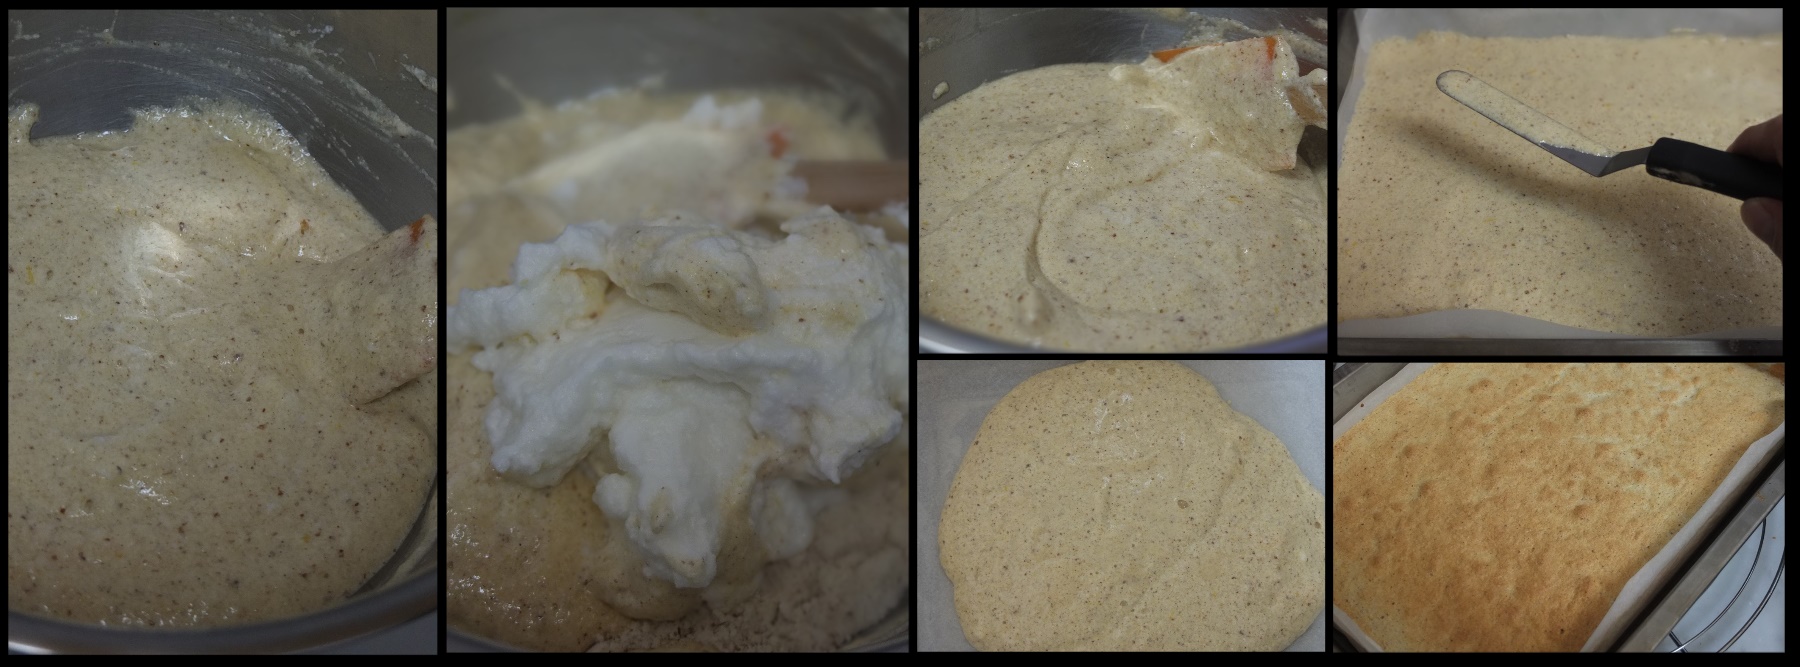
Use baking paper to line a medium-sized baking tray around 30cm x 22cm (12in x 8.5in) wide so your sponge is around 1.5cm/1/2 inch high.
- 35g/1/3 cup less 1 tsp ground almonds
- 40g/1/3 cup gluten-free flour (I used Doves Farm self-raising gf flour) or standard cake flour (1/3 cup + 3 and 1/3 tsp)
- pinch of fine sea salt
- 65g/1/4 cup + 2 tsp caster/superfine sugar (preferably golden unrefined)
- 55-60g egg yolks (about 3 yolks from medium/large free-range eggs)
- finely-grated zest from 1 orange or lemon
- 1/2 – 1 tablespoon freshly-squeezed orange or lemon juice (might need just 1/2 tbsp with standard cake flour)
- 25g/1 tbsp + 2 and 1/3 tsp caster/superfine sugar (preferably golden unrefined)
- 145g/ml egg whites (about 3 and 1/2 whites from medium/large eggs)

Tips:
- Have no yolks traces in your egg whites and the bowl must be very clean or they won’t whisk up well (for soft and stiff peak see basics section).
- glutenfree flour usually requires more liquid so for plain/cake flour add 1 tablespoon extra flour and/or use less juice. Your final mixture should have the typical ‘dropping’ consistency (mixture is thick and fluffy but loose enough so when scooped up with the spatula it slowly drops into the bowl).
Cool the sponge completely on the baking paper then store loosely wrapped in a plastic bag at room temperature or in the freezer (freeze on a tray first then wap tightly in plastic film). The sponge can be inserted frozen in the cake.
Optional decorations (can make on Day 2)

Chocolate curls: follow instructions on my chocolate lollilops post with useful videos and info on mycryo cocoa butter for easy, reliable tempering (chocolate tempering pages: mycryo cocoa butter, ice-bath or spreading method).
Chocolate ends for the log: crumple a large sheet of baking paper into a ball then smooth out. Spread the tempered chocolate thinly and evenly on the paper, wait till it turns satin-like and doesn’t stick to your finger. Cut 2 squares (9cm x 7cm/3.5in x 2.7in). Make extra squares in case of breakage. Allow to set covered with another sheet of baking paper and heavy baking tin (see making chocolate decorative shapes).
Meringue kisses and mushrooms: make a small quantity following your own recipe or this meringue recipe in the basics section. Natasha’s Kitchen has nice instructions for making meringue mushrooms.
DAY 2
Preparation
Before making the mousse…
Cut a rectangle (8cm x 25cm/3in x 10in and about 1.5cm/0.5in high) in your sponge to fit inside your mould. Make it 24cm/9.5in long if not using chocolate ends. Cut another rectangle and freeze the extra sponge for a future cake.
Prepare your disposable piping bag if using. Cut your frozen insert to the same length as the sponge.
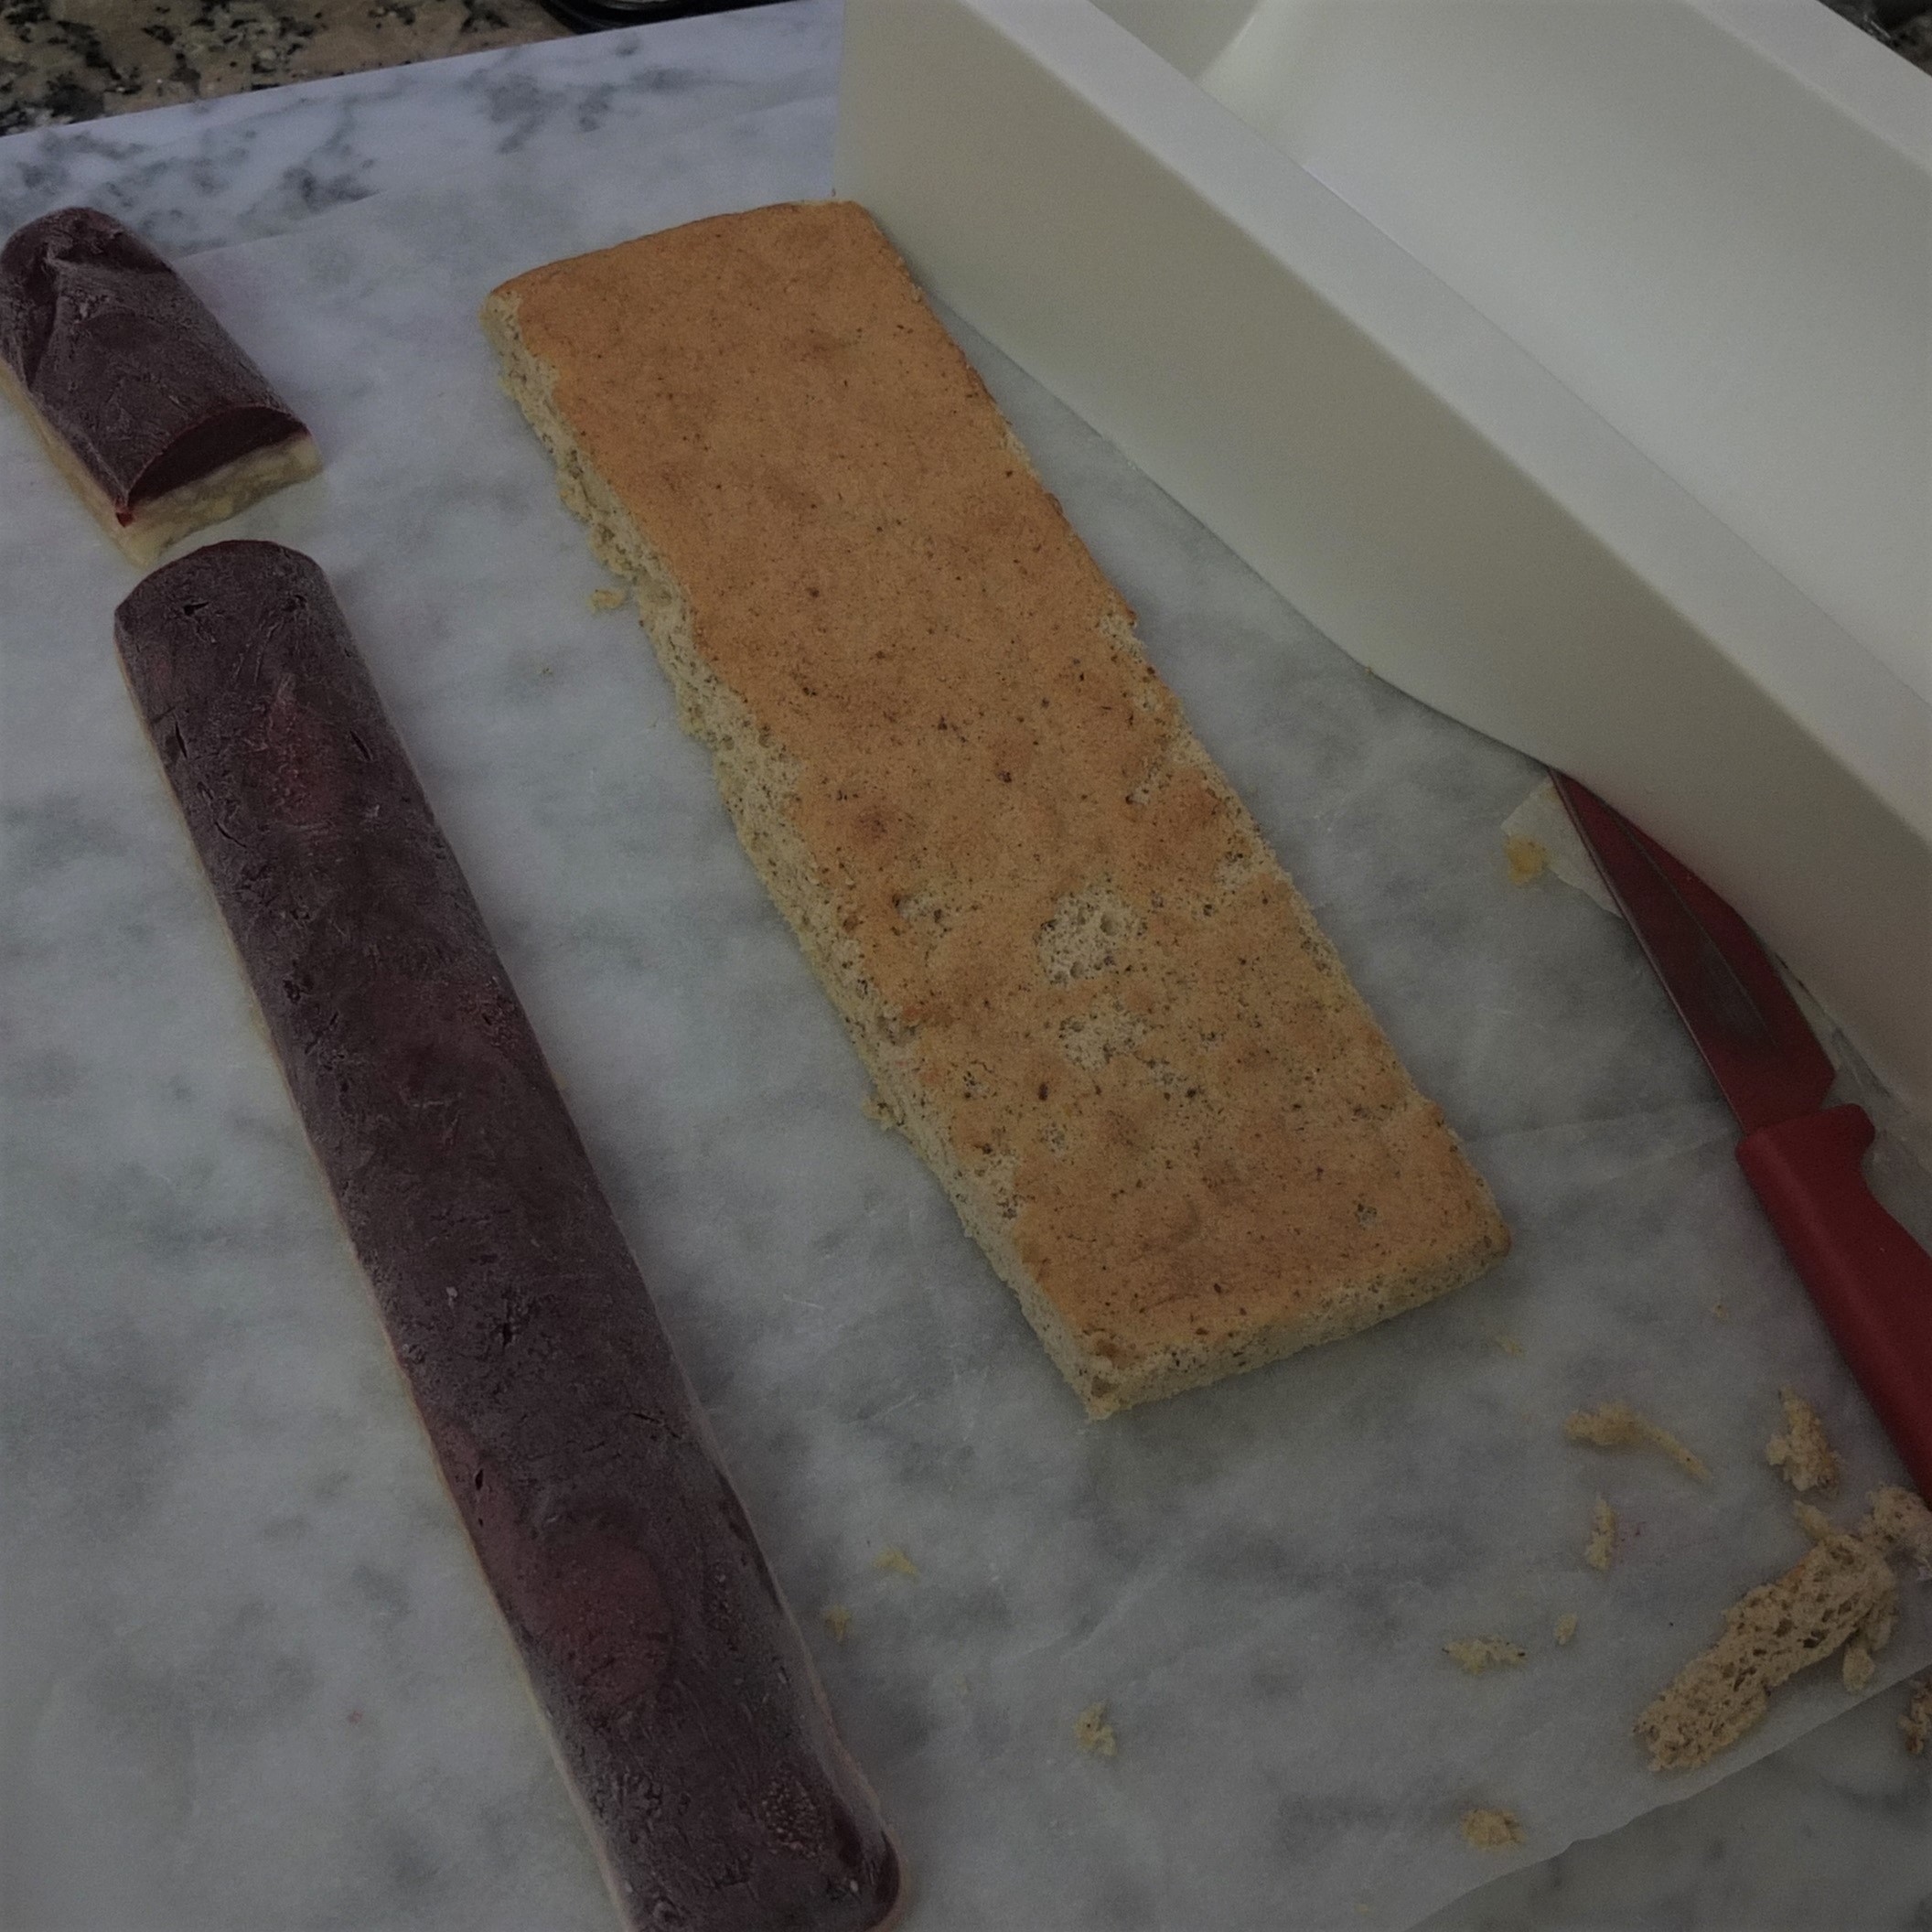
Return insert to freezer. Set out a small offset spatula or metal tablespoon, and piping bag if using. Make mousse.
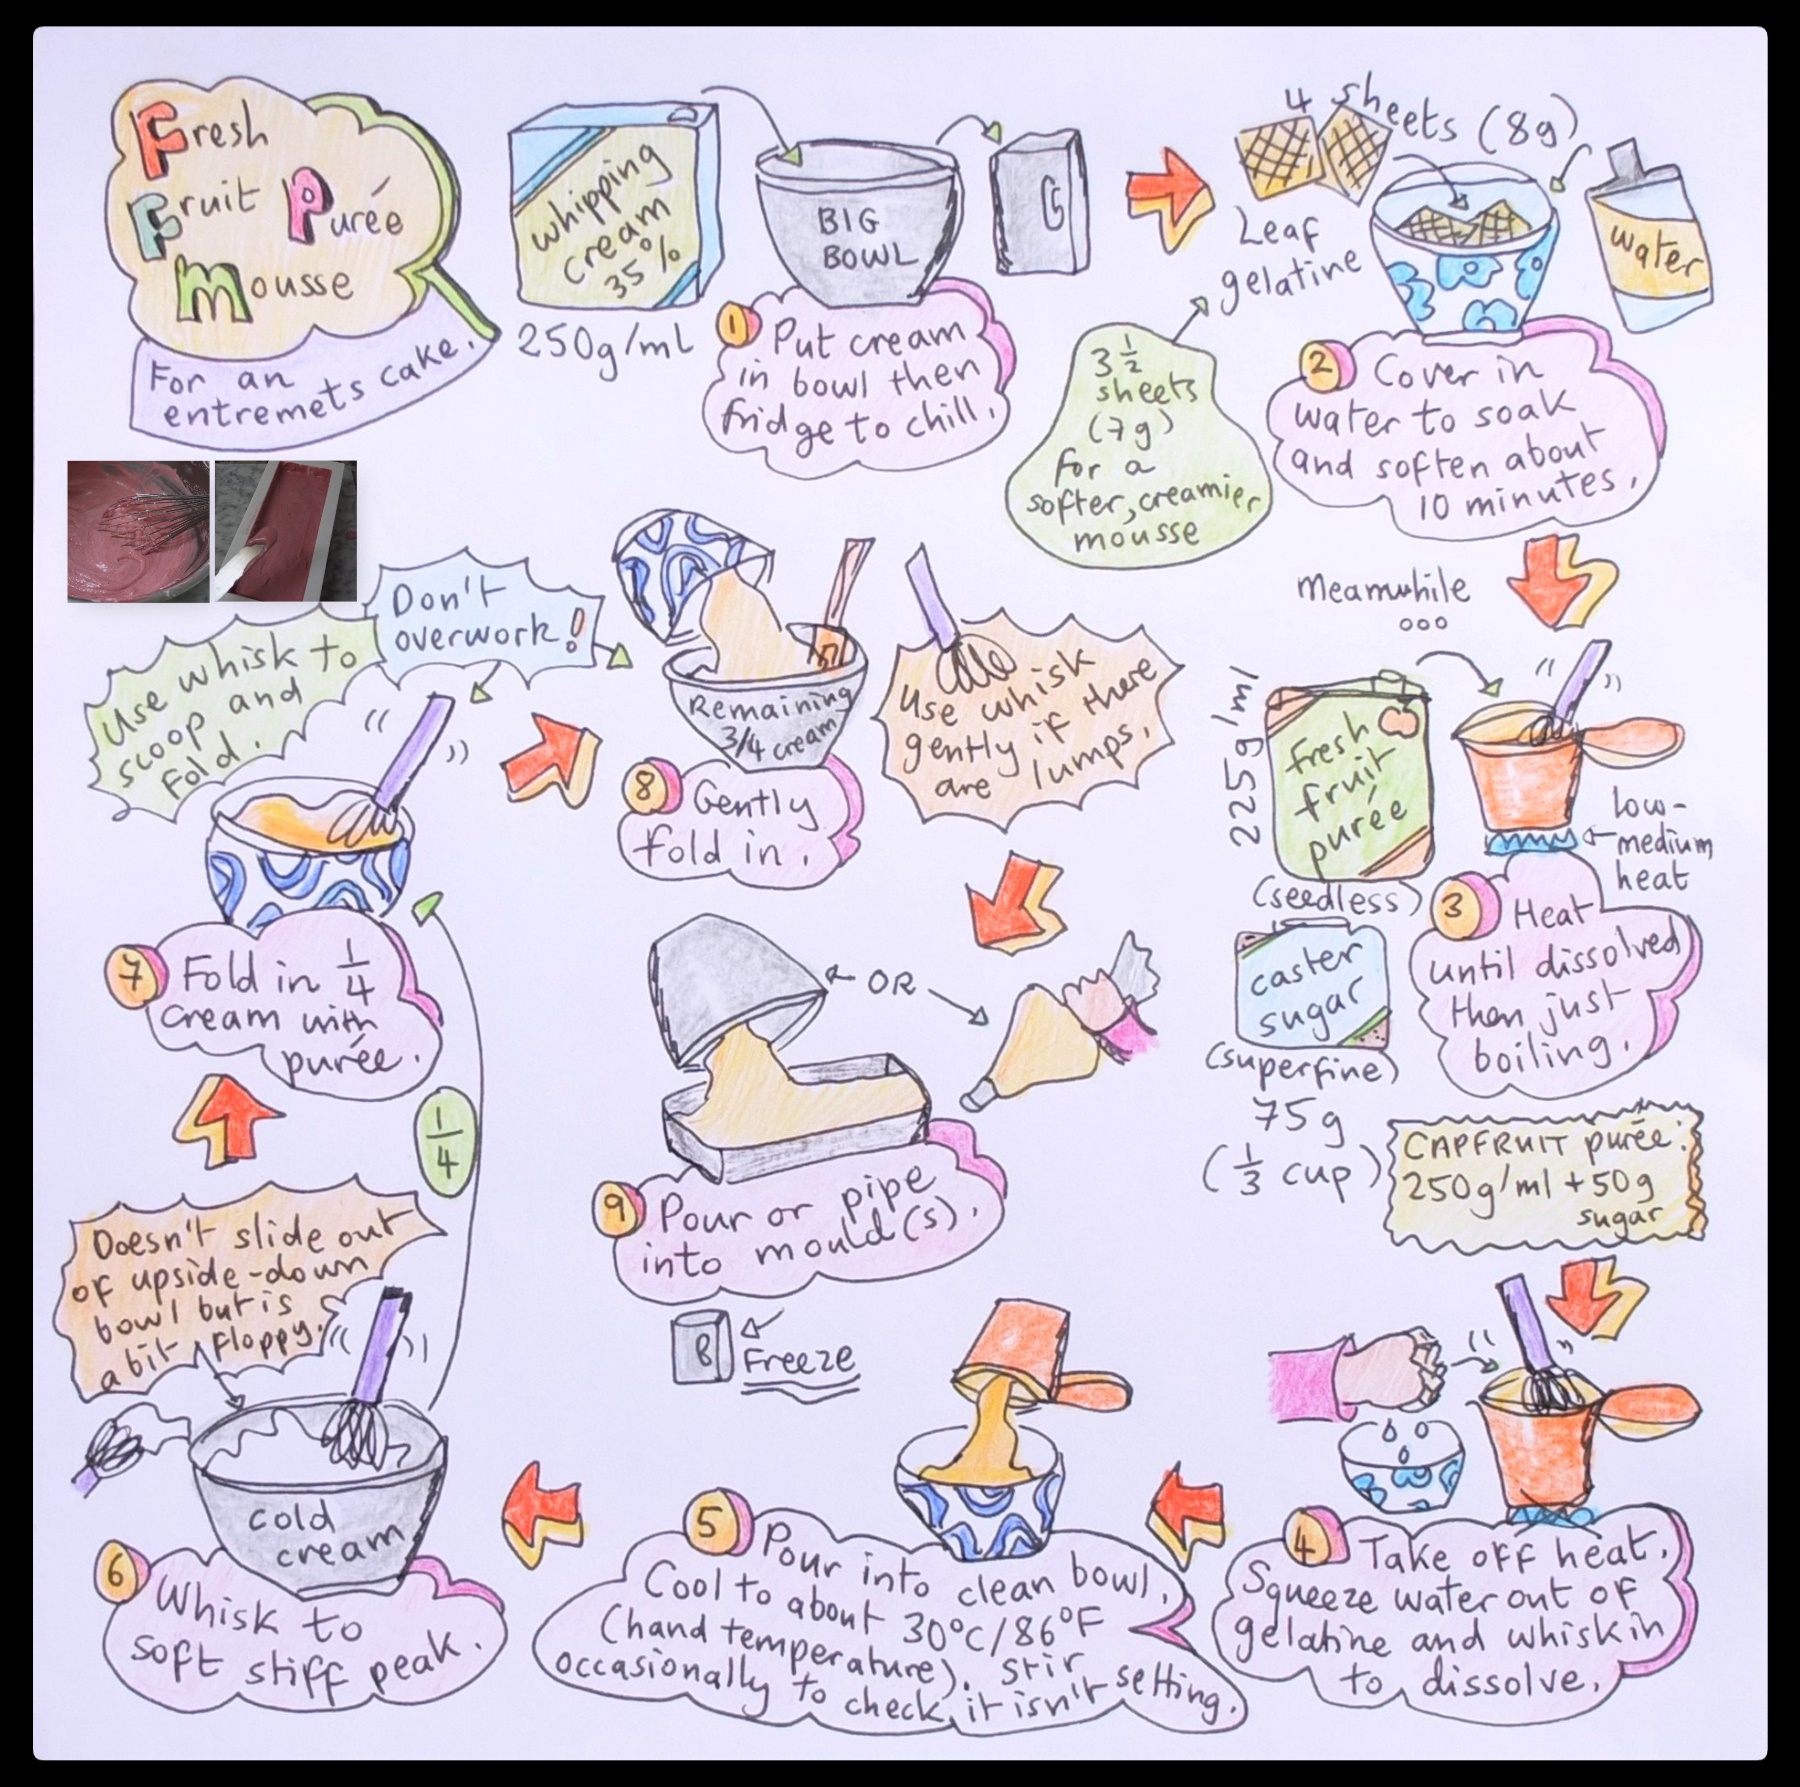
Mandarin mousse
Note: if using Capfruit purée use 250g/ml purée and 50g (1/4 cup less 1 and 1/4 tsp) caster sugar
- 250g/ml liquid whipping cream (35% fat)
- 4 sheets of leaf gelatine (8g) – could use 3 and 1/2 sheets (7g) for a creamier mousse
- 225g/ml fresh mandarin (or clementine) purée
- 75g/1/3 cup caster/superfine sugar
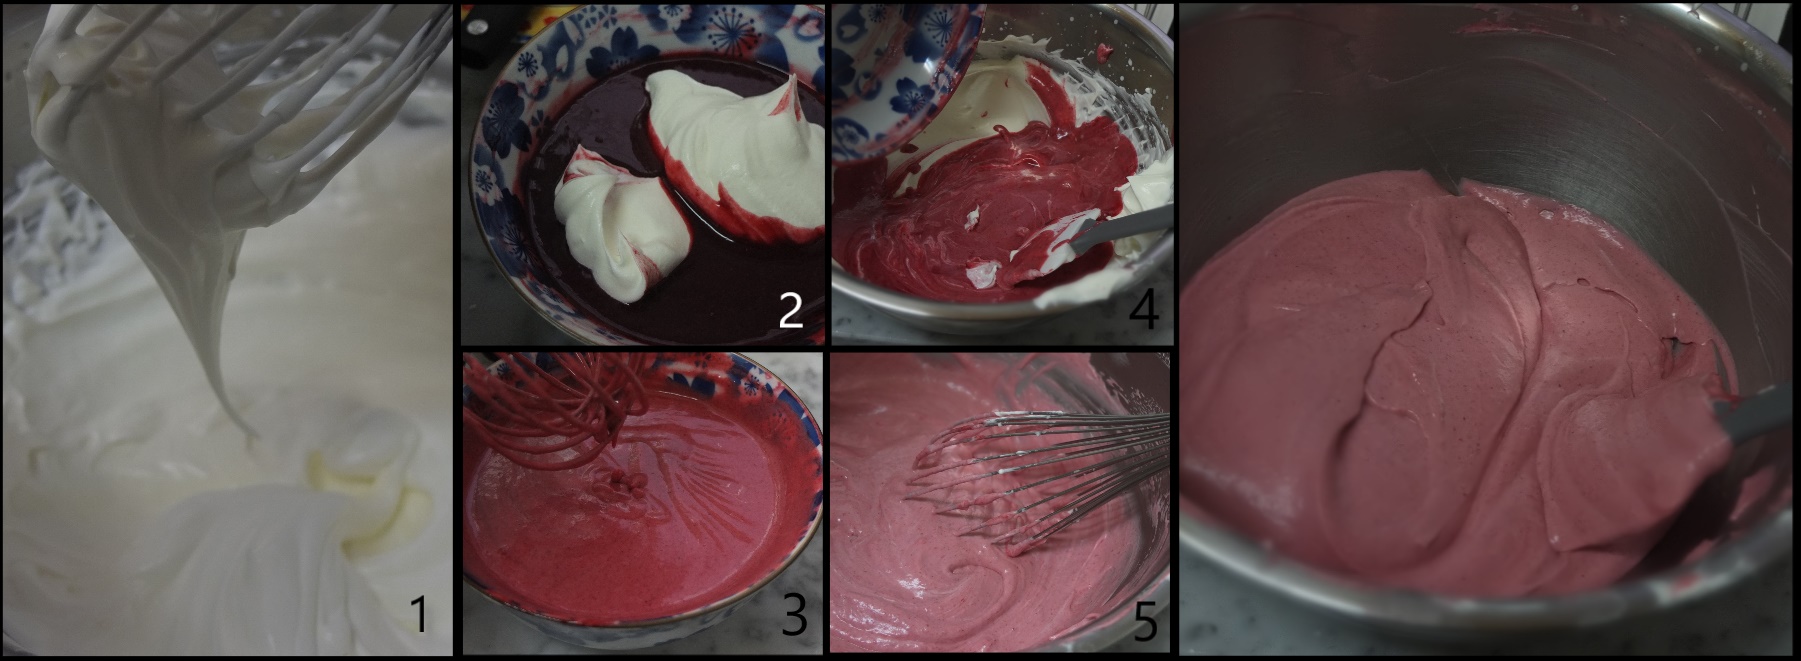
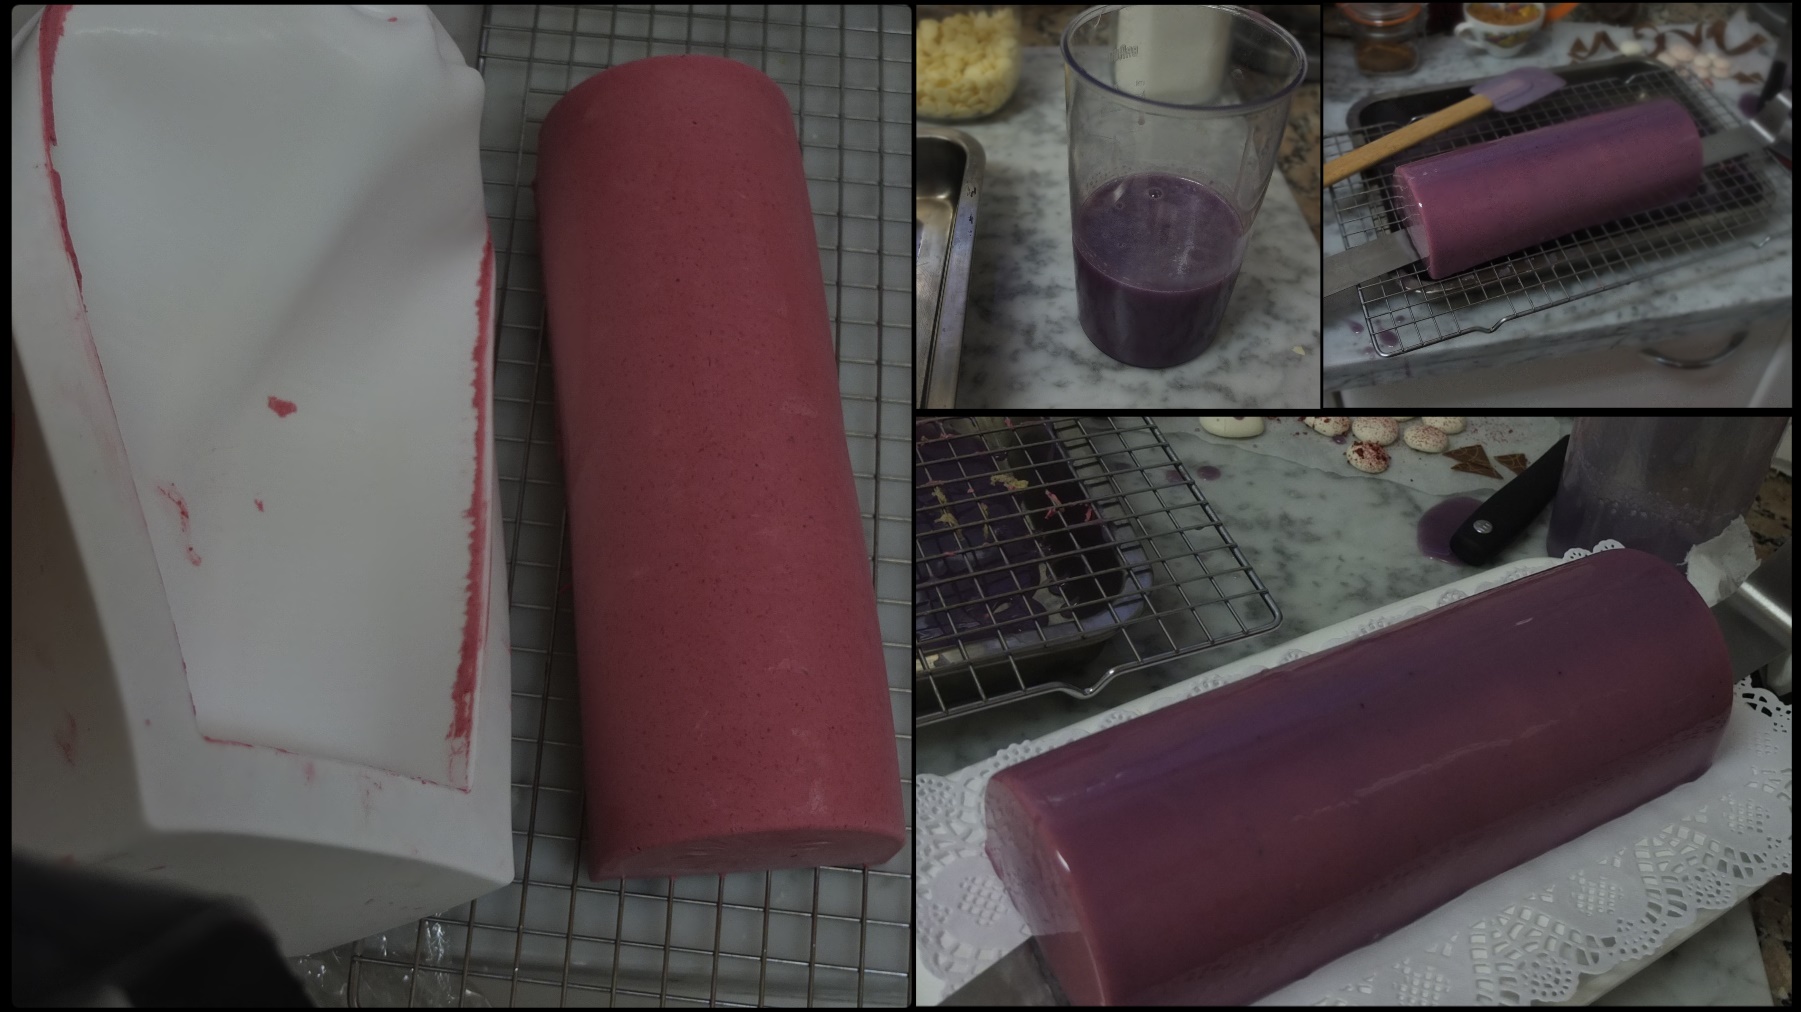
Note: process photos are of the blackcurrant-raspberry version.
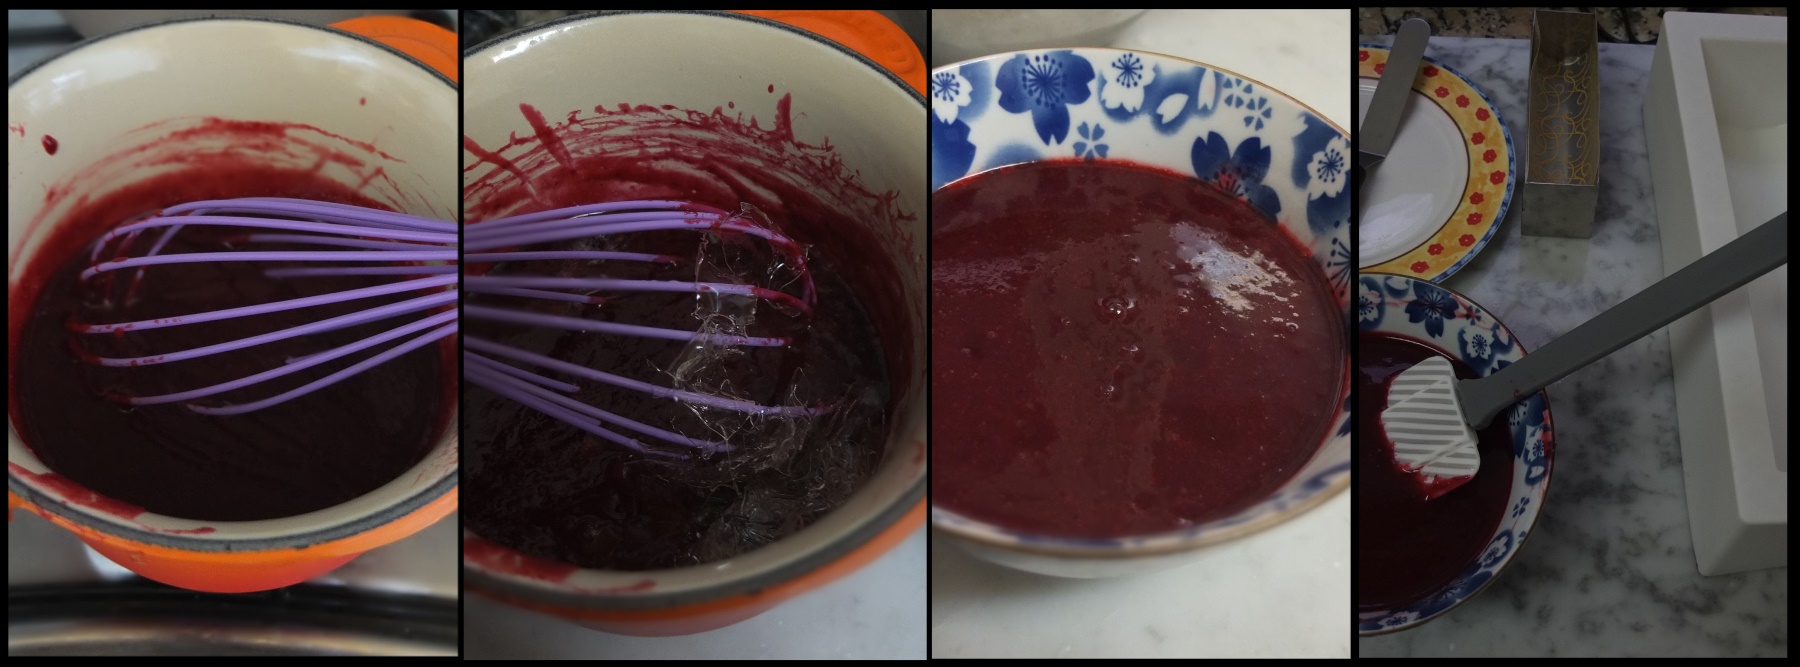
Pour almost immediately into your mould, just waiting until a little thicker but still pourable and not setting.
Assembly
- 1 – 1.5 tablespoons Grand Marnier orange liqueur or freshly-squeezed orange juice, to taste
A Just in Cooking video shows a similar process: log cake on youtube (watch from 5:48) – in French but it’s pretty self-explanatory.
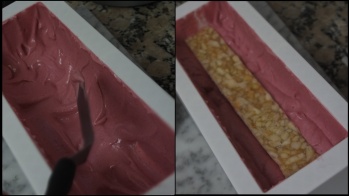
- Pour or pipe the mousse at the bottom of the mould. Use a small offset spatula or back of metal spoon to push a little mousse up the sides – this gives neater sides. Freeze 10 minutes to firm up before placing the insert. Make sure that meanwhile the remaining mousse isn’t setting. Note: I haven’t been doing the freezing part (it wasn’t taught on the course) and my insert has been sinking off-centre – next time I’ll freeze.
- Gently place the insert in the middle.
- Cover with the remaining mousse almost to the top.
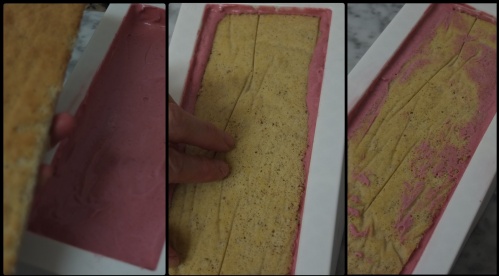
- Brush the sponge rectangle with the Grand Marnier orange liqueur or orange juice. Don’t oversoak or it will fall apart. Carefully place on top of the mousse. Smooth if necessary.
- Freeze overnight or 1-2 days before unmoulding (3-4 hours is possible but riskier).


DAY 3
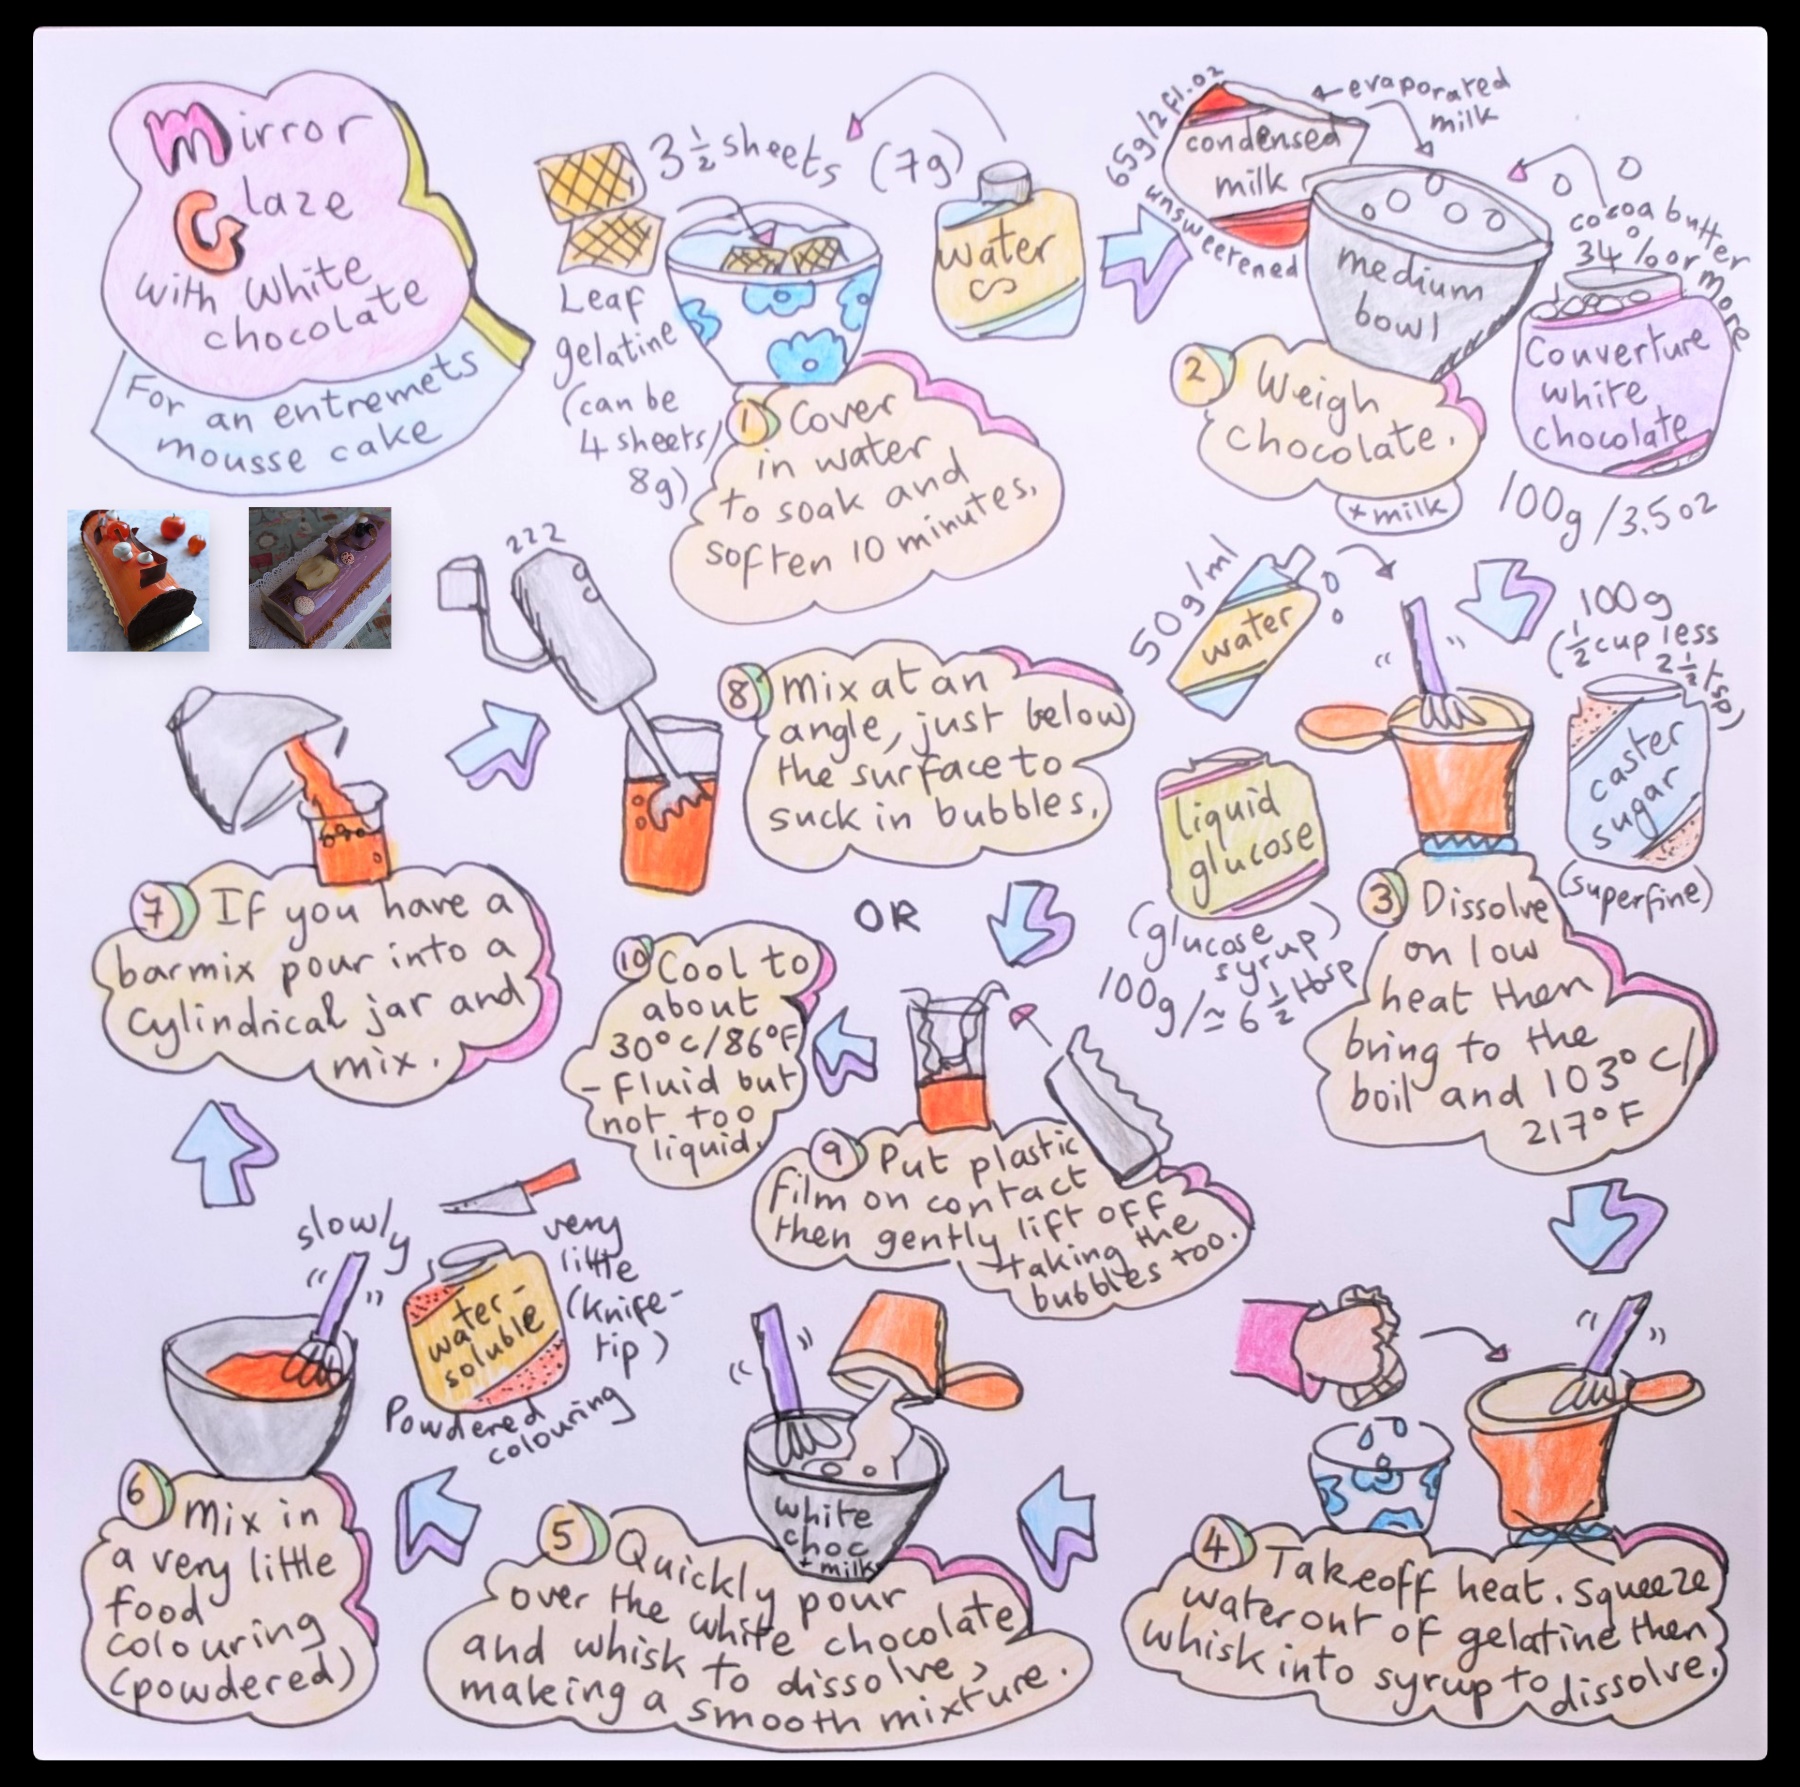
Mirror glaze
- 3 and 1/2 sheets leaf gelatine (7g) or 4 sheets (8g)
- 100g/3.5oz good-quality couverture white chocolate (34% cocoa butter minimum)
- 65g/ml (2fl oz.) unsweetened condensed milk (evaporated milk)
- 100g/1/2 cup less 2 and 1/2 teaspoons caster/superfine sugar
- 100g/approx. 6 and 1/2 tablespoons glucose syrup
- 50g/ml mineral water
- a very slight knife-tip of powdered orange food colouring (or red + yellow) or Wiltons gel

See a simple demo on the Just in Cooking video (watch from 6:33 to 8:18). If you get bubbles here are some tips:
- If using a bamix (star attachment) keep it under the glaze to avoid making bubbles. Tip it at 45º just below the surface to create a whirpool sucking in bubbles. If you don’t have a bamix then after combining with a whisk switch to a rubber spatula and stir slowly.
- You can leave the glaze in the fridge overnight to help eliminate bubbles. The next day warm again to the correct temperature.
- Alternatively carefully place a sheet of plastic film on top of the glaze on contact then gently lift it off and bubbles will come off with the plastic film. Lift out the remaining bubble or two with the tip of a teaspoon.

- The glaze must be at the correct temperature and consistency: fluid but not too liquid. This is usually at around 30ºC/86ºF (hand temperature). If it’s too cold and starts setting then heat very briefly using a microwave or bain marie. Don’t whisk as this causes more bubbles. Stir gently.

Option: use the simple neutral glaze in my basics section, coloured orange.
Final decoration
There’s a similar process in the Just in Cooking video (7:44 – 8:17) – Justine’s pouring’s erratic and works but .. er.. try doing it more systematically.
- Place a wire rack on a fairly deep and clean baking tray (this catches glaze drips to scoop out and reuse).
- Set out your rectangle cake plate/base and decorating elements: the glaze at the correct consistency, chocolate ends (if using) and curls, etc.
- Unmould your log, pulling the silicone carefully back from one end.
- Place the log on a long offset spatula, on the wire rack (with another offset spatula at the other end if possible).
- Start at one end and pour the glaze, zigzaging back and forth over the cake while going backwards and covering the whole cake and other end in just one go. Check the sides to make sure the glaze is covering everything. Note: you should try to pour the glaze in one go otherwise it could get lumpy – but if your glaze is quite liquid you could go over it again.
- Allow to set a few minutes then use the long spatula(s) to rotate the cake a little on the rack (this neatens the bottom edges). Lift your cake onto the serving plate or base.

- Decorate. When placing decorations try to get it right first time as pulling them off can spoil the glaze. Cover any imperfections with decorations. If your chocolate rectangles are flawed you could carefully round off the edges.

Eating and storing
Place the glazed log to defrost in the fridge a minimum 6 hours before eating – the cake keeps in the fridge up to 3 or 4 days. It also freezes really well in airtight tupperware, ideally up to 2 weeks (2 months maximum).
Well that’s the slightly epic mandarin mousse log cake or bûche for you! I’m rather fond of the shape – it’s so easy to slice and eat! Mum really loves this cake. I really love it. Happy sigh… it’s a light entremets that’s easy to adapt with different fruits and flavours and great all year around, not just for Christmas! Mandarins or clementines are deliciously refreshing in cakes! Shall I cut us a slice …? 😉
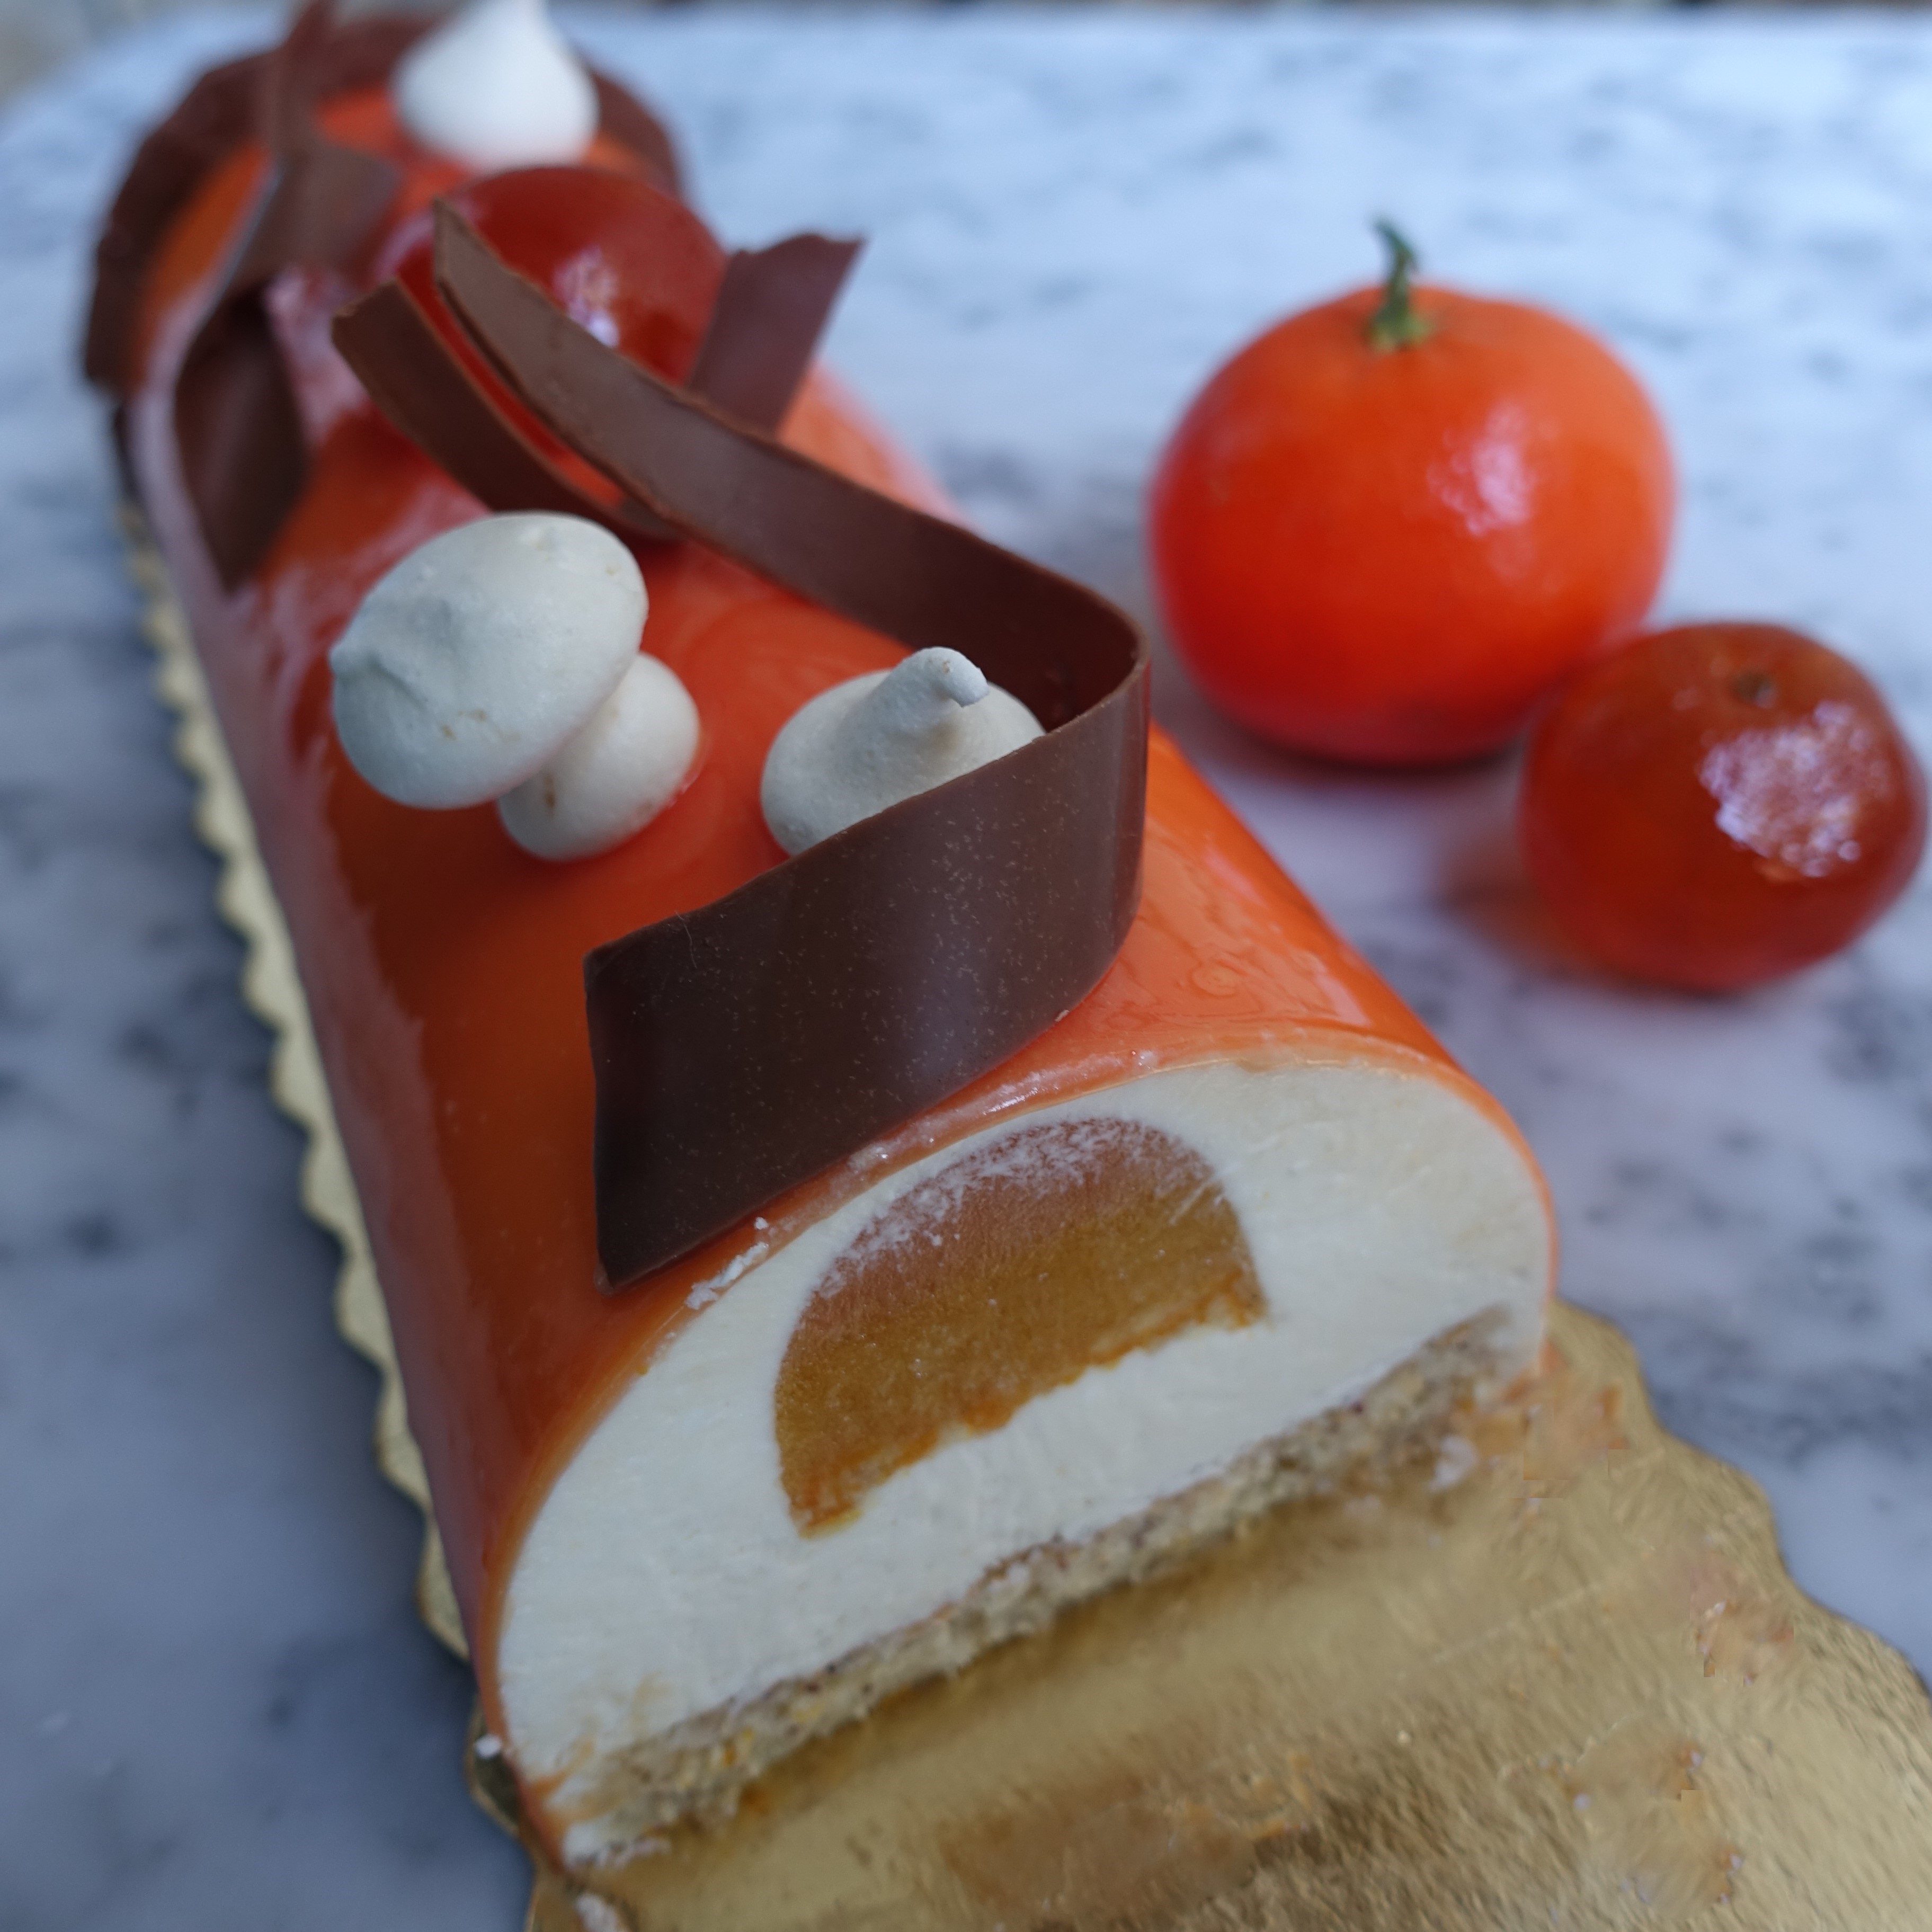
‘Mazing mandarin citrus mousse logcake
Bye for now and thanks for making it this far down the rather long post dear reader! Wishing you a lovely week ahead with some epic baking and eating! 🙂 Lili x

😲! So you have your own bakery?
LikeLiked by 1 person
I wish! Thanks for the compliment Ralu! No, I just eat a lot of cake and give some to friends and family. 🙂
LikeLike
Lucky friends and family! Your cakes are so beautiful!!! You should open a bakery
LikeLike
This is so beautiful Lili, amazing! It also sounds very delicious!😍
LikeLiked by 1 person
Thank you Ursula! 😍Happy you like the cake, it’s a favourite. 🙂
LikeLiked by 1 person
WOWZA!!! That’s so elaborate! It looks and sounds so good!
LikeLiked by 1 person
Aw thanks Deborah! 😍It’s quite straightforward to make if you have the two moulds, if you’d like a bûche of your own… !? I do love this cake.. 🙂
LikeLiked by 1 person
Wow ! This is amazing, I don’t think I would be able to do what you have done here, even in my wildest dream. 🙂
LikeLiked by 1 person
Thank you Megala! 😍 Happy you like the cake and you could make this, seriously! 👍We made it (some of us beginners) at a workshop one morning. It’s quite straightforward if you have the log and insert moulds – just make a simple insert with one fruit purée the night before. Not just a cake dream! 😉 🙂
LikeLiked by 1 person
I would like to try along with my cousins, when they visit here ! Let me see !! 🙂
LikeLike
Hey that’s great! Hope you do and have fun with it. ..if you give it a go let me know! 🙂
LikeLiked by 1 person
Sure, will do !
LikeLiked by 1 person
Looks great and yum 🙂
LikeLiked by 1 person
Thank you! 😍 Wish you could have some..!
LikeLiked by 1 person
such a wonderful recipe. cake looks amazing and delicious..
LikeLiked by 1 person
Aw thank you Neetha! 😍 Happy you enjoyed the recipe and cake – wish you could have some! 🙂
LikeLike
Pingback: Happy new year!!! Top posts in 2017 and baking projects for 2018… And how are healthier and vegan cakes doing? :) | lili's cakes