
Millefeuilles are absolutely heavenly. Imagine light flaky layers of puff pastry interspersed with clouds of creams. These little inventions have a layer of crème pâtissière flavoured with matcha green tea balanced with creamy white chocolate. Then there’s chestnut cream in the second delicious layer lightened with whipped cream. A treat for your taste buds. You can use homemade inverted puff pastry or good quality all butter shop-bought puff pastry. This recipe is fast and easy if you’re careful flattening and cutting the pastry. A visiting friend (aka cake tester) announced decisively that so far from all my cakes these are her favourites! And not too sweet with that hint of matcha bitterness. Eureka! And hurray for matcha, white chocolate and chestnut millefeuilles! So light and delicious no-one can refuse a second helping – not even a health-conscious friend. And definitely not me. Tee hee. 🙂

matcha white chocolate and chestnut millefeuilles
THE RECIPE – makes 8 individual millefeuilles
I was very surprised this millefeuilles experiment turned out beautifully first time. They have that lightness and subtlety of flavour I associate with my favourite Japanese pâtisserie in London. Partly because I forgot to add the rum used in my original chestnut mousse recipe! A happy accident. Actually there was also an unhappy accident no cream cake could survive unharmed. I’ll show you the photo later.
Timings
You can make the matcha white chocolate crème pat and chestnut mousse the previous day or at least 2 or 3 hours before assembling the millefeuilles. The creams need to be cool and firm enough to hold when piping balls. Serve the millefeuilles as soon as possible because the puff pastry can becomes soft. But you can keep some in the fridge for the following day, when I found mine were still delicious and the pastry still fine too.
Puff pastry layers
I recommend wonderful inverted puff pastry but good quality shop-bought all-butter puff will also be delightful. If you’re making it, the instructions are on my inverted puff pastry page – the quantities there make 800-810g of pastry so just use about half and freeze the rest for another cake! I used around 410g of puff.
- 400-450g/14-16oz homemade (inverted) puff pastry or shop-bought puff pastry
To make 8 millefeuilles with 24 rectangles (3 rectangles for each millefeuille)
- Flour a piece of baking paper very lightly, on a flat working surface
- On the baking paper, with half your pastry roll out a rectangle about 2mm thick (or a little less) measuring 29cm x 18cm (or 11.5in x 7in). The sides should be straight but not necessarily perfect because you’ll trim them with a knife later. Repeat with a second rectangle. Two rectangles are easier to handle and bake than one big rectangle – you can bake them separately if your tray isn’t big enough for both.
- Place on your baking tray and prick all over with a fork
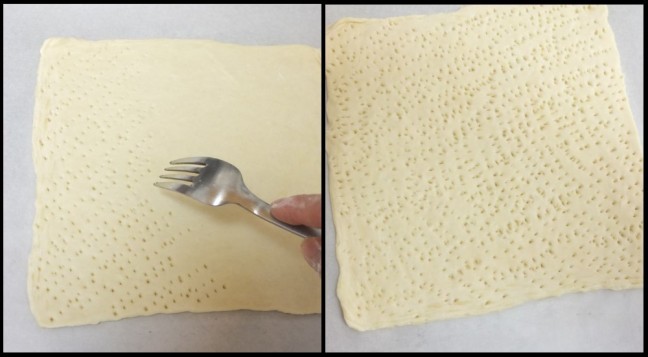
- Put in the refrigerator to chill 2 hours or more (okay, 1 hour if you’re in a hurry)
- During this time preheat your oven to 220°C/425°F (static, non-convection oven) or 200°C/400°F (fan-assisted/convection).
- When ready to bake, place a sheet of baking paper on the pastry and a baking tin on top with something heavy (and oven-proof) in it, like a creuset saucepan lid! This is so the pastry layers stay nice and flat when baking and don’t puff up into unmanageable little pillows. A brick probably works too.

- Lower to the oven to 200°C/400°F (static, non-convection oven) or 180°C/350°F (fan-assisted/convection) and put the pastry in the oven to bake 30 minutes. If your tray on top isn’t very big you might find the outer edges brown first and after 30 mins mine looked like this (not a problem). The photo is from batch 2 of my millefeuilles, in case you’re wondering why it’s a longer rectangular shape.

- Take your pastry out of the oven and remove the tray and paper on top. Lower the oven to 180°C/350°F (static, non-convection oven) or 160°C/320°F (fan-assisted). Put your naked pastry back in the oven to bake another 10 minutes until it’s a nice brown colour all over. The pastry actually tastes better if brown (with no slightly undercooked pale bits).
- Take out and cool on a wire rack.
- If you’re baking the second rectangle separately, repeat the process from no. 5 to 9.


Matcha white chocolate crème pâtissière (pastry cream)

- 300g/1 and a quarter cups full-fat milk
- Half a vanilla pod (scrape the seeds out then use both the seeds and the pod)
- 3 egg yolks – around 57-60g (freeze the whites or make macaron shells/meringues)
- 50g/a quarter cup caster sugar (preferably unrefined golden)
- 25g/a quarter cup less 1 generous half tablespoon cornflour
- 2 teaspoons matcha green tea
- pinch of salt
First make the crème pat with the above ingredients. Follow the instructions on my crème pâtissière recipe page but whisk the matcha green tea with the cornflour. Cover on contact with plastic film and allow to cool in the fridge.
- 100g/3.5oz white chocolate (good neutral baking quality, not too sweet or flavoured with vanilla)

- When you’re ready to add the chocolate, take the pastry cream out of the fridge and get it to room temperature. Whisk to refresh it.
- Melt the white chocolate over a bain marie. Cool to room temperature.
- Whisk a few tablespoons of the crème pat into the chocolate to loosen it up. Then use a rubber spatula to fold this mixture gently into the rest of the crème pat. You want a light smooth cream.
- Cover with plastic film on contact and store in the fridge a minimum 2 or 3 hours to firm up.
Lighter chestnut cream
- 100g/3.5oz/half a cup plus 1/8 of a cup sweetened crème de marron
- half a sheet/1g of gelatine
- 200g/ whipping cream
I made my original chestnut mousse recipe lighter by reducing the quantity of chestnut cream and not adding rum. So this cream is lovely and light with a lovely subtle chestnut flavour.


Assembling the millefeuille
Cutting
Be very very careful when you’re cutting. Use a serrated bread knife and cut straight down very slowly, sawing to and fro. Like sawing a tree trunk, but downwards. And very gently. Any impatient pressure or pressing down and there’ll be cracking (yup, been there). Do the sides first to practise. Cut a very little off the sides to make straight edges. 
Then cut rectangles. Your big rectangles are probably smaller than originally because they shrank (became smaller) in the oven and you trimmed (cut) a little off the edges. So these are the approximate measurements but adapt if your rectangles are different sizes.

Using a ruler is a good idea to make light marks at the top and bottom with a small knife. Then line up your serrated knife with the marks to cut, sawing downwards.

Piping

Save your best rectangles for the top layer. Use any cracked or broken pieces as a middle layer. Use a medium-sized (10 or 12) plain nozzle to pipe 10 (5×2) balls of matcha white chocolate crème pat, on the base rectangle. Cover with a rectangle., very gently and carefully. Repeat with the chestnut mousse. Cover with the final rectangle.
Finishing
To finish, use a piece of paper and place it diagonally over the top. Sieve some icing sugar lightly over the uncovered half to make a pretty triangle design. Be very gentle with your millefeuilles. They’re delicate. Don’t press too hard and transport them very carefully. Don’t let them slide against each other. And can you guess why there are two flattened millefeuilles in the background?!
 Yes, something fell on them! I sometimes use some slate squares as a striking background when I photograph my cakes. Anyway one of these squares decided to strike – it suddenly lurched forwards and flattened two of my poor little millefeuilles (the one in front is going ‘phew! That was close!’). Anyway, I had a little cream left so managed to patch up the middle one. The end one was a goner but you’ll be pleased to know it was delicious. I ate it. And that was the end of the photoshoot.
Anyway, at moments like these I’m happy not to be in the cake-selling business. I’d be pulling my hair out and carrying out cake repairs far too often. lol.
So my main advice to you is don’t flatten your millefeuilles. And if you cut them in half make sure you use a serrated bread knife to saw them straight down slowly and carefully. Little by little, sawing to and fro again.
Sharing
I’m taking these to Perfecting Patisserie@bakingqueen74 – do visit to find some lovely cakes and recipes or bring some!

matcha white chocolate and chestnut millefeuilles
And please help yourselves to a lovely matcha whilte chocolate and chestnut millefeuille.

matcha white chocolate and chestnut millefeuilles
Wishing you a lovely rest of the week sweet reader, with lots of subtle lightness and joy. Happy baking and eating! 🙂 x

They look perfect Lili…just beautiful!
LikeLiked by 1 person
Thank you so much Marisa! That’s very kind and sweet. 🙂
LikeLiked by 1 person
Again a great post! Congrats!!!
I must try it =) Looks delicious!
LikeLiked by 1 person
Thanks so much Leticia! You’re very sweet. Hope you try them – let me know how it goes if you do! 🙂
LikeLiked by 1 person
Pingback: Weeks 46 and 47 of cakes and a mini Swedish princess cakes recipe | lili's cakes
A work of art! They look delicious too 🙂
LikeLiked by 1 person
That’s very sweet – thank you! I’m glad you like them. 🙂
LikeLike
The flavours sound so delicate and so lovely Lili! What incredible pictures–even the flattened ones there in the background look heavenly. Also, in regards to the inverted puff–wow! I knew that it was inverted but I completely didn’t realize it actually (actually!) meant inverted! Does that make it harder to work with?
LikeLiked by 1 person
Thanks Laurie … happy you like even the flattened ones and the flavours! 🙂
Inverted is harder to work with when it’s hot and I think you have to be more careful the textures of both layers are similar. But it always seems to work even when the butter has squished out in some places!! So maybe it’s easy in a way? I think you’d enjoy the inverted experiment. 🙂
LikeLiked by 1 person
Hmm I see 🙂 I will have to give it a try!
LikeLiked by 1 person
I have been meaning to try making millefeuille and seeing your lovely recipe and photos has spurred me on again! The matcha Creme patissiere looks delicious and the chestnut cream sounds lovely too. Thanks so much for joining in with #PerfectingPatisserie!
LikeLiked by 1 person
Thank you Lucy! Glad you like these millefeuilles. And hope you get to make millefeuille too soon. It’s such a lovely cake. And thank you for hosting Perfecting Patisserie! 🙂
LikeLike
Lili these look amazing, they are so neat. Even the ones which had the ‘accident’ look great but I’d still very happily polish those two off. I love the contrast between the two fillings – the green colour created from the matcha is gorgeous.
Angela x
LikeLiked by 1 person
Thank you Angela! These are the first neat millefeuilles I’ve ever made! (now I know about the bread knife and sawing slowly). I’d happily send these on to you… whole or slightly flattened The flattened ones are almost easier to eat. 🙂 Happy you like the colours. 🙂 Lili x
LikeLike
wow….this is quite original!!! Love the combination
LikeLiked by 1 person
Thank you! Glad you like it and hope you can taste this combo one day. 🙂
LikeLike