
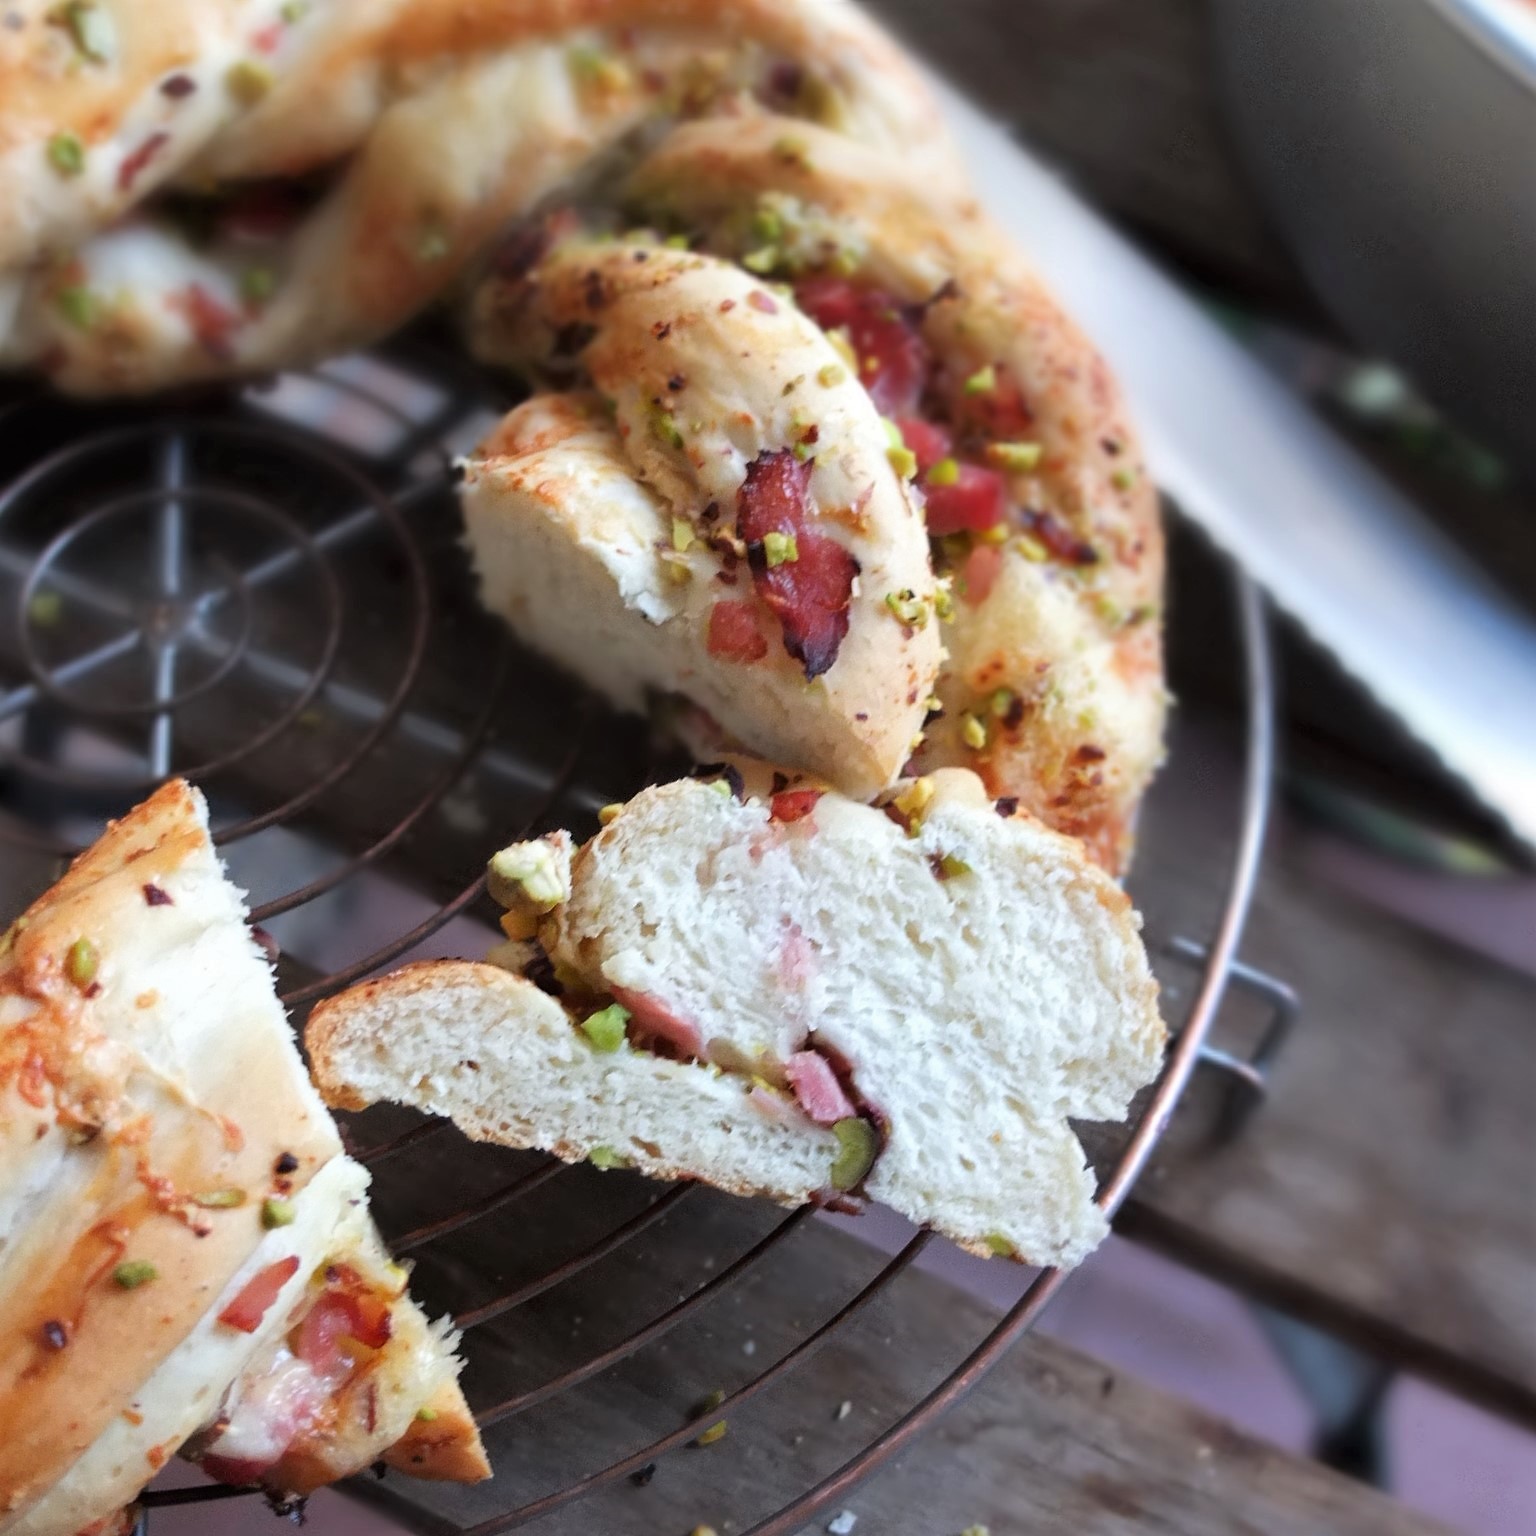
Is your life-long ambition to bake a bread wreath? Are you a big fan of ham and cheese sandwiches? And do you love pistachios? If you answered ‘yes’ this recipe’s for youuuu! And me as I´ll be making this bread regularly! Many wreaths I found online involved a brioche dough but my heart was set on a soft white sandwich bread so I experimented with my tried and trusty pain de mie, filling it with grated cheese, chopped cooked ham and pistachio nuts. The cutting and twisting part isn’t difficult and you can achieve an impressive look with very little work! Which is always nice. And most importantly this ham, cheese and pistachio bread wreath has a lovely texture and is delicious, perfect with butter as a take-away snack or part of a quick meal! Nom, nom, nom… 🙂
Ham, cheese and pistachio bread wreath
The experiments
Breads lose a little fluff when weighed down with filling so how to transform my pain de mie dough into a wreath while maintaining as much lightness as possible? So started The Wreath Odyssey.
- Prototype 1: the dough was rolled out quite thin to a large rectangle (34x42cm) and Philadelphia cheese spread on it then grated cheese, ham and nuts sprinkled on. Baked on a baking tray it spread outwards and was beautiful but too dense.

- Prototype 2: After the first rise I did the quick knead on individual little balls instead of 1 large one – easier to handle and achieve a better dough? Then the dough was rolled out less thinly (about double the original thickness) for it to rise better. So the rectangle was smaller (34x24cm). The Philadelphia cheese was eliminated and there was just emmental, extra ham (yum) and pistachios. This time the wreath was placed in a 26cm/10in round cake tin, which helped it rise better. The bread was fluffier but after rising and baking it filled out in the tin so lost wreath-shape definition. Back to the drawing board…

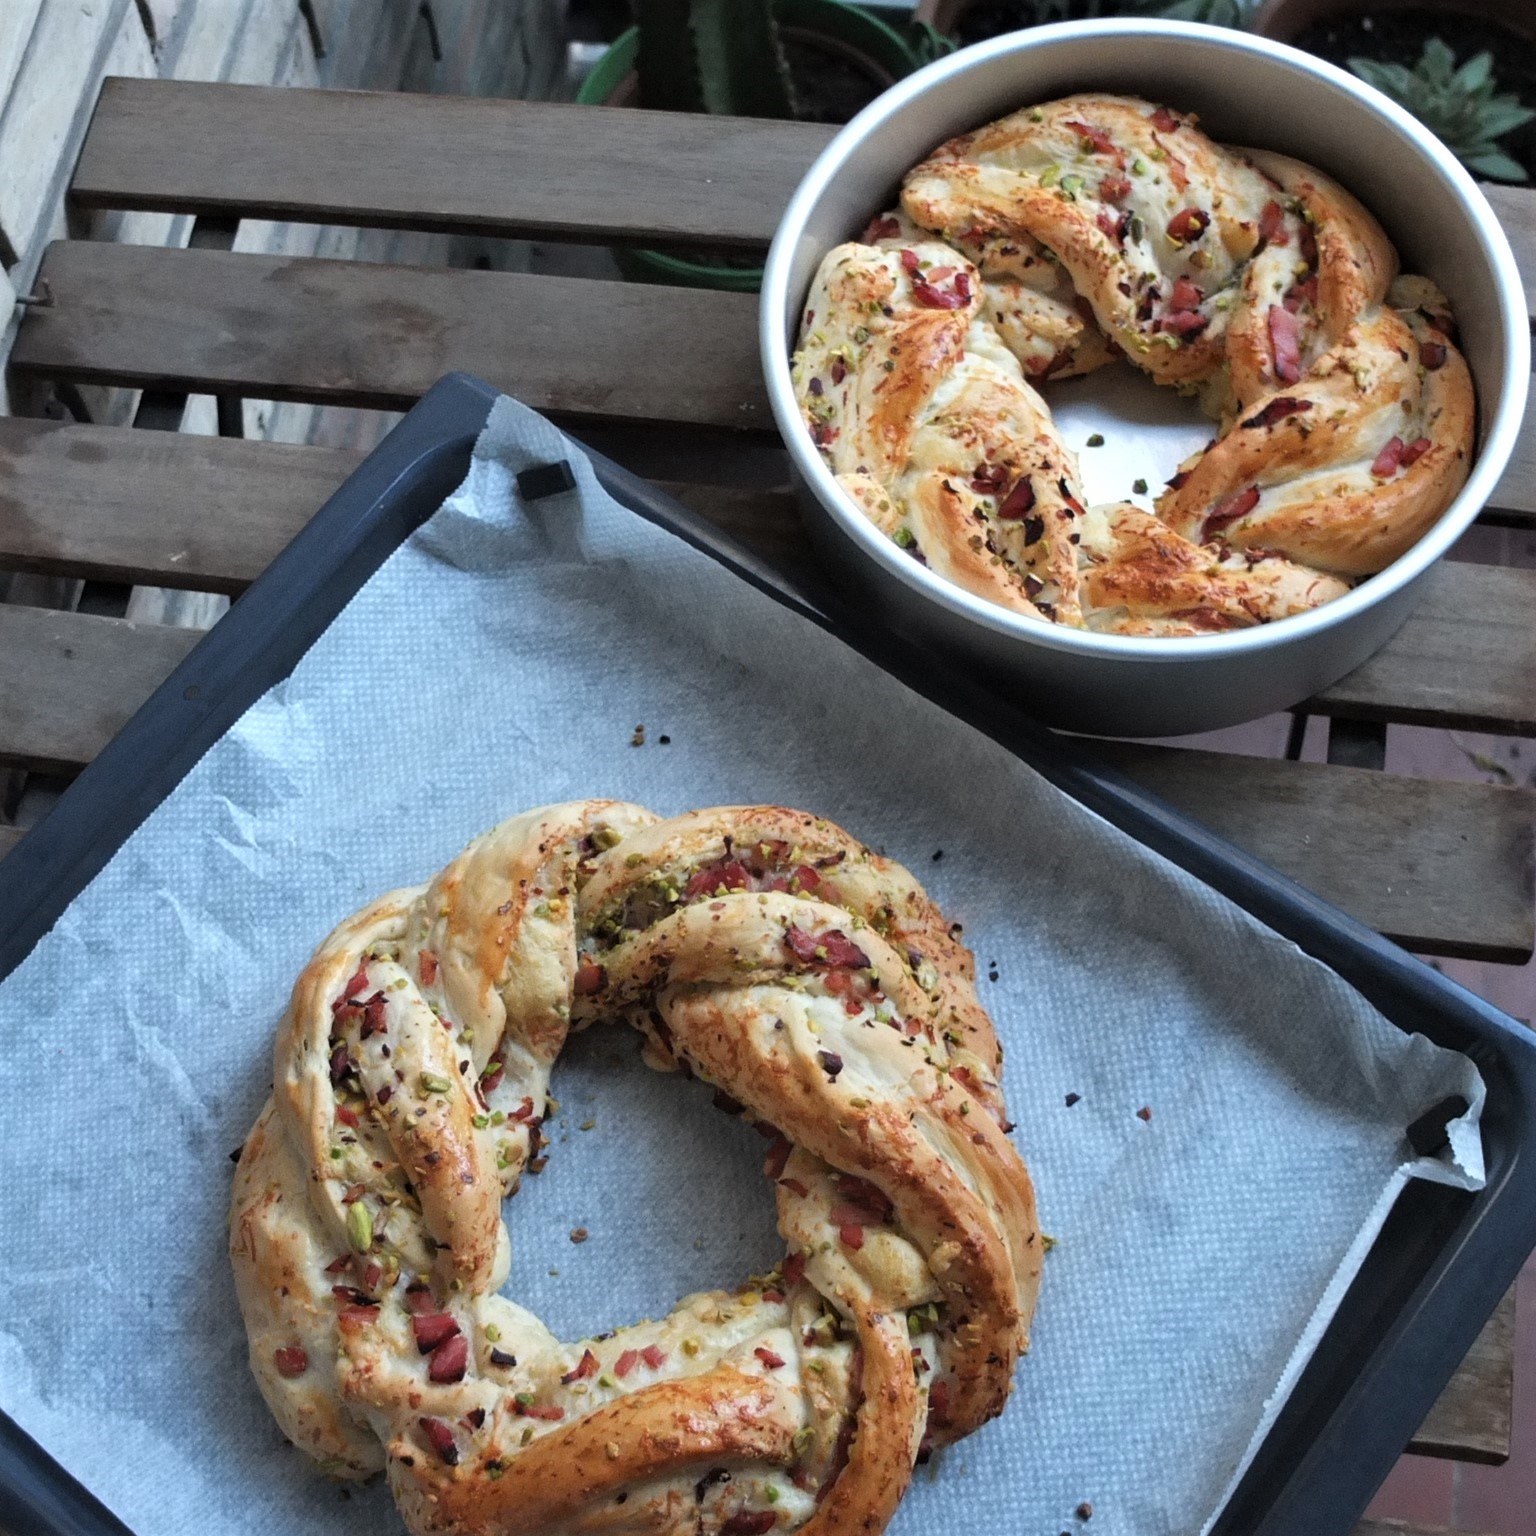
- Final versions 3 (baked in tin, left in the photo) and 4 (on the baking tray): the two wreaths were made with the same dough, but one baked in the tin (with less dough this time) and the other on a tray. I made sure the hole in the middle was big enough by gently pulling and stretching it out before the second rise. Both wreaths came out wonderfully: attractive and delicious with a light texture. Hurray! Approved all around by happy eaters. Unlike the earlier prototypes this bread was easier to keep eating and eating. 🙂


Ham, cheese and pistachio bread wreaths
Conclusions: on a baking tray the form is more wreath-like but the texture just a little less fluffy. In a tin the shape is less wreath-like but more even and the texture slightly more fluffy. Can you guess which loaf each slice comes from?

Yes, the top slice is from the ‘tin’ loaf and the other from the baking tray. But they’re not so different are they? Both wreaths were delicious so feel free to choose how you’d like to bake yours.
THE RECIPE
First make the pain de mie (white sandwich bread) dough. There’s less salt than in my usual loaf as there’s cheese in the filling.
Dough – 528-540g (1 and 1/5 lb)
- 36g/2 and 1/2 tablespoons butter, melted and hot
- 180ml full-fat milk (room temperature)
- 12g/0.35oz fresh compressed yeast (or 4g/1 and 1/8 teaspoons dried active yeast)
- 150g/1 and 1/5 cup plain/all-purpose flour or T45 cake flour
- 150g/1 and 1/5 cup ’00’ flour or strong white bread flour (or plain/all-purpose/cake flour)
- 12g/2 and 1/2 teaspoons caster (superfine) sugar (or 12g/2 and 3/4 tsps granulated sugar)
- 3g/half tsp fine sea salt
You can find instructions for my pain de mie here and you follow this recipe up to after the first rise. Prepare the filling while you’re waiting for the dough to make its first rise.
Filling
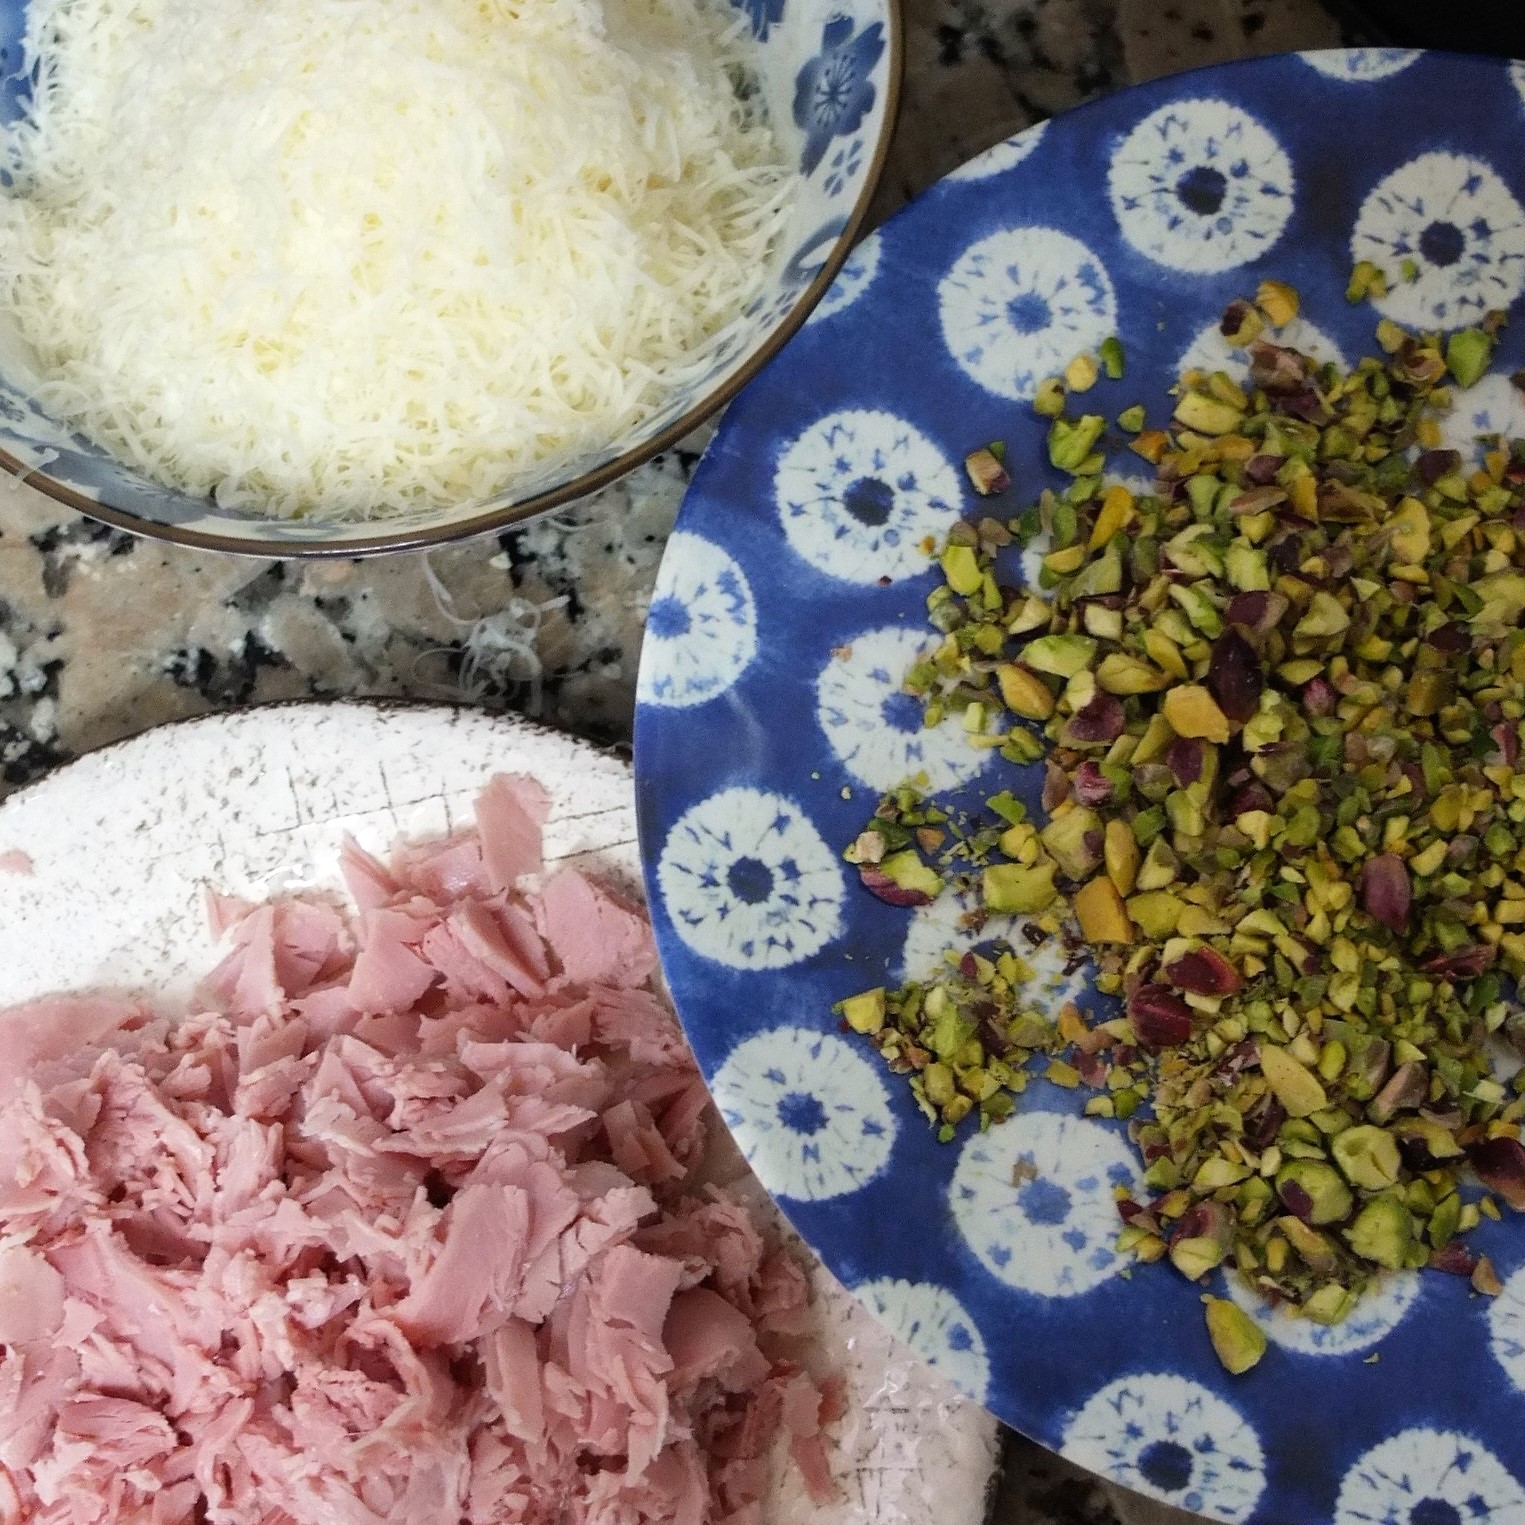
- 60g/2/3 cup less 1 tablespoon grated hard cheese, like emmental, gruyère or cheddar
- 90g/3.2oz chopped cooked ham
- 30g/1oz chopped pistachio nuts, some more finely and others a little more roughly
Shaping the wreath (after the first rise, when the dough has doubled)

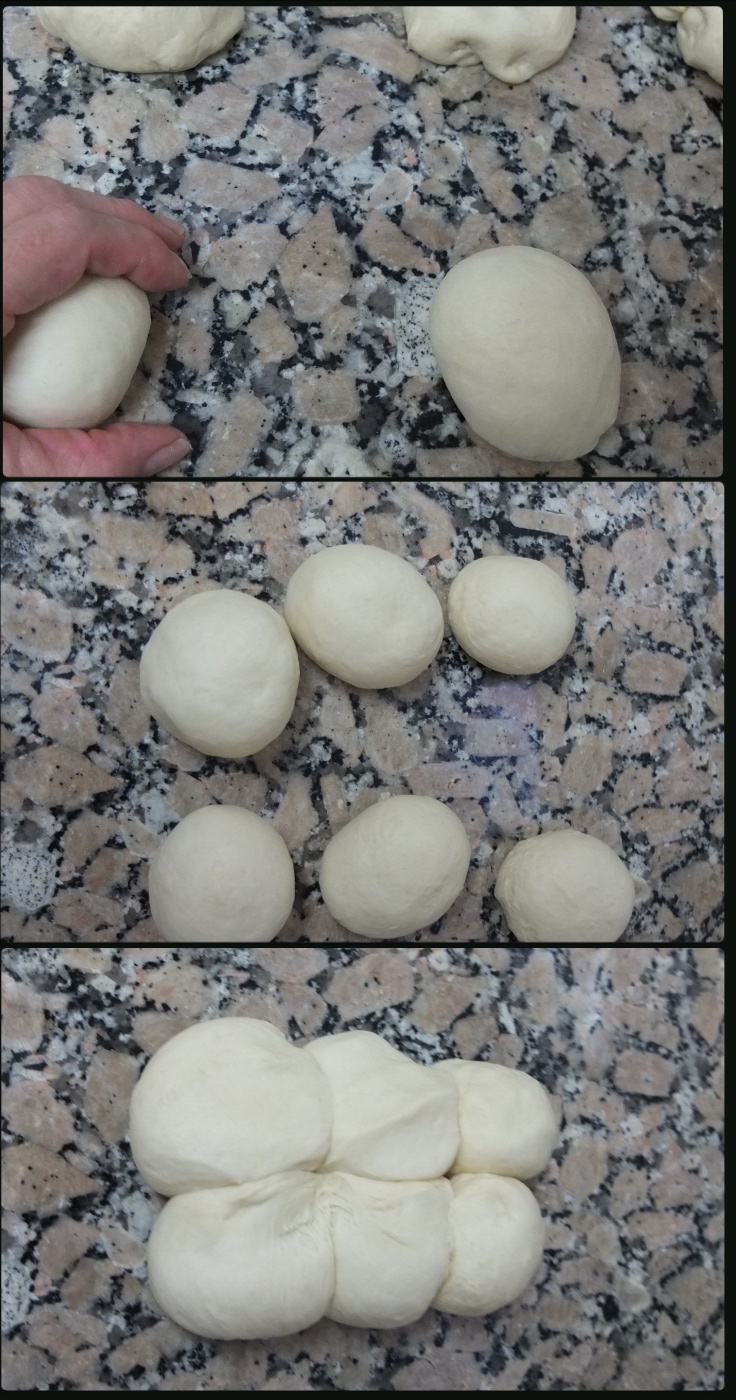
Note: my system of making balls then shaping them into a rectangle is probably not the conventional way to make a rectangle but it works for me! I do this because my dough comes out better than when I did it with one big ball. It’s optional.
- Weigh out 6 balls (about 90g each) of equal size.
- Flatten each ball into a circle about 1cm/1/4in high then fold the outside edges into the middle to make a ball again.

- Turn upside-down so the fold is underneath. Roll each ball on your cold flat surface, letting it roll under the palm of your hand and fingers, with a little pressure but not so hard you flatten the balls. Roll in a circular motion (clockwise or anticlockwise) – pro bakers roll two simultaneously, one under each hand. 🙂 At the beginning the ball of dough will be very soft. After you roll it 10 seconds to 1 minute the ball becomes a little springy and offers some resistance. When you poke it with your finger the dough will spring back up a little.

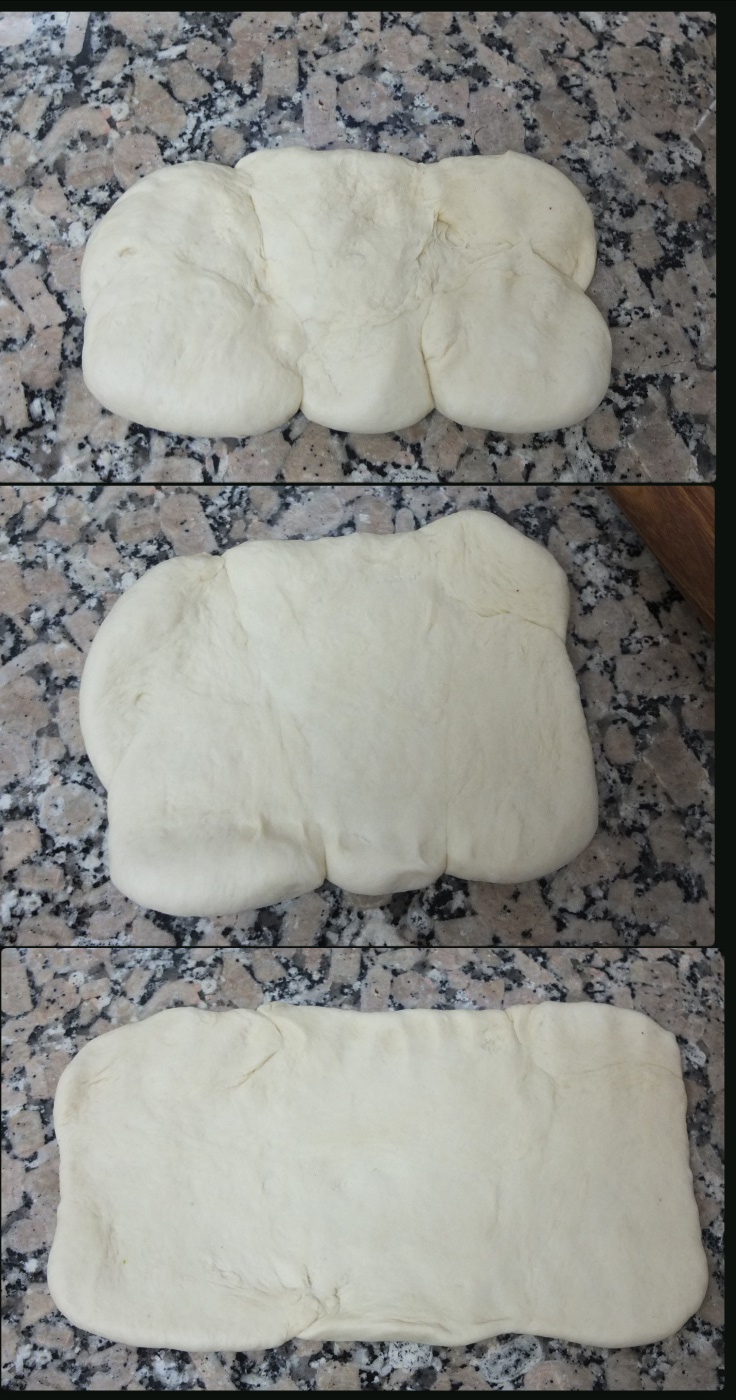
- Position and squeeze the 6 balls together to make a rectangle (2×3). Fold over if necessary to help shape the rectangle. Roll out with a rolling pin to make a rectangle about 36cm x 20cm (14in x 8in). If you roll it thinner your wreath will be even prettier (like Prototype 1) but maybe not as fluffy.


- Leaving a 1cm edge around, sprinkle the grated cheese over the rectangle, then the ham and finally the chopped pistachios. Start rolling away from you to make a roll that isn’t too loose or too tight.

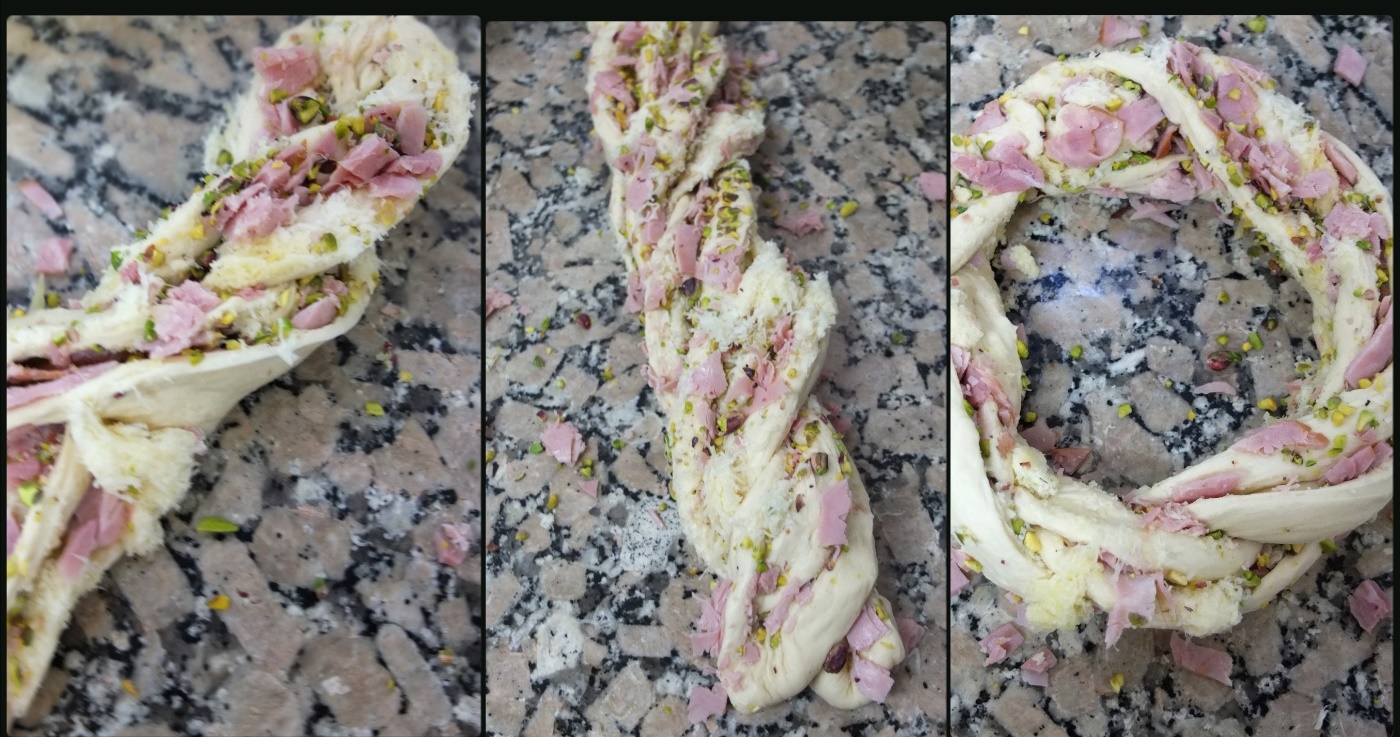
- Place the seam facing up and with a sharp knife cut all the way down the middle of the roll.
- Be careful to keep the filling facing up so it doesn’t all spill out on your worktop. A little will fall out but it’s not a problem and you can stuff a little back in. Start plaiting, putting one side over the other, then repeating the other way. You can pull the dough a little.

- Join in a wreath, with the filling still always facing up. Make sure you have a big hole in the middle, gently pulling the sides out if necessary.

- Place carefully in a big cake tin (26cm/10in diametre) …
 …or on a baking tray lined with baking paper.
- Loosely place plastic film over the dough (for the wreath on the baking tray lightly grease the film with vegetable oil so it doesn’t stick).
- Place in a warm place to rise a second time until it doubles in size. This can take between 30 minutes to 1 hour, depending on how warm your environment is.
- During this second rise pre-heat the oven to to 220°C/425°F (static, non-convection oven) or 200°C/400°F (fan-assisted).
- When the wreath has doubled in size remove the plastic film and brush lightly with a little beaten egg yolk.

This is Prototype 2 – you can see the hole was too small in the middle.
- Place in the oven and immediately lower the heat to 180°C/350°F (static) or 160°C/320°F (fan-assisted).
- Bake 25 to 35 minutes until light golden brown on top and underneath. It should still feel quite soft and light. A probe thermometre inserted in the middle of my loaves usually shows a temperature of around 90°C/195°F to 94°C/200°F.
- Let the bread cool on a wire rack. If in a tin, let it cool 5 minutes then use a butter knife to loosen any sides sticking to the tin, turn upside down and cool on a wire rack. Test some.


Hurray for bread wreaths!

Ham, cheese and pistachio bread wreath
Eating and storing
This bread keeps well in airtight tupperware for up to 2 days. To store longer cut into slices, wrap well in plastic film individually or in packs of 3 to 4 (so there’s no air between the plastic and bread) and freeze them up to 2 months. Defrost at room temperature an hour or two. Personally I like this tasty bread best with salted butter on a slice that isn’t too thick or too thin. Very yummy. I took some to the climbing wall and couldn’t resist eating all my slices before climbing. Ooops, not really recommended. But I couldn’t stop. Perhaps bread wreaths are irresistible?

Ham, cheese and pistachio bread wreath
Would you like some? You’d be eating a very special bread!
Wreaths
There’s a lot of symbolism attached to wreaths. You can imagine how they symbolise such things as the circle of life, completeness, wholeness, victory and loyalty. Made of leaves, flowers or herbs, they’ve appeared in festivals, rituals and on the heads of rulers in Greece and Rome. Apparently one of the finest Roman breads was made in the form of a wreath and called panis corona. It’s depicted on the plate of a servant from a Roman tomb and this kind of bread would have been amongst offerings for the dead. Bread wreaths nowadays are still associated with Harvest celebrations and religious festivals such as the Advent. In Sweden they make them for Sant Lucia’s Day on December 13 but you can see ‘holiday bread wreaths’ all over the world. So there you go. Make a bread wreath and work a little magic onto your table.

Bidding you a fond farewell dear savoury reader! Wishing you a magic week and weekend ahead… with lots of happy baking and eating! 🙂 Lili x

Yummmm! Looks fabulous Lili 🙂
LikeLiked by 1 person
Thank you Alba! 🙂
LikeLiked by 1 person
Oh please! these look so beautiful and delicious!!!
LikeLiked by 1 person
🙂 Thank you Natascha, and virtual slices on their way to you! 🙂
LikeLike
I’ve never tried anything similar, sounds and looks so delicious!
LikeLiked by 1 person
Thank you, yes these were my first bread wreaths and really enjoyed them. I think you would too! 🙂
LikeLiked by 1 person
Beautiful!! The idea of putting it in a cake pan is a great one – never would have thought of that. This would be a lovely recipe to share for a potluck!
LikeLiked by 1 person
Thank you Jasmine! Yes, the cake tin idea was borne out of desperation to get a better rise! lol. And you’re right, this would be cool at a gathering. Nice idea. 🙂
LikeLike
LiLi it sounds so delicious. A flavour filled bread wreath!!
LikeLiked by 1 person
Aw thanks Sumith, that’s a lovely description! 🙂
LikeLiked by 1 person
Gorgeous shots! and thank you for all the finer the details and progress images you include
LikeLiked by 1 person
Thank you and I’m happy you like them. 🙂
LikeLiked by 1 person
Looks great!!
LikeLiked by 1 person
Thank you! 🙂
LikeLiked by 1 person
Love this wholesome bread wrath! Thanks for sharing!
LikeLiked by 1 person
Thank you, so happy you like it! 🙂
LikeLike
Pingback: Happy new year! Top posts in 2016 and baking projects for 2017… | lili's cakes