
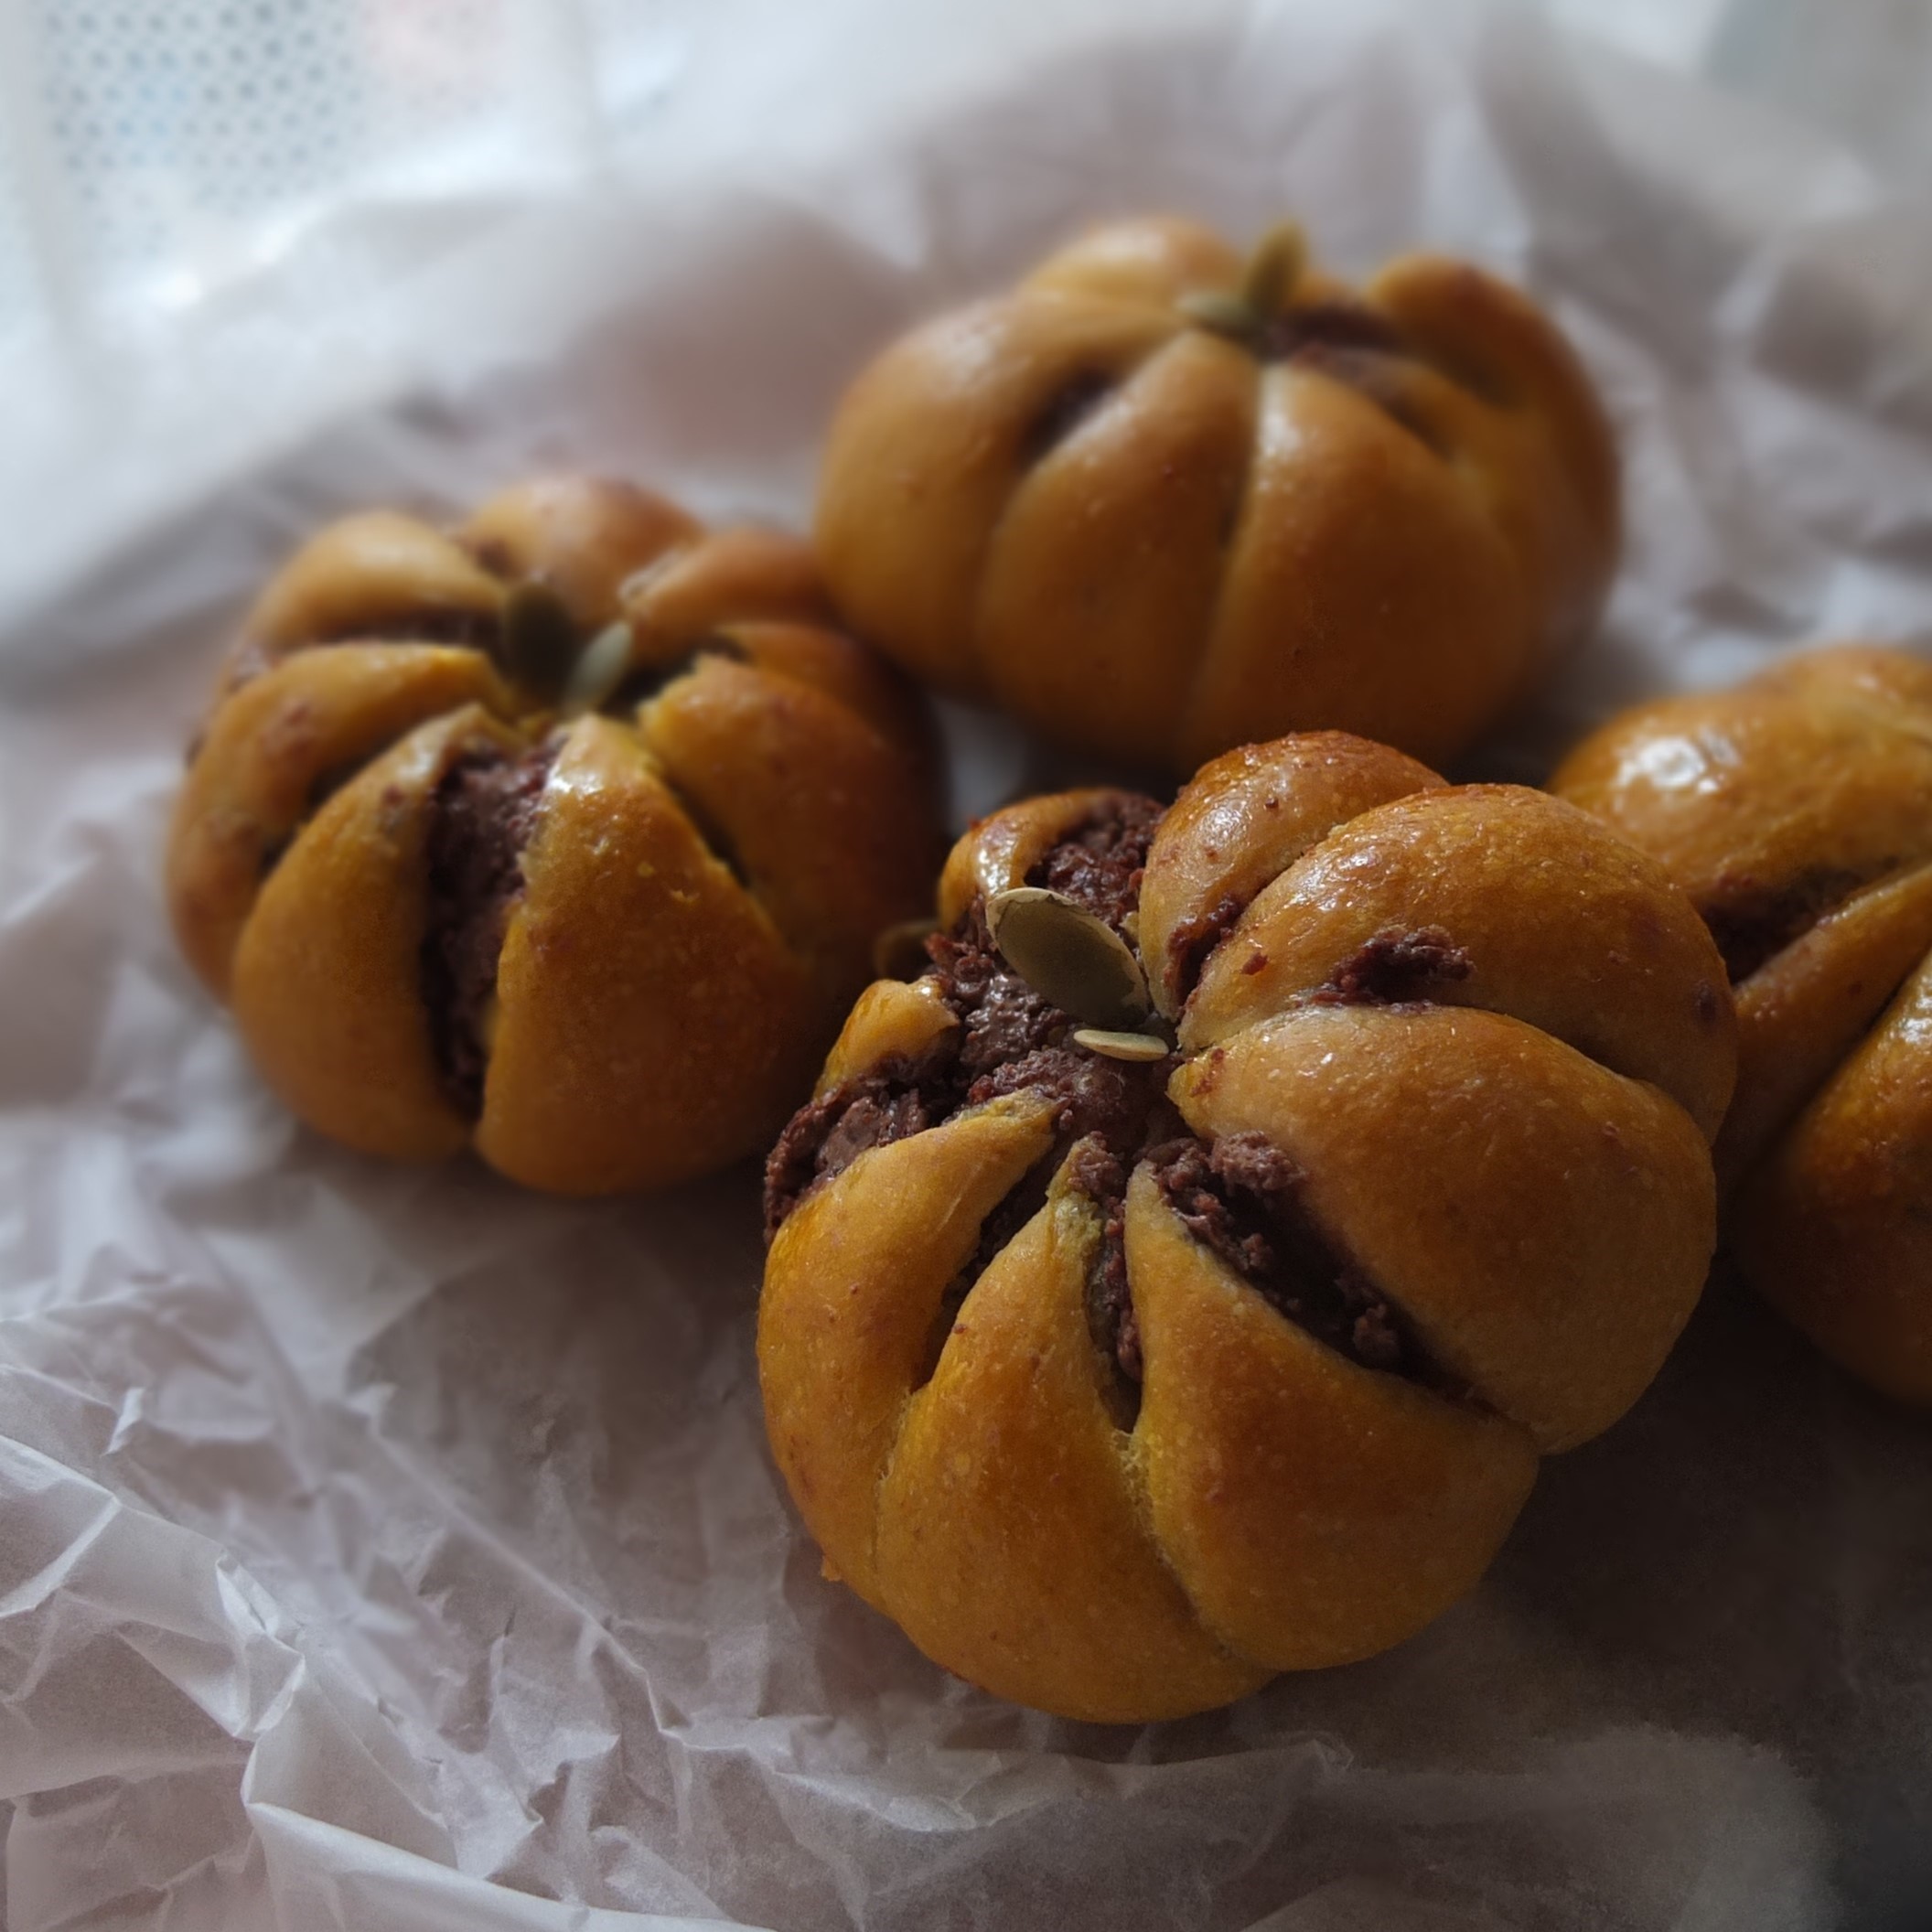
These cute little buns are amazingly soft and tasty with the pumpkin purée, orange zest and chocolate combining to create a heavenly aroma and flavour. They’re slightly adapted from Sylvain Vernay’s panecillos de calabaza y chocolate at his Gourmétier website. I made the sourdough buns but he also includes instructions for using instant yeast. Mine just had different timings for proofing and a yummy melted filling of milk chocolate drops rather than dark chocolate. The pumpkin buns have very little sugar so a sweeter filling works great. I also used canned pumpkin purée instead of making my own because I had a tin that was about to expire and well… it was very convenient! Ahem. Anyway homemade pumpkin purée would be really amazing too. And using Sylvain’s method of wrapping oiled kitchen twine around the balls of dough is so much fun for shaping delightful little pumpkins! You could have simple round buns but it’s autumn, halloweeeen soon and the perfect very exciting time to make and eat these pumpkin and chocolate buns! Yum yum… 🙂

Pumpkin and chocolate buns
THE RECIPE
Sylvain Vernay’s panecillos de calabaza y chocolate are amazing. Genius really. And the photos are beautiful. Please go there for his original Spanish-English/instant yeast-sourdough recipe.
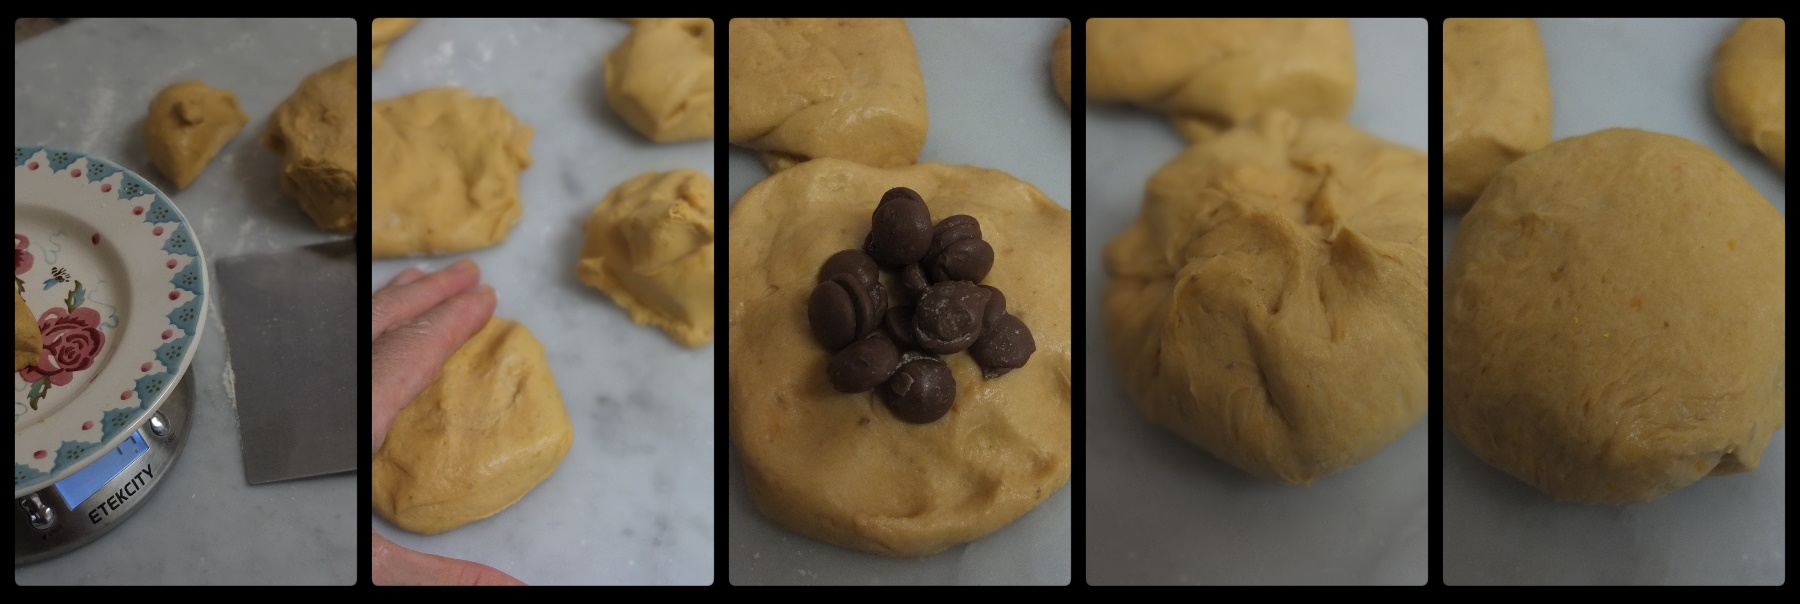
The sourdough process usually creates doughs that taste less sweet because the sugar and flour are broken down during longer proofing. If using instant yeast the dough will probably be sweeter so dark chocolate could be good. In the first prototypes I put 8g (scant tablespoon) milk chocolate drops and in the second prototypes upped it to 10g (tablespoon) which made shaping more difficult and caused leakage in some buns. Which is okay if you want them to proudly display their chocolate filling! Lol.
Pumpkin and chocolate sourdough buns – 2nd batch
You can see chocolate explosion disasters don’t look so bad. But perhaps less chocolate’s better.
Flavourwise it’s almost tempting to add pumpkin spices or cinnamon but I feel the original pumpkin purée and orange zest combo is deliciously fresh and light contrasting nicely with that little bit of runny chocolate inside. I love the aromas and taste. In fact it was night and I was looking at and smelling these buns thinking I’d love to eat more. But it was late and I needed to wait till the next day. Ah the dilemna…! Resist, resist.
Let’s make some more…

Pumpkin and chocolate sourdough buns – 2nd batch
Ingredients
- 35g/2 and 1/2 tablespoons unsalted butter
- 240g/8.5oz/1/2 cup pumpkin purée, canned or fresh (unsweetened and unspiced)
- 70g/ml full-fat milk (add 1/2 or 1 tablespoon while kneading if your dough is too stiff or dry)
- 250g/1 cup strong white bread flour (more or less)
- 100g/4/5 cup plain/all-purpose flour (or 00 flour)
- 60g light brown sugar (1/3 cup) or unrefined golden caster sugar (1/4 cup) or some other kind of sugar
- 1/4 tsp fine sea salt
- 100g/scant 1/2 cup active young sourdough starter, 100% hydration – approximately 12-13g (1 tbsp) starter refreshed with 50g flour and 50g/ml water
- finely-grated zest of 1 orange
For shaping and decorating
- a little light vegetable oil
- kitchen twine (heat-proof string for baking)
- beaten egg
- half tablespoon honey mixed with a little hot water
- 20 – 22 pumpkin seeds
Method
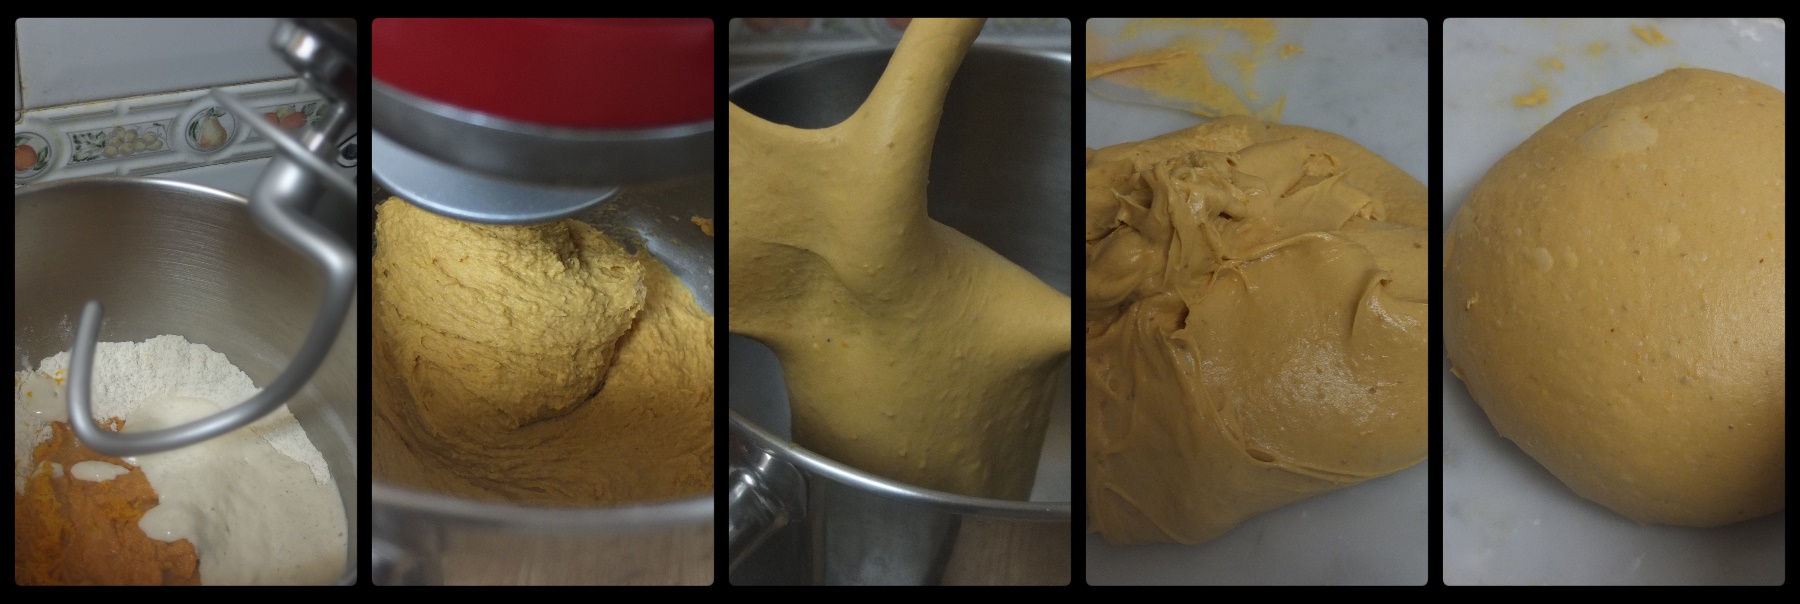
DAY ONE – evening (starter refreshed earlier in the day, 6 to 8 hours ago)


Notes on kneading, quantities and flexibility
Try this French hand kneading system proposed by Sylvain – Spanish video here and English video here, It’s fine to use a standmixer with dough hook but don’t overmix and I like finishing off the kneading by hand on a flat surface for 5 to 10 minutes. I’ve found the dough becomes quite elastic but is still a bit sticky and it doesn’t stretch to a perfect ‘window pane’, possibly in part because of the inclusion of lots of pumpkin purée or the high humidity in my kitchen. It still works fine though.
If while kneading your dough by hand or machine it continues to be really sticky then add a very little flour gradually (1 teaspoon/tablespoon or 2, or a little more) and continue kneading at least 5 to 10 minutes. You don’t want a dry dough (if dry add a little more milk). Be flexible because it all depends on your starter, flours, pumpkin purée and room temperature.
DAY TWO – morning

Filling option: sweetened red bean paste (about 10g/1/2 – 2/3 tbsp) – delicious!
Note on saving time: if you don’t want to faff around with pieces of string leave out steps 1 to 7 below and go straight to step 8 brushing with egg/proofing to have simple round buns. They’ll taste just as good but … this string part is so much fun! 🙂
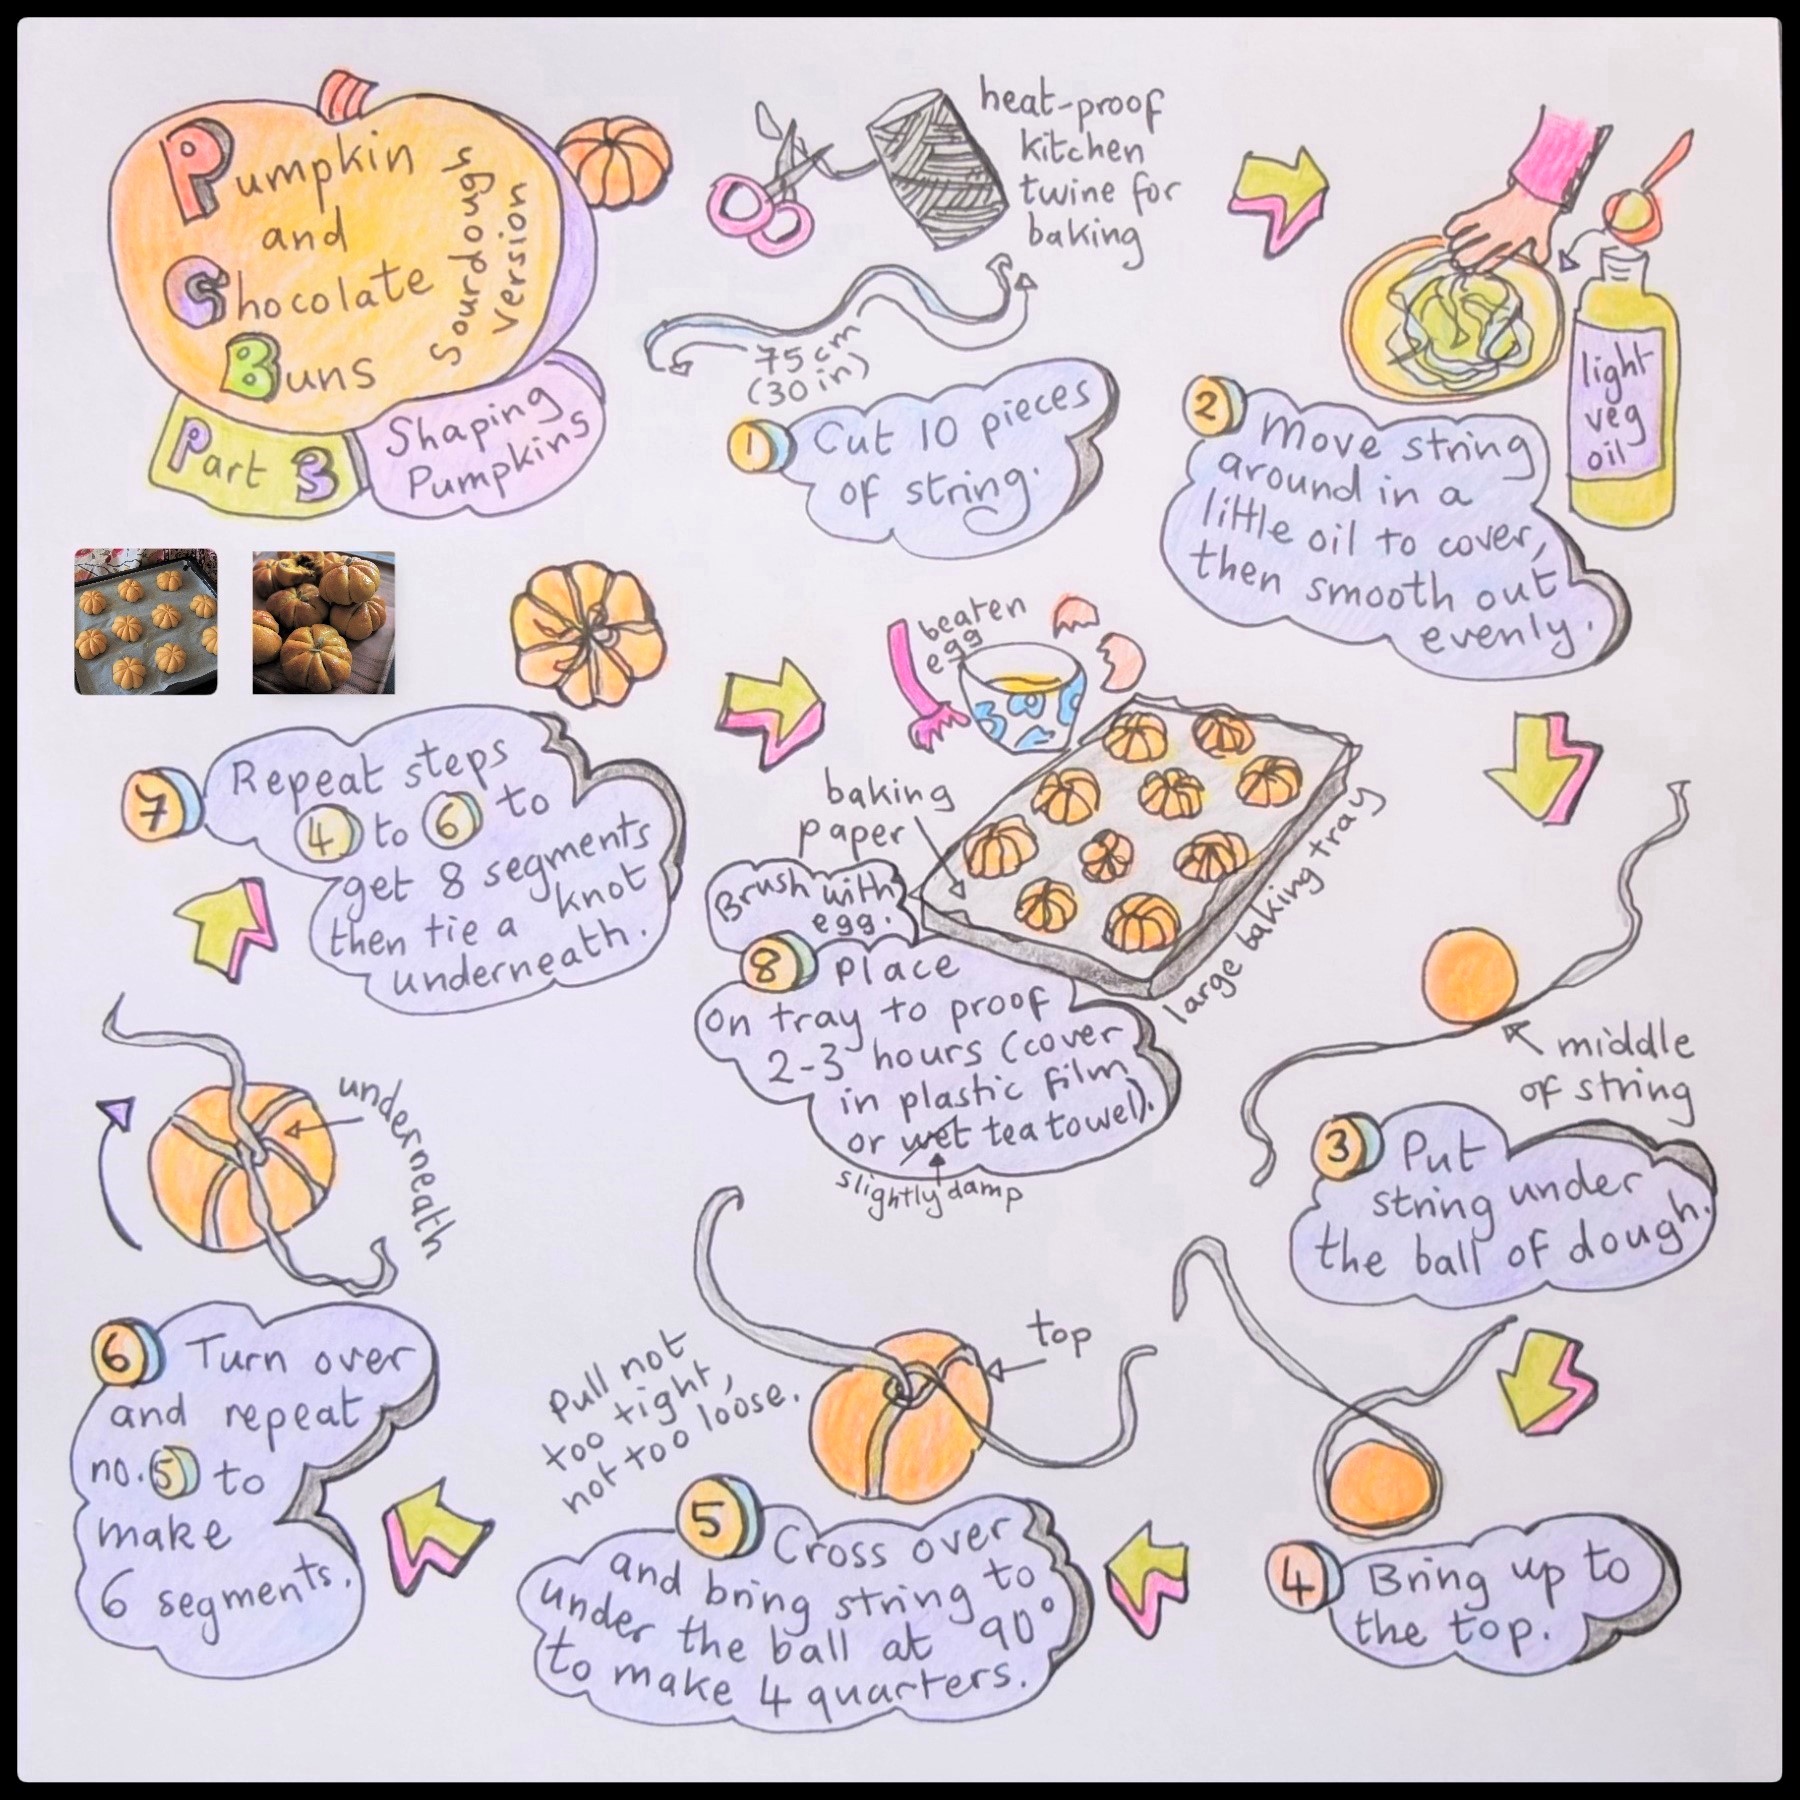

When brushing with beaten egg try not to touch the string. Brush the segments upwards (or downwards) between the string.

Proofing
How long?
The buns need about 2 to 3 hours at room temperature. They get bigger but maybe don’t double in size. If you poke them with your finger and the dough springs back quickly they’re not ready yet. If you poke with a finger and the dough springs back slowly and there’s still a bit of an indent then they’re ready (if there’s no spring back but just an indent left in the dough they’re on their way to overproofing so get them in the oven quick).

Timings and oven
- When the buns are almost ready to bake preheat your oven to 180ºC/350ºF fan/convection oven or 200ºC/400ºF static oven.
- When the buns have proofed brush with beaten egg a second time.
- Bake in the middle of the oven 14 to 20 minutes until light and orangey golden brown. I’ve been taking out a segment from one of the buns to check inside and if it looks very doughy they stay in 5 more minutes or so.
- When baked place on wire rack to cool. While still warm brush with honey diluted in a little hot water to make them shiny.
- After 10-15 minutes cut the string at the top and at the bottom then carefully pull pieces of string sideways or downwards from the bottom to remove. So far I’ve chewed on just 1 little piece of string that was left behind (oops… just a warning).

Stick a couple of pumpkin seeds at the top to look like stems. Kind of.

Eating and storing
Eat warm or at room temperature. Can be stored in air tight tupperware at room temperature for up to 3 or 4 days. Can also be frozen wrapped tightly in plastic film (or maybe bees wax wrap?) up to 2 months or so.
They’re really tasty with great texture – moist and pull apart fluffy but quite satisfying. The skin is a little crispy because mine baked a little longer. Flavourwise the orange zest complements and bring out the pumpkin so there’s both colour and yummy flavour. Then you get a delicious surprise pocket of milk chocolate. Plus the bun splits into handy segments making it easy to eat piece by piece… yum!

Thank you
So thanks again to Sylvain Vernay for inventing this amazing original recipe and kindly allowing me to share it again with everyone here on the blog – he has a lovely instagram account if you’d like to follow him by the way.
Will just offer you a little pile of sourdough pumpkin and chocolate buns! It’s all part of pre-halloween excitement. Teaching English to little ones aged 3 to 8 so we’ve already started singing and stomping along to halloween songs and watching scary stories. It’s hard to look at a pumpkin bun without smiling, being slightly scared or mostly just feeling hungry. Been having quite a craving for these… hope you’ll try them! 🙂

Pumpkin and chocolate sourdough buns
Farewell to you dear reader! Wishing you an excellent scary and yummy run-up to Halloween with lots of lovely happy baking and eating! 🙂 Lili x

Wow Lili these look absolutely amazing! Funnily enough i have been looking at large sourdough pumpkin bread made this way but I really like the little ones, might have to give these a go! Hope all good with you, Sue XXX
LikeLiked by 1 person
Thanks Sue! A large pumpkin bread sounds great too! 🎃 These were fun to shape and really yummy…hope you make them. Make both the big bread and small buns?! 😉 All is great thanks and hope all is good with you too and all the lovely renovations and baking! Lili xx
LikeLike
OMG those are too adorable!
LikeLiked by 1 person
Aw thank you! Yes, very attached to my little pumpkin bun babies. Happy you like them. 🎃😊
LikeLiked by 1 person
These are so pretty. I’ve been wanting to try this shaping method for a while now, thank you for making it look so easy. Well done!
LikeLiked by 1 person
Thank you so much Jess! 😍 I’m so pleased you like them and that the shaping instructions could be useful for you. I was surprised at how easy it was too. Hope you have fun making pumpkins and look forward to seeing them! 🎃😊
LikeLike
How adorable and they sound delicious too! I’d love a few of these on my Thanksgiving table!
LikeLiked by 1 person
Aw thank you Julie! 😍 Think you’d enjoy them… 😊
LikeLiked by 1 person
It’s going to have to be instant yeast, Lili. I don’t have starters. Still it sounds and looks delicious.
LikeLiked by 1 person
Thank you and sounds great Mary! 😍 Hope to see your little instant yeast pumpkins some time.:)
LikeLike