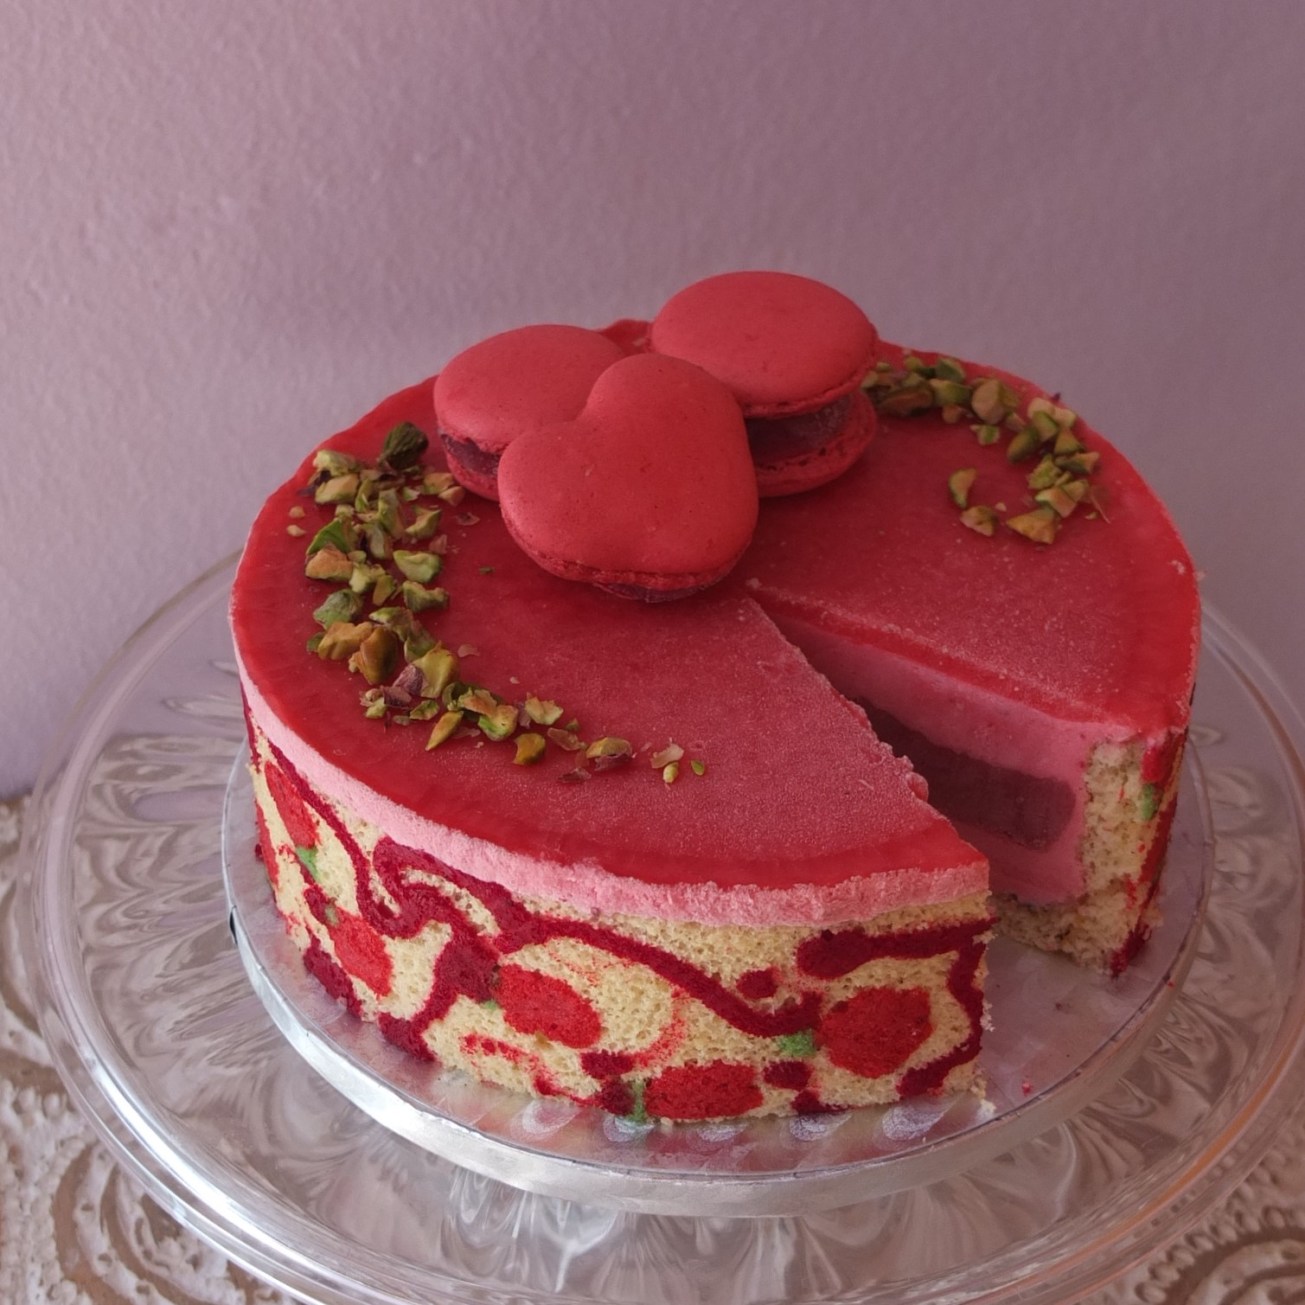
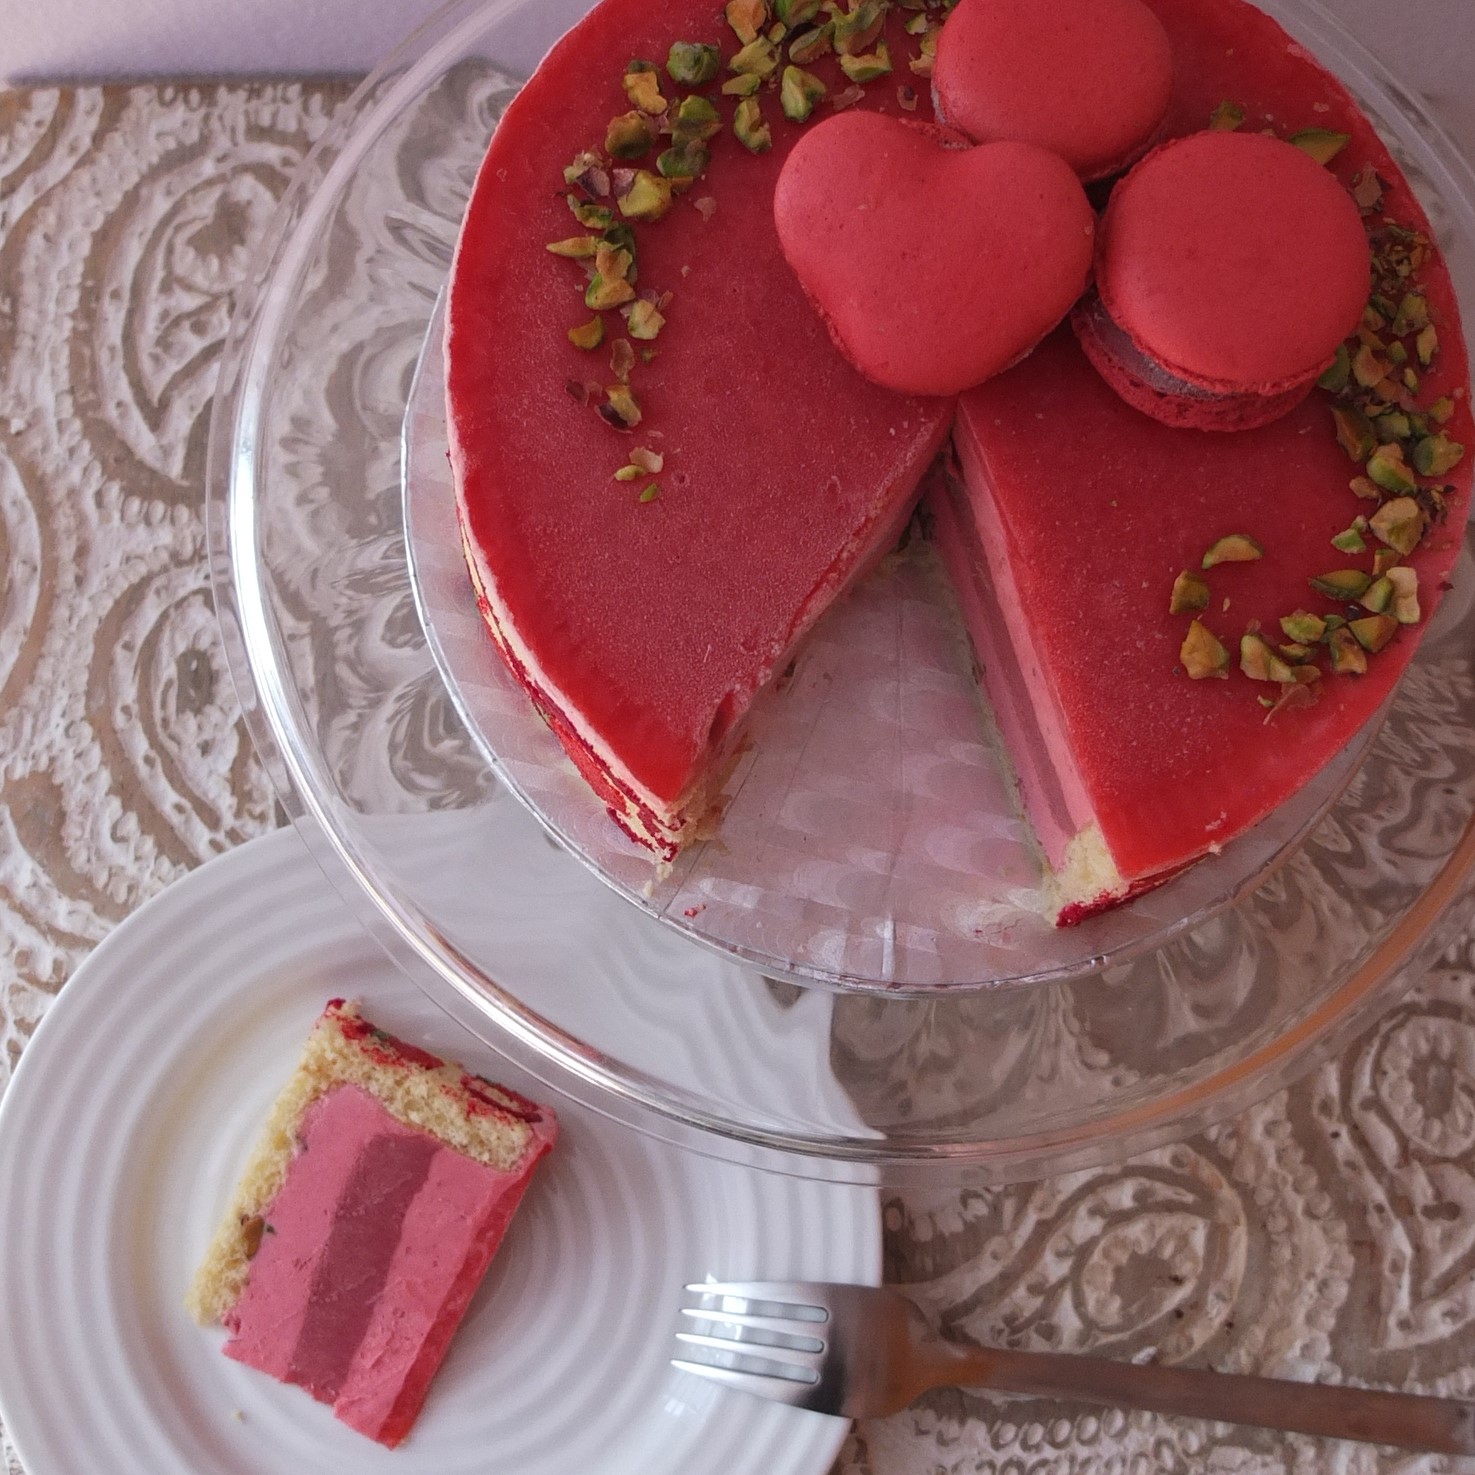
A raspberry mousse cake with a layer of raspberry curd and a raspberry glaze. Because you can never have too much raspberry! With the charming crunch of green jewel-like pistachios swirling on top and studding the genoise sponge layer. And you can easily create a pretty cigarette paste design on the outer sponge layer! As with most entremets the elements are simple to make so you can have your very own ultra raspberry cloud mousse cake! It’s been very popular with friends, who waxed lyrical about how their slices tasted just like summer: delightfully fresh, light and delicious. Not just a pretty cake but also absolutely yummy! 🙂

Ultra raspberry cloud mousse cake
RECIPE
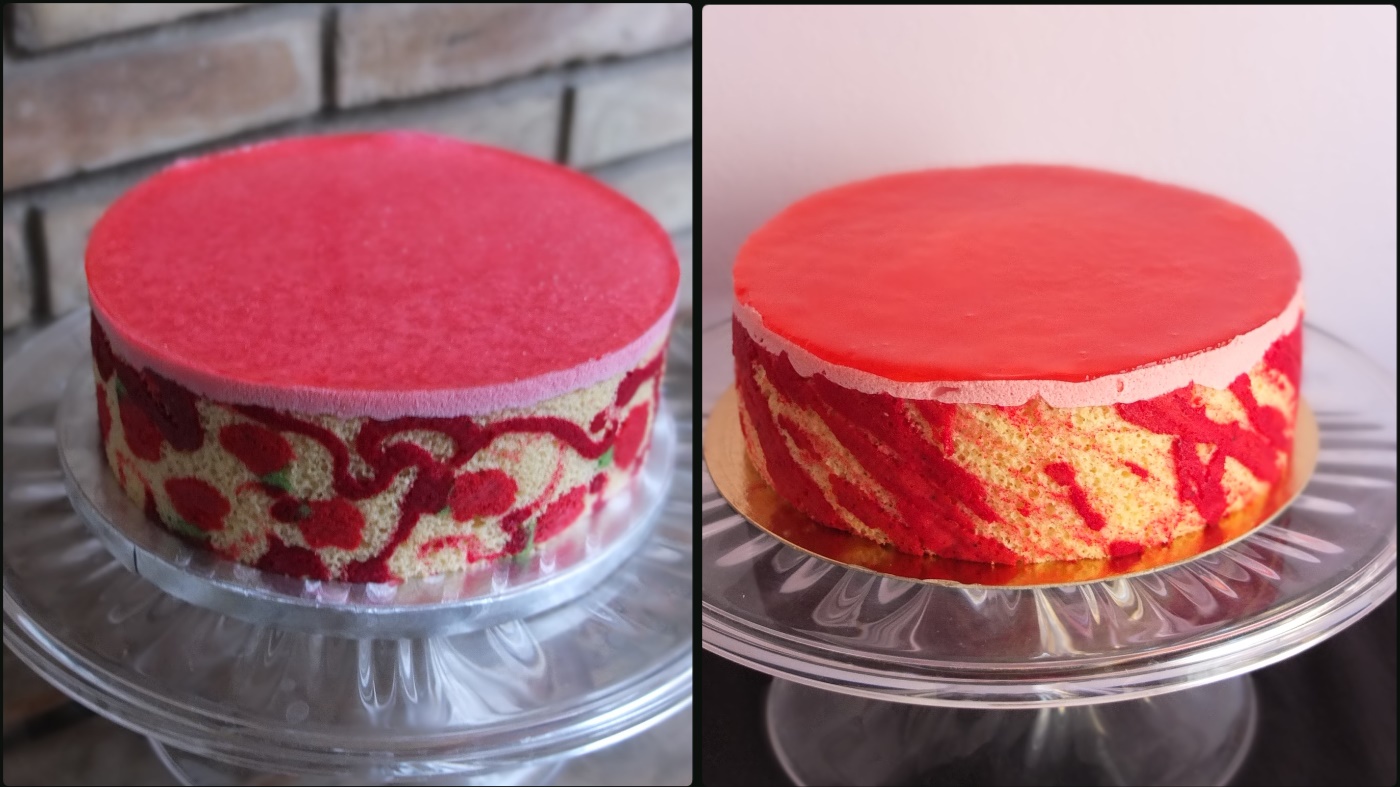
This recipe’s an invention based on an entremets we made on the Intermediate Cordon Bleu pâtisserie course in Paris. It’s been simplified and become an all-raspberry cake with genoise sponge and a curd. The cigarette paste and design are optional and you could have a plain genoise outer layer, maybe decorated with macaron shells stuck on with extra curd. But it’s nice to practise cigarette paste patterns and not that difficult or time-consuming. You have the option of the more careful piped design or the arty ‘splash’ design.
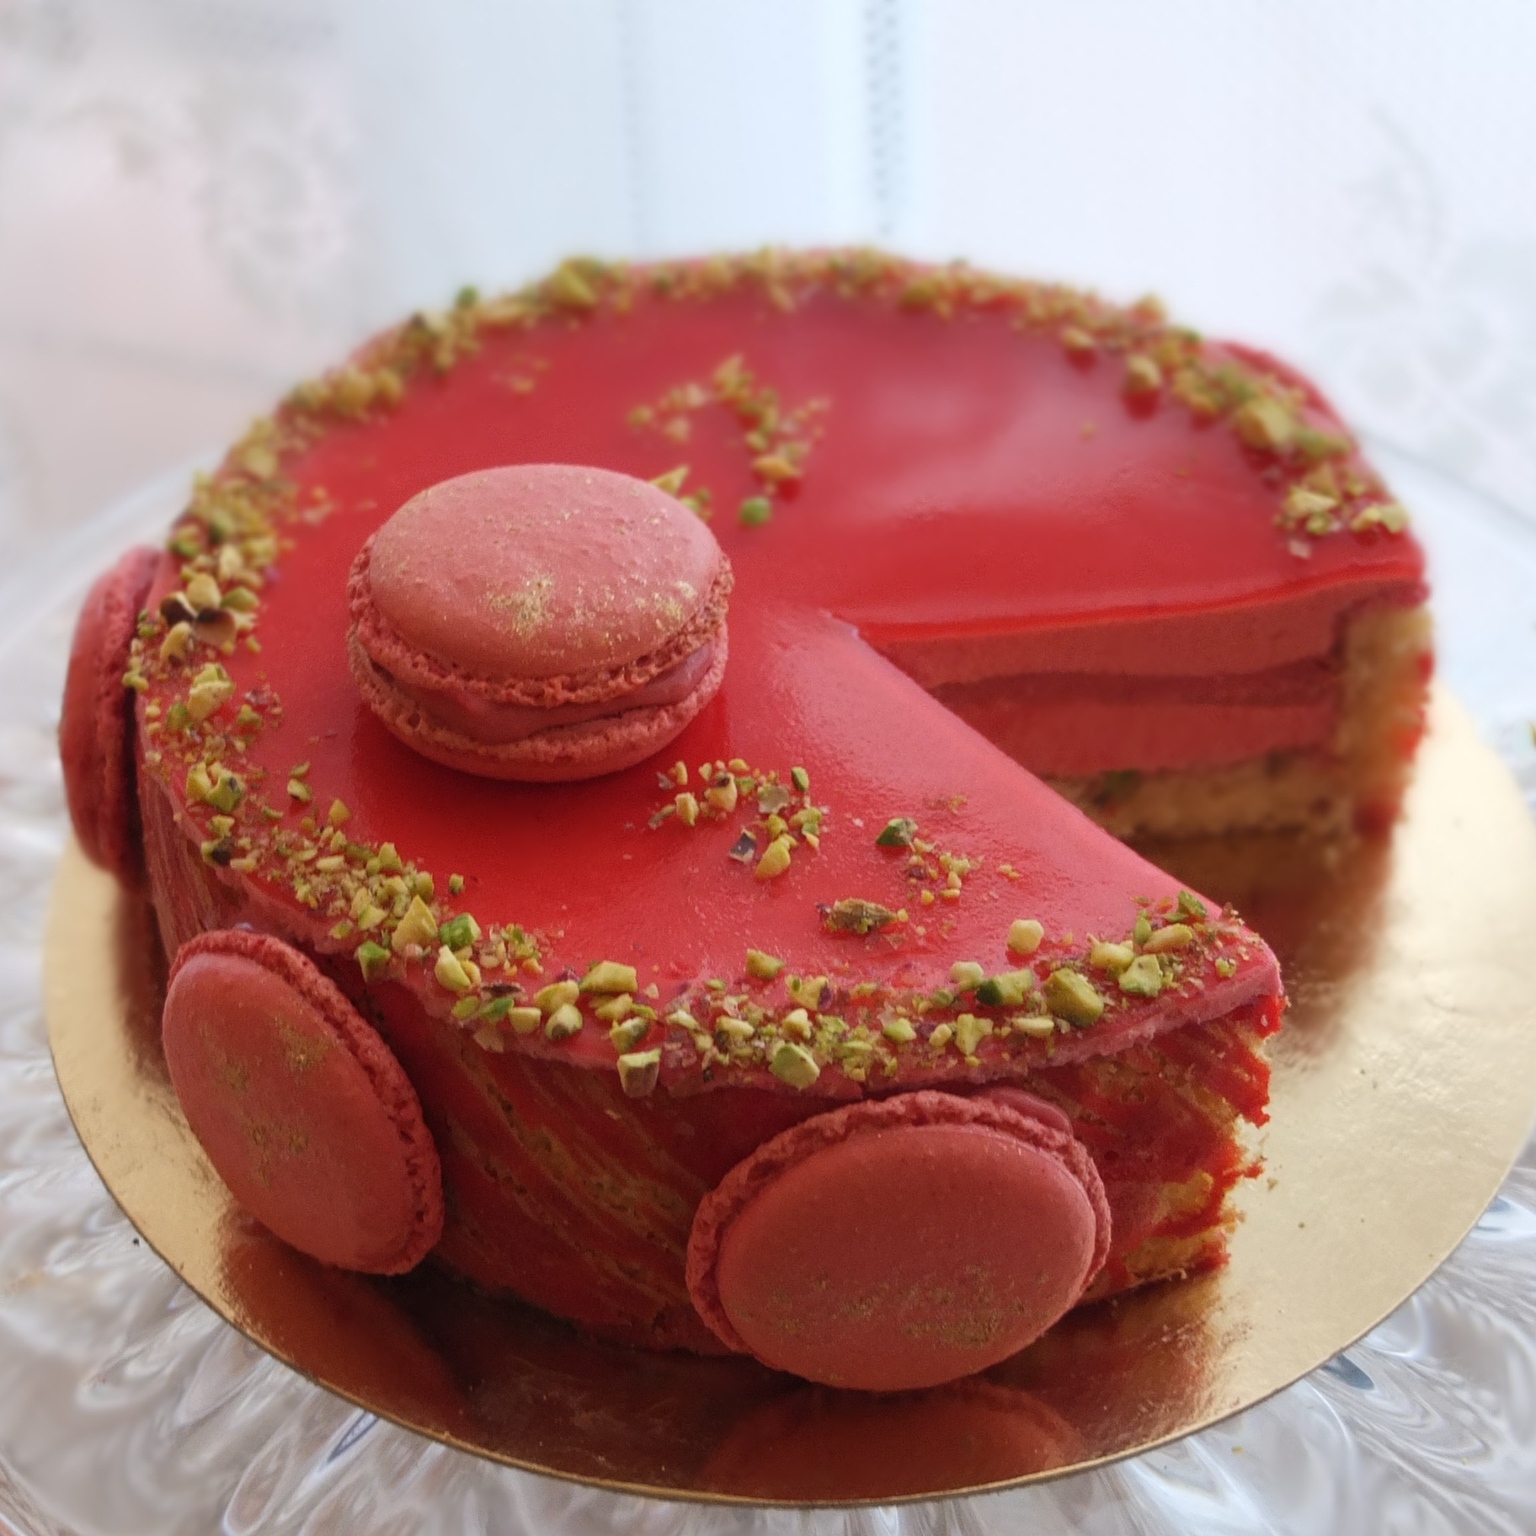
And here’s a version with macarons stuck on!
Ultra raspberry cloud mousse cake
All my friends spontaneously commented on how great the pistachios were in the cake, so I recommend you keep them.
Special equipment
Cake ring (18cm/7in diametre and 6cm/2.4in high); acetate strip (6cm/2.4in wide); baking tray (30x40cm/12×15.75in or bigger if possible)
Sponge (cigarette paste decoration and genoise)
Preparation
- line your baking sheet with baking paper. First on the baking sheet draw 1 strip 5cm/2in wide the whole length of the sheet then another strip about 1/2 of the sheet (you need about 60cm/24in), Then with your cake ring draw a circle 18cm/7in in diametre. Turn the paper upside-down so the pencil or pen marks are underneath. Keep the corners down with magnets right at the top edges or a little of the paste under each corner. (If you can do it by eye you don’t need to draw the shapes on).

- for the piped design prepare two or three disposable piping bags with very small plain nozzles.

Cigarette paste
- 20g/1 and 2/5 tablespoons unsalted butter, softened
- 30g/3 tablespoons icing/powdered sugar
- 32g egg white (2 good tablespoons) from 1 egg, at room temperature
- 22g/2 to 3 tablespoons plain/all-purpose or cake flour (first add 2/3 then see if it’s too liquid and add more)
- Colouring powders or Wilton colouring gels
- Beat or whisk the butter till creamy.
- Whisk in the icing/powdered sugar.
- Whisk in the egg white. If it curdles keep whisking and whisk over heat if necessary.
- Whisk in the flour until smooth.

- Piped raspberry design: separate 1-2 tablespoons of the mixture in a small bowl and stir in the green powder colouring. Colour the rest with the lighter pink and use a little (about 1/4) to pipe raspberries on the baking paper in the strips.

- Then whisk in a darker pink to the light pink and pipe swirls around the raspberries. Finally add dots of green to the tops of the raspberries.

- OR Splash/lines design: separate the cigarette paste into 2 or 3 bowls. Colour with red, orange and yellow (optional) or dark pink and light pink. As you prefer. Use a metal handwhisk to splash the first colour over the strips section of the baking paper
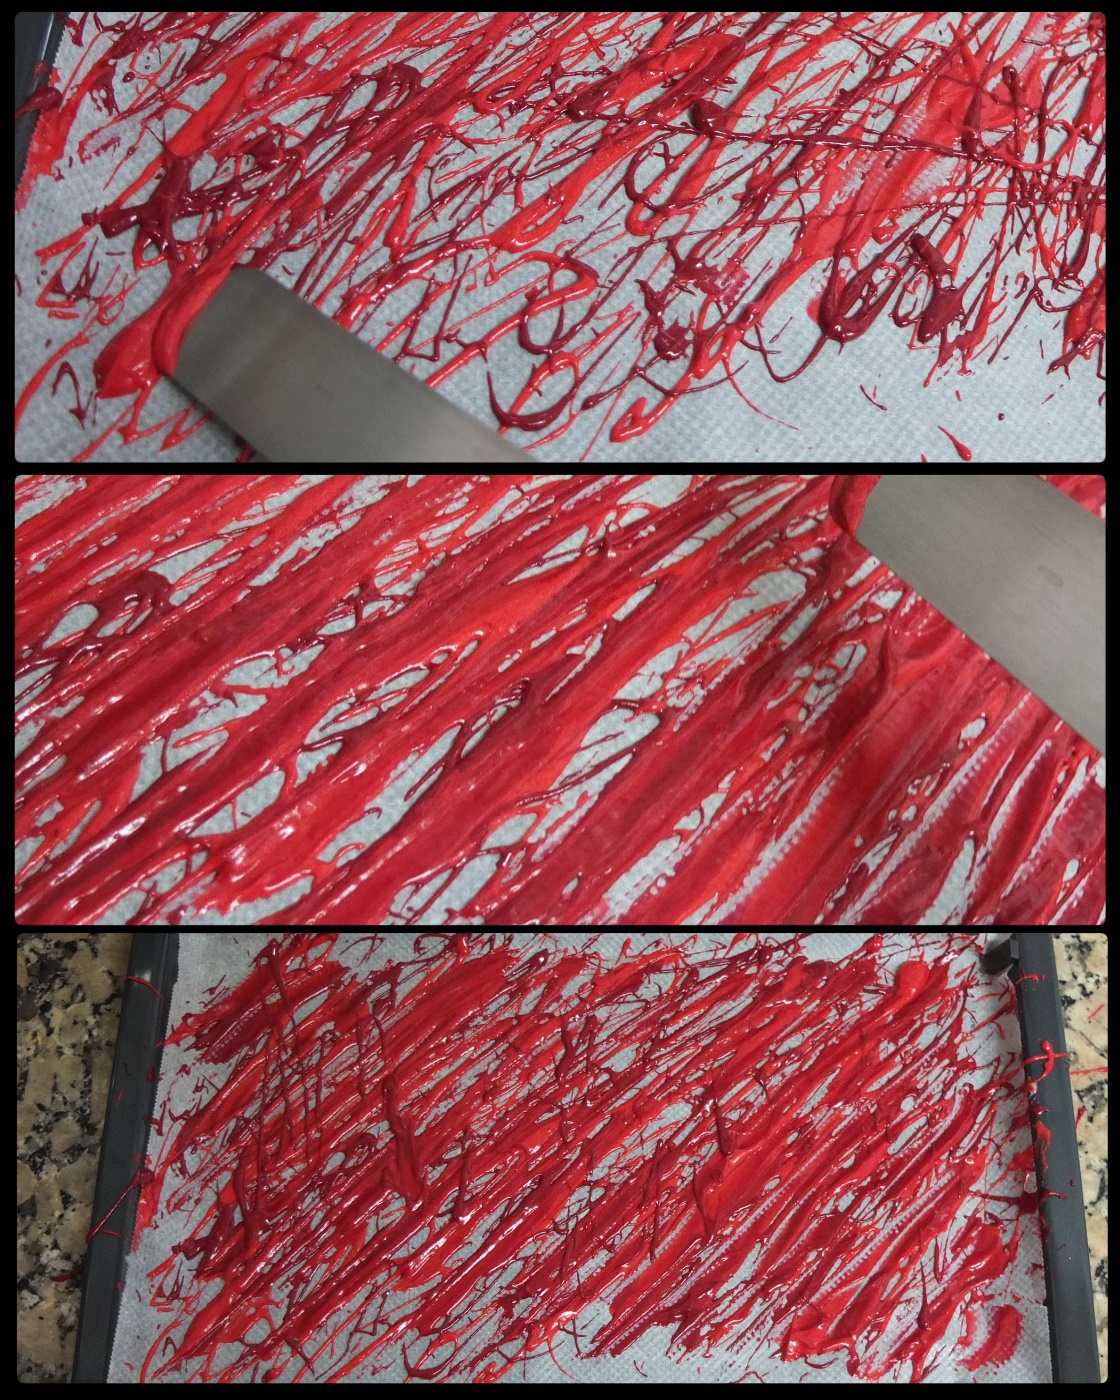
 Splash the next colour around the first, then the other if using. Then use the tip of an offset spatula knife at a 45º angle and make diagonal lines across the strips.
- Other design options: you could pipe diagonal lines or any design you like. Apparently if you pipe continuous lines they can come out better than piped dots, which often get stuck to the paper.


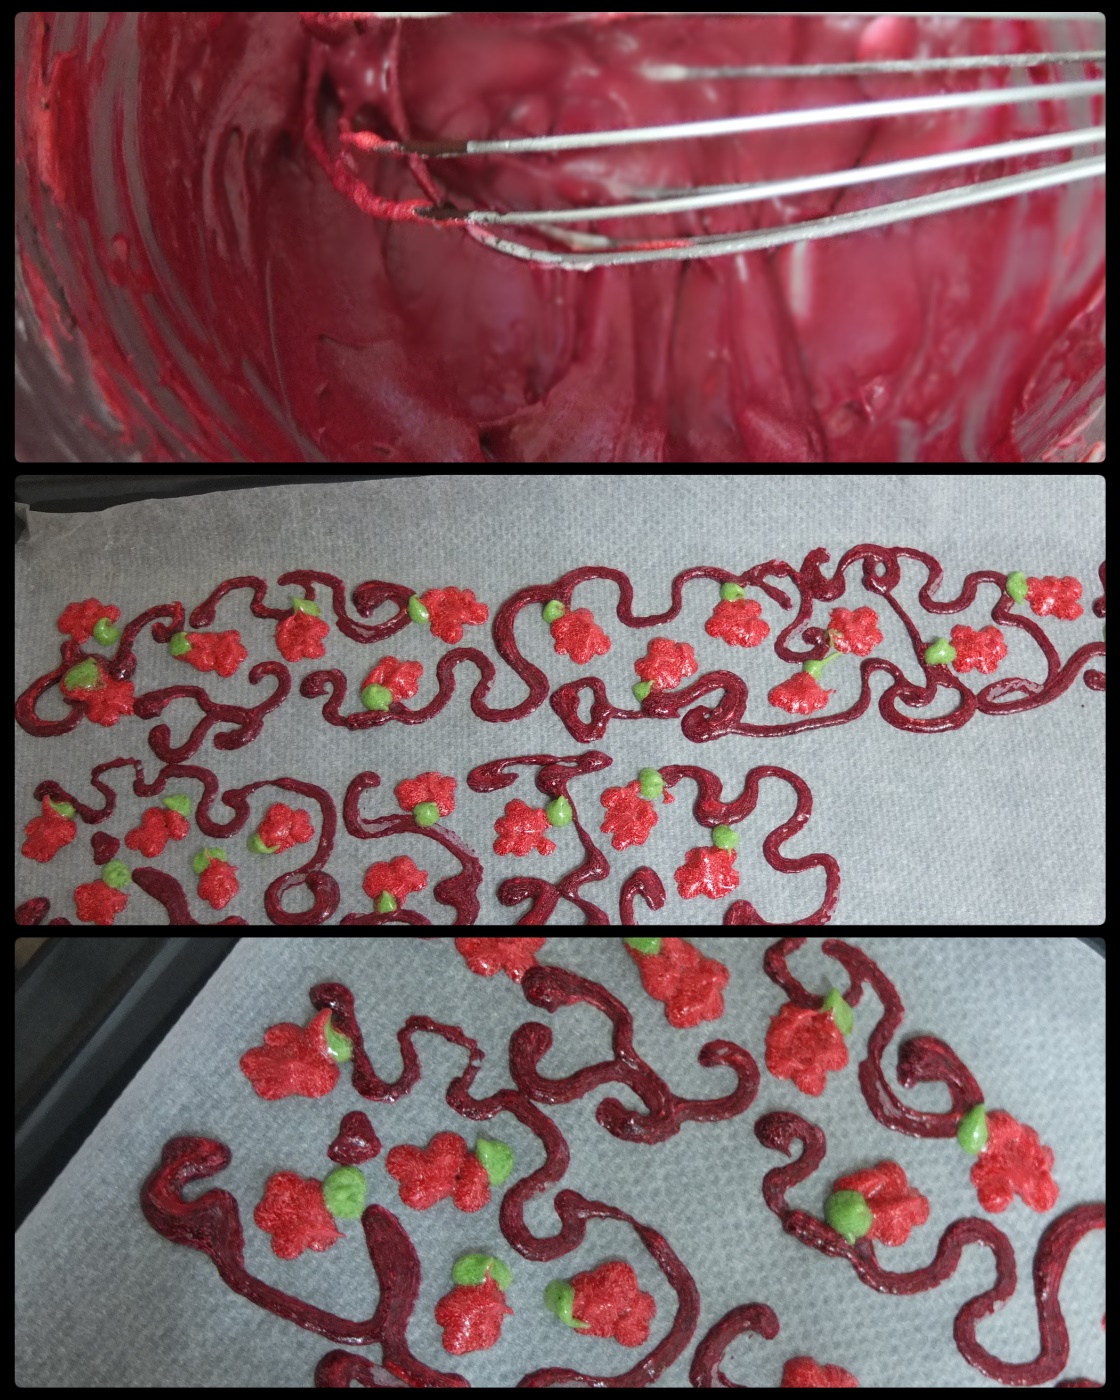
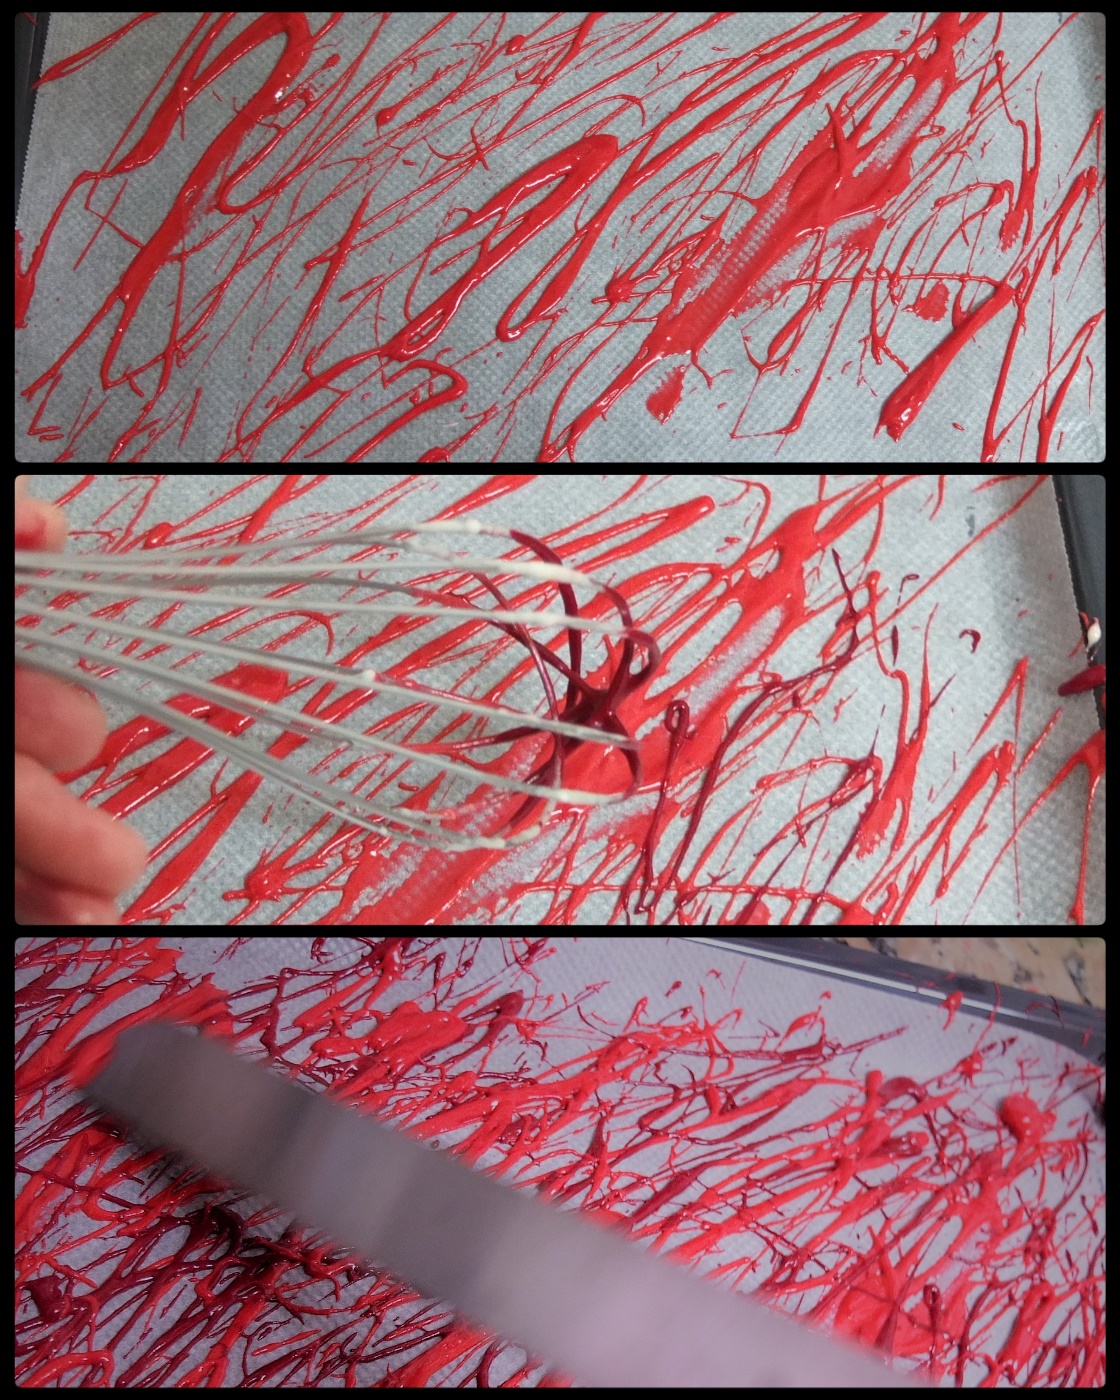
Warning: if you make some of the lines a bit thin then they won’t come out so well in your final design. You can see some of my lines are a bit weak. Poor things.

Ultra raspberry cloud mousse cake
Genoise sponge
- 80g/2/3 cup cake flour (but not with baking powder) or plain/all-purpose
- 20g/2 tbsp cornflour (cornstarch)
- 40g/1/3 cup ground almonds
- 230-240g egg (from 4 medium-large eggs)
- 120g/1/2 cup caster/superfine sugar
- pinch of salt
- 1/2 teaspoon pure vanilla extract
- 2-3 tablespoons roughly chopped pistachios
See my genoise sponge recipe here for detailed information and photos. Basically you whisk the flour, cornflour and ground almonds together in a medium-sized bowl. Whisk the egg and sugar in a large bowl over a bain marie until the mixture has doubled or tripled in volume and is thick. It should not go over 45º celsius (hot to touch, but not so hot so you can keep your little finger in it). Then add the salt and vanilla and whisk until the bottom of the bowl feels cool and the genoise mix is thick and fluffy (it should form a ‘ribbon’ when you let it fall – you can whisk with an electric whisk or pour into your standmixer bowl and whisk on medium-high speed).
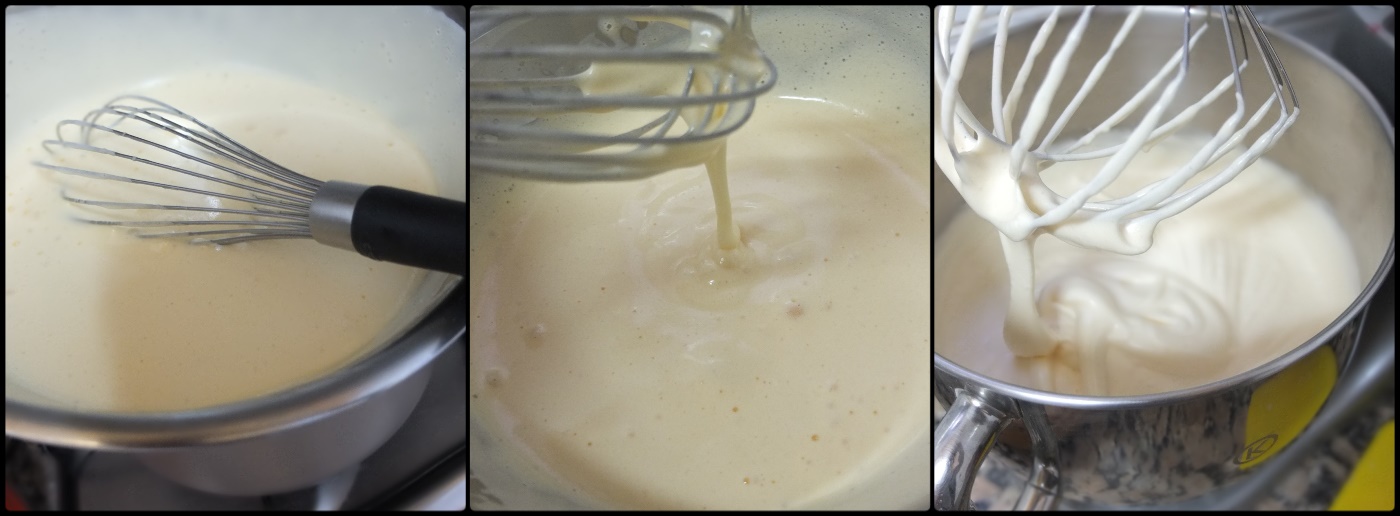
Gently fold the flour mixture in two goes with a rubber spatula until just combined. Don’t overmix or it will flatten out.
Pour the genoise mixture carefully into the middle of your baking sheet and spread with a large offset spatula knife, starting from the centre to the corner, then again from the centre to the other corner until all four corners have some mixture.

Then spread along the sides. The idea is to make a flat layer by spreading with as few movements as possible so you don’t overwork the mixture and have it collapsing. Sprinkle with chopped pistachios where your circle is.

Bake about 8 to 11 minutes (depending on your oven). An inserted skewer should come out clean but don’t overbake or it will be a little dry. As soon as it comes out of the oven take it off the hot baking tray and place to cool on a wire rack so that it stays moist and doesn’t dry out!
Raspberry curd insert
- 170-175g/ml seedless raspberry juice/pulp (press about 300g/10.5oz fresh or frozen raspberries through a sieve)
- 2 tablespoons lemon juice (optional)
- 70g/3 and 1/2 to 4 tablespoons maple syrup (or 65g/3 tbsp honey)
- 60g egg yolks (from 3 medium/large free-range eggs) mixed with 1 tbsp cornflour and 1-2 teaspoon water
- 50g/3 and 1/2 tbsp unsalted butter
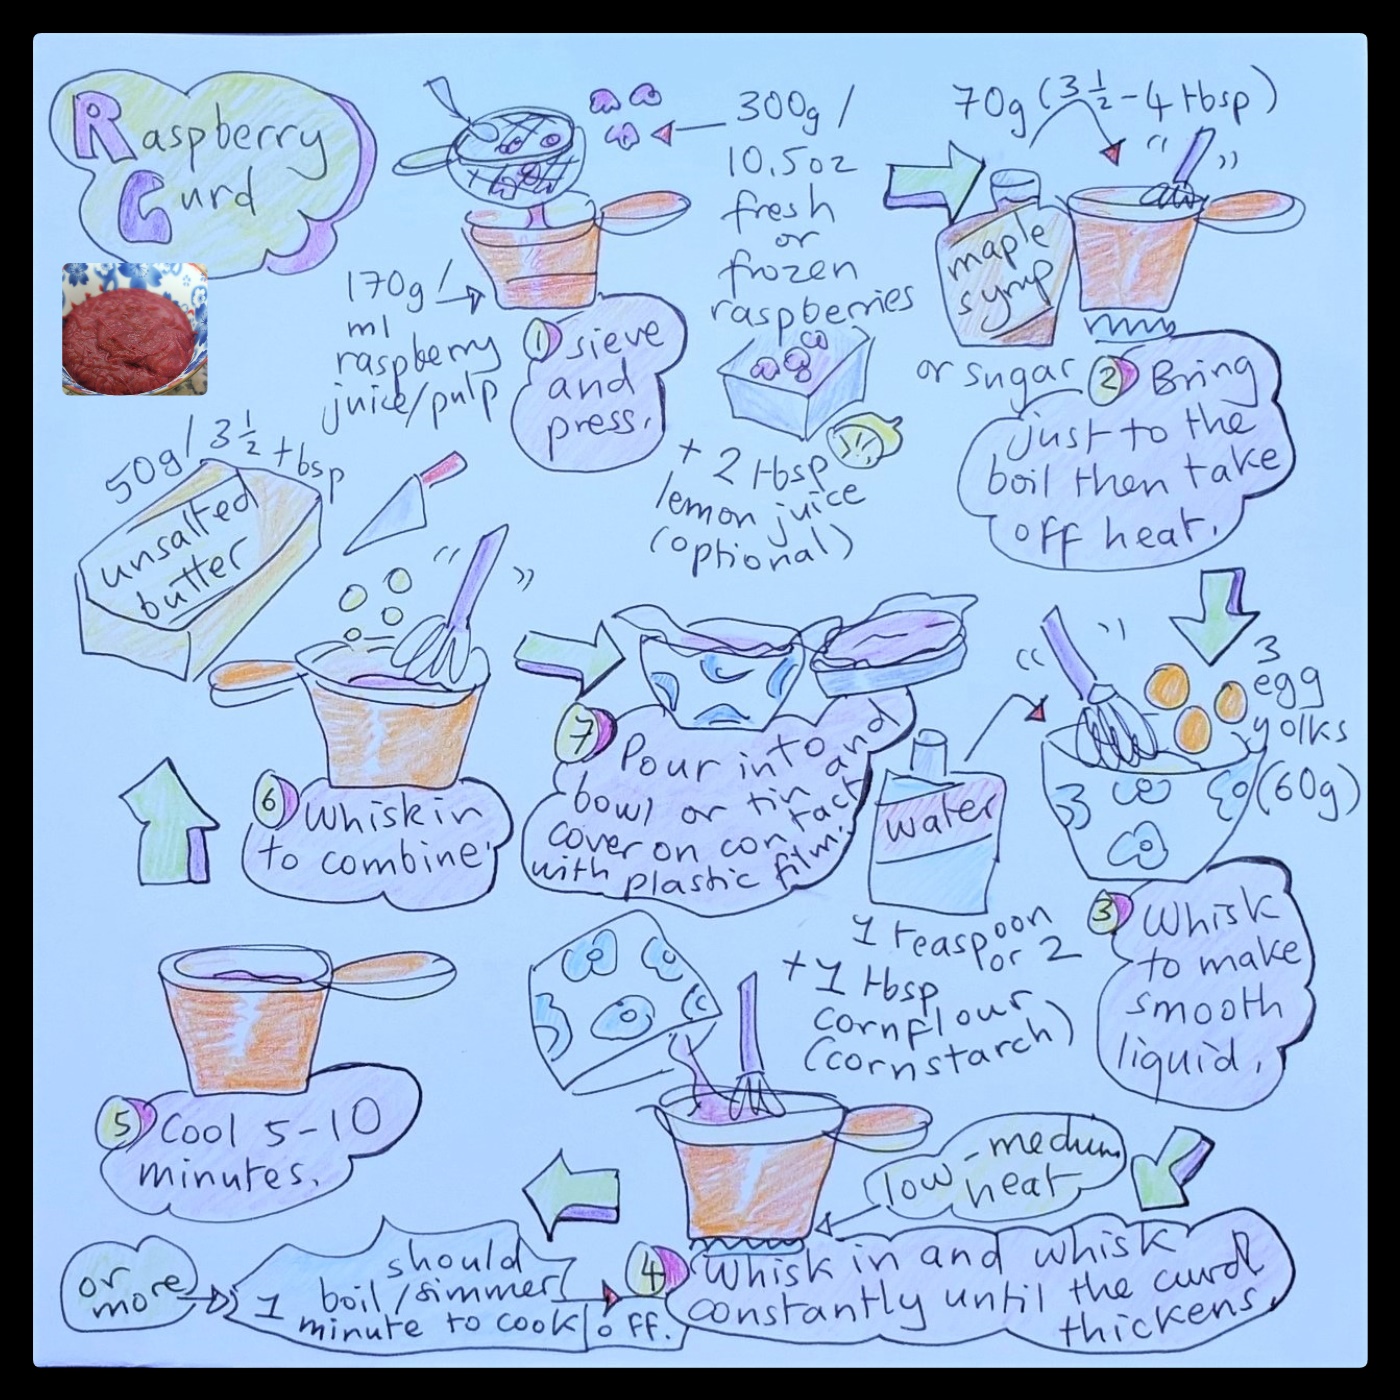
Pour the curd into a 16cm/6in diametre cake tin lined with plastic film. Cover with the plastic film (on contact) and freeze for 1 hour or more.

Assembling – part 1
- Tape the acetate strip together to make a ring of acetate that fits snugly in your cake ring and doesn’t fall out.
- Place your cake ring (with the acetate inside) on your serving plate or silver/gold cake base.
- Cut the strips of genoise sponge (cut the edges so they’re flat) and line the sides. You can use a sharp knife and rectangular wire rack to cut even strips. There should be a space of about half a centimetre between the top of the sponge and cake ring.
- Trim the circle (with the pistachios) so it fits at the bottom of the cake ring.

Optional syrup: if your sponge is a little dry or you like the idea of alcohol (tee hee) you can make a kirsch syrup. Bring to the boil in a small saucepan: 30g/ml of water, 30g/ml kirsch cherry liqueur and 30g/2 and 1/2 tablespoons sugar. Simmer a few minutes then allow to cool to room temperature. Brush the sponge base and sides with the syrup to moisten.
Raspberry mousse
- 200g/ml raspberry juice/pulp (press about 340g/12oz fresh or frozen raspberries through a sieve)
- 44g/1/5 cup sugar
- 3 and 1/3 gelatin leaves (about 6.5g)
- 167g/ml whipping cream (35%) – measure the cream into a big bowl (or standmixer bowl) and chill in the fridge for 30 minutes to 1 hour or more. If you live in a hot climate prepare another bigger bowl of ice and water to place underneath (to keep it cold).
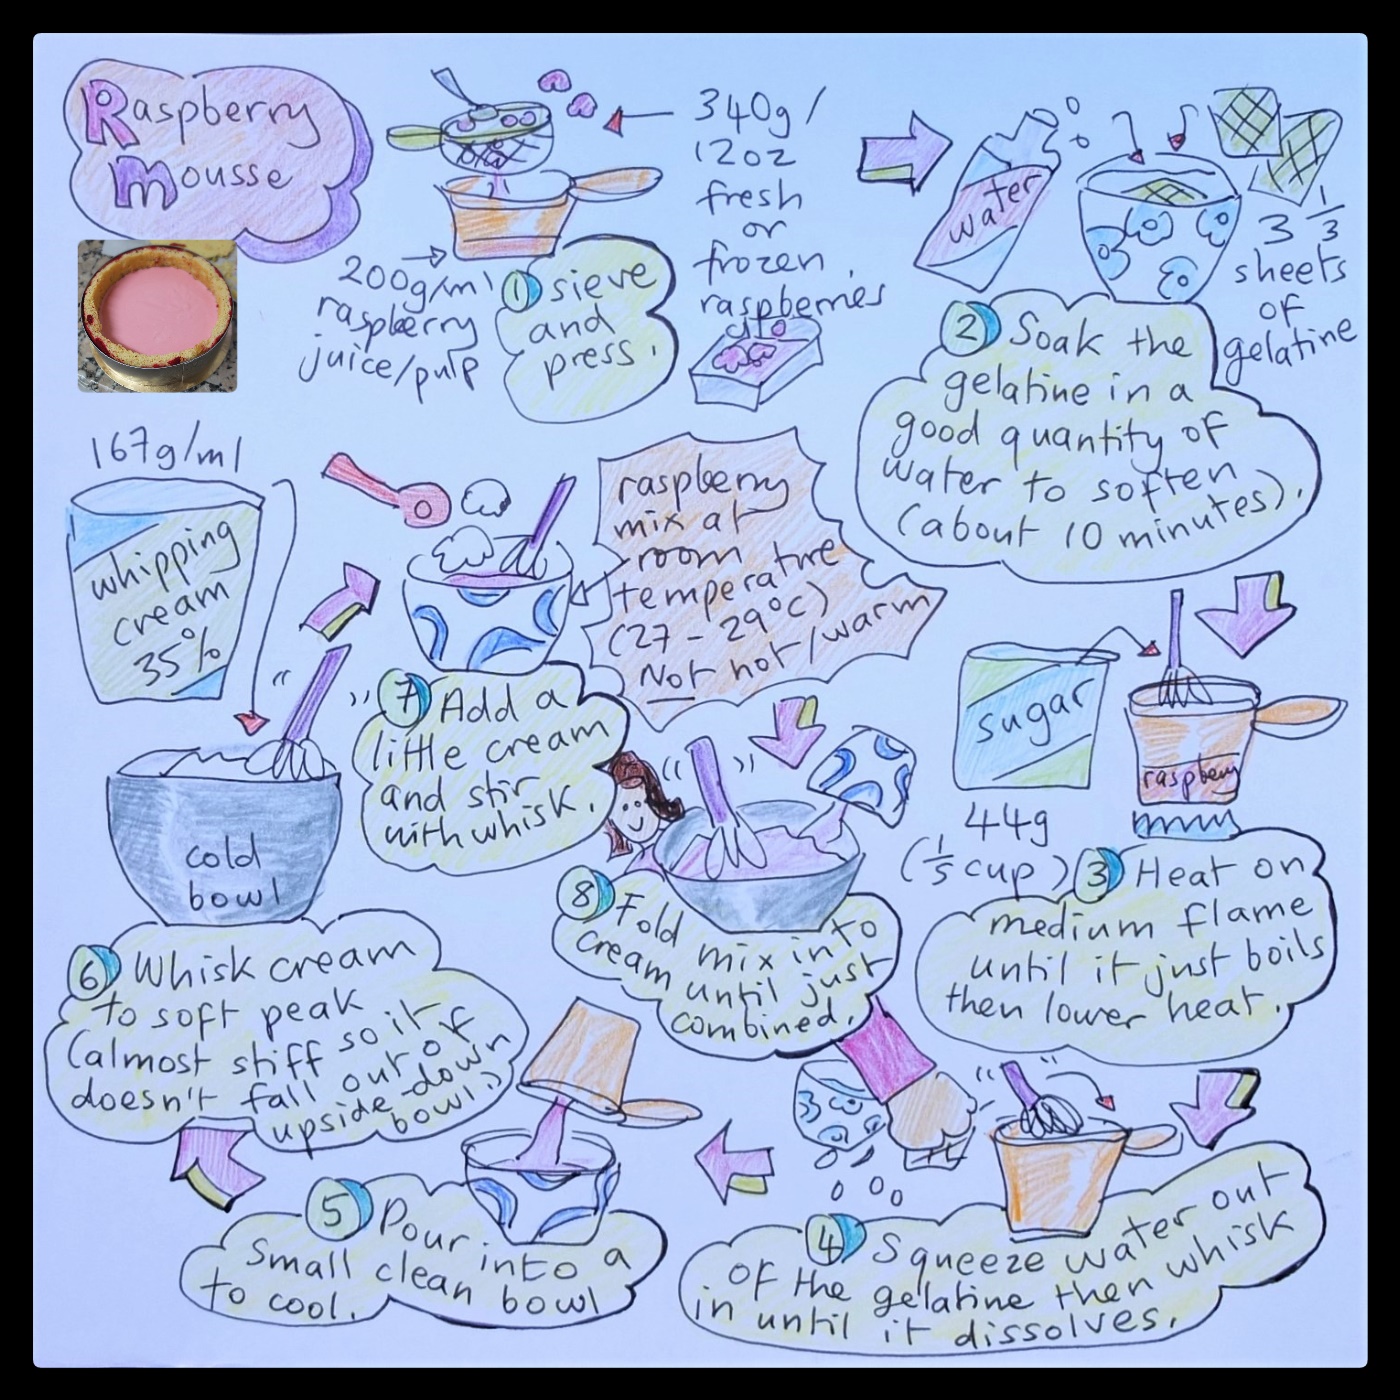
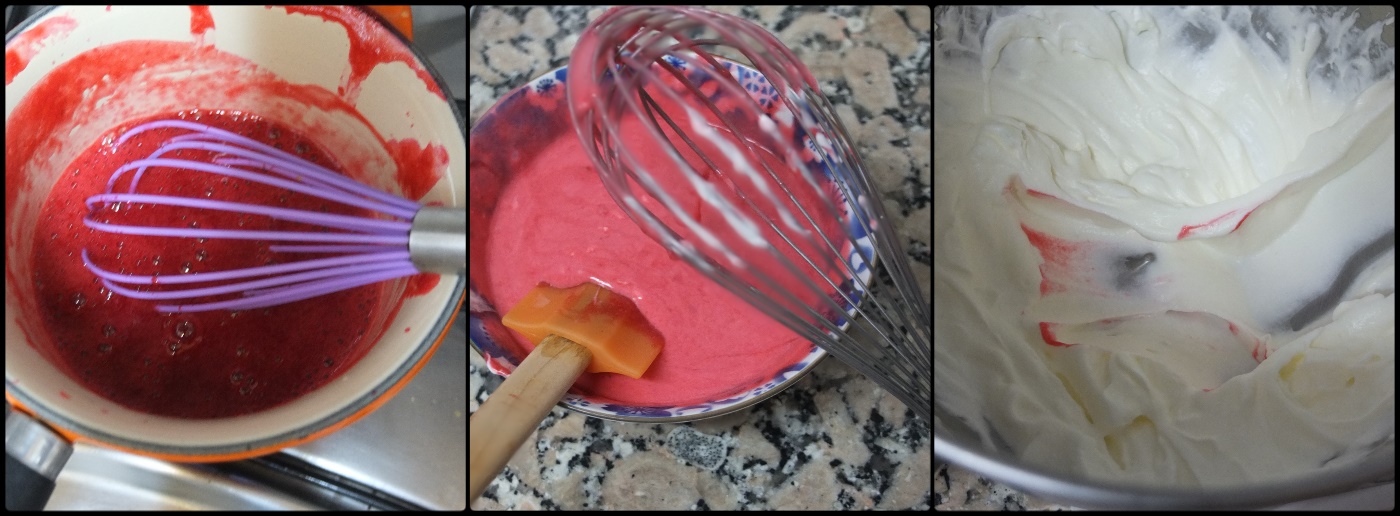
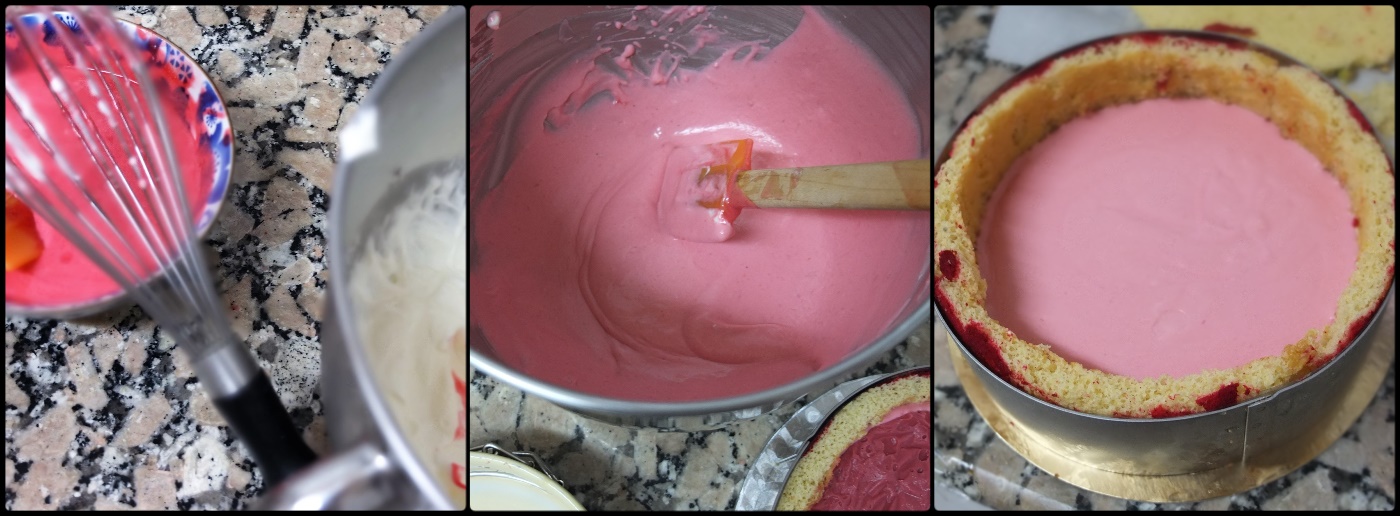
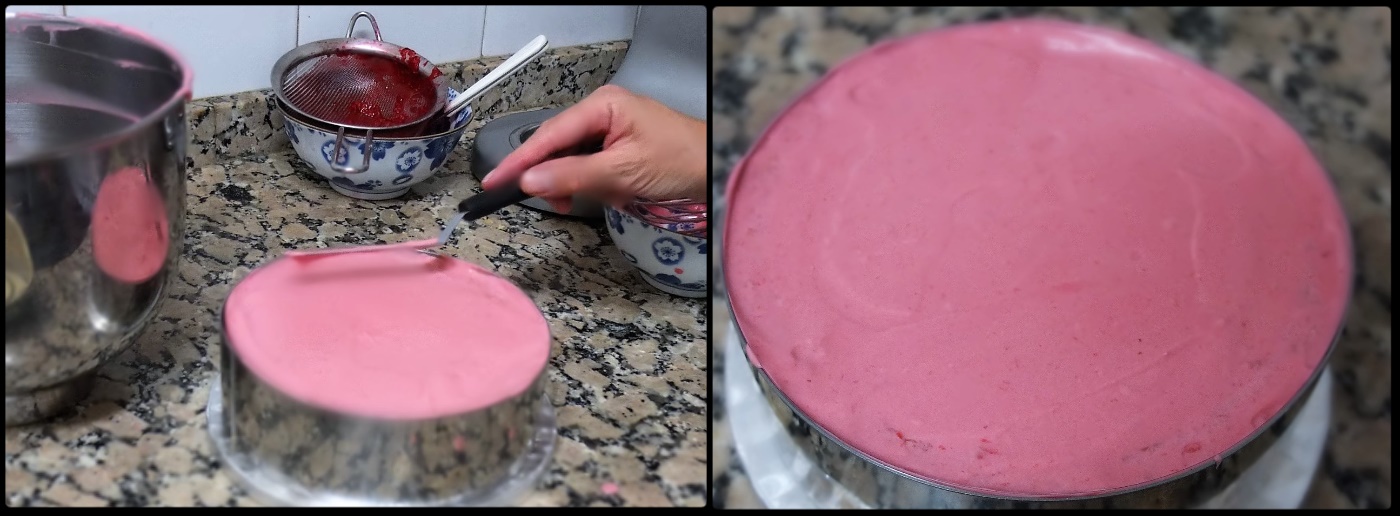
Use the mousse immediately to fill the bottom half of your cake.
Assembling – part 2
- Three pink macarons for decoration (optional) – you can follow my recipe for Italian macaron shells here and fill with a little of your raspberry curd or raspberry jelly. You can keep the rest of the macaron shells in the freezer for other cakes.
- A few tablespoons chopped pistachios
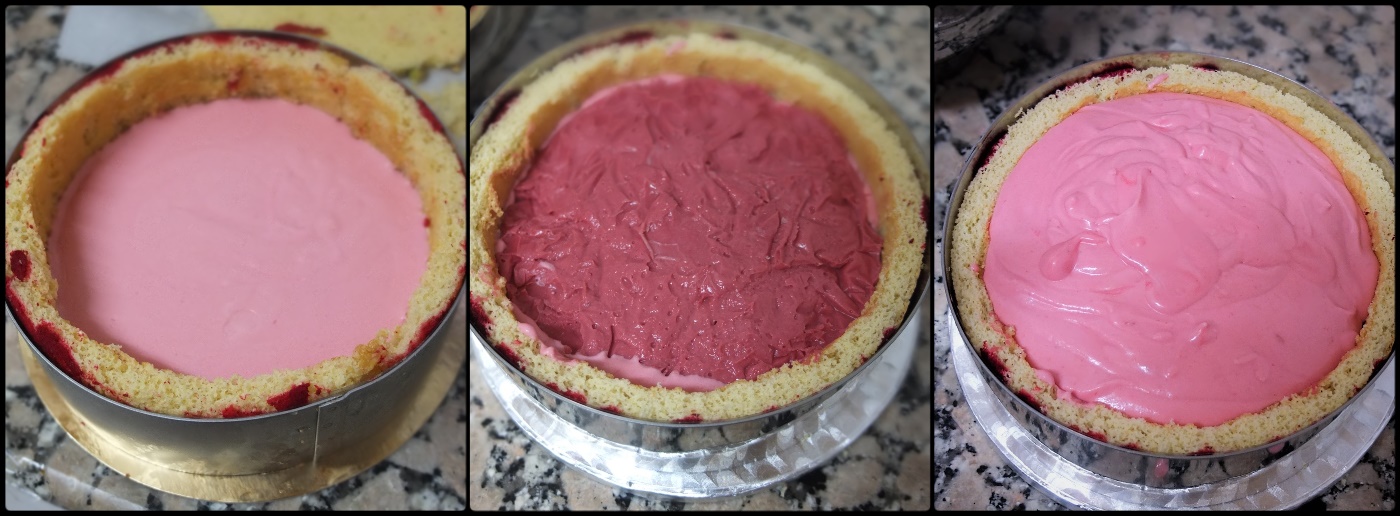
- Carefully place the frozen circle of raspberry curd in the middle of your cake.
- Pour the remaining raspberry mousse over the curd layer. It should almost come to the top, leaving a space of just 1-2 mm (for the glaze).


- Freeze for 1 to 3 hours or more (overnight if you like). The cake needs to be set and cold when you add the glaze.
Rasberry glaze
- 75g/1/3 cup sugar
- 75g/ml water
- 50g/ml raspberry juice/pulp (press about 85g/3oz fresh or frozen raspberries through a sieve)
- 1 and 1/3 sheets of gelatine (between 2 and 1/2 to 3g)
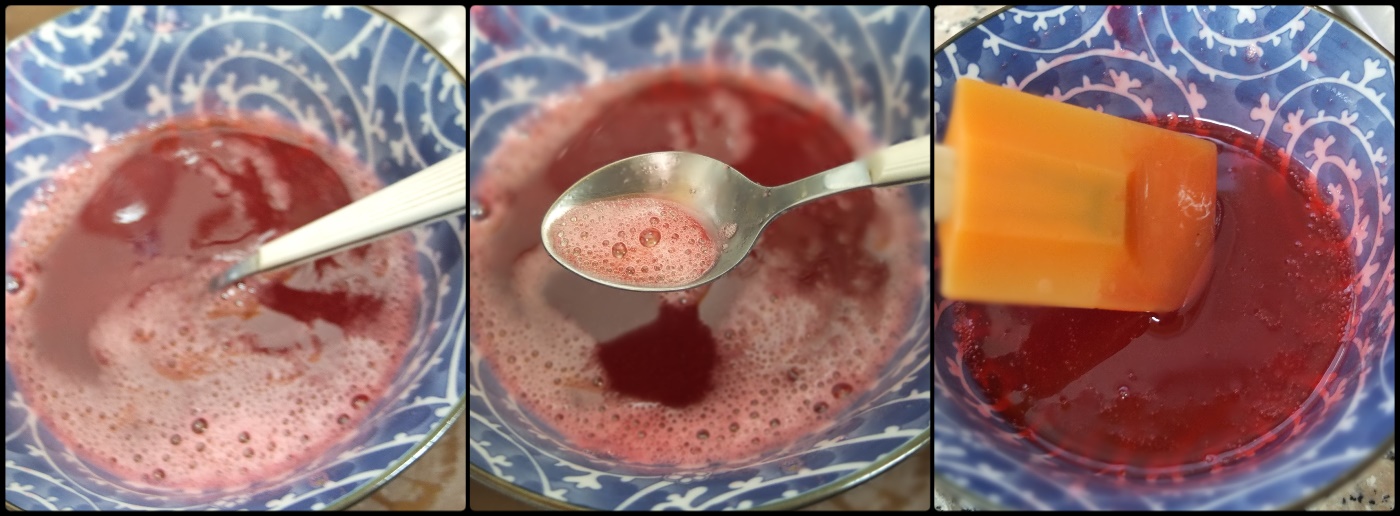
- Put the gelatine in a bowl and cover completely in cold water. Leave to soften.
- Heat the sugar, water and raspberry juice in a small saucepan over low-medium heat until the sugar dissolves and it just boils. Immediately take off the heat.
- Squeeze the water out of the gelatine then add the gelatine to the saucepan and whisk in until it dissolves.
- Pour into a small clean bowl to cool until it’s at room temperature. Do not whisk again or your glaze will have too many bubbles and become cloudy. You can put it in the fridge to cool faster but make sure it doesn’t solidify too much. It should be a gloopy mixture, not too liquid and not too set. See my neutral mirror glaze post for more details.
When ready to use the glaze, check the consistency and remove bubbles with a spoon (you can also cover in plastic film on contact and it will come off with the plastic). Stir but don’t whisk. Warning: if the glaze is too liquid it will run down the sides of the cake (but could still work if some stays on top) and if too set it won’t be easy to spread over the top. If too set you can warm again over a bain marie (the glaze will then work but may not be as pretty).
Pour the glaze in the middle of your cake and swirl around so the glaze covers the top. You can use an offset spatula knife if you just spread quickly once or twice over the cake. Place again in the freezer to set for 1 hour or so.
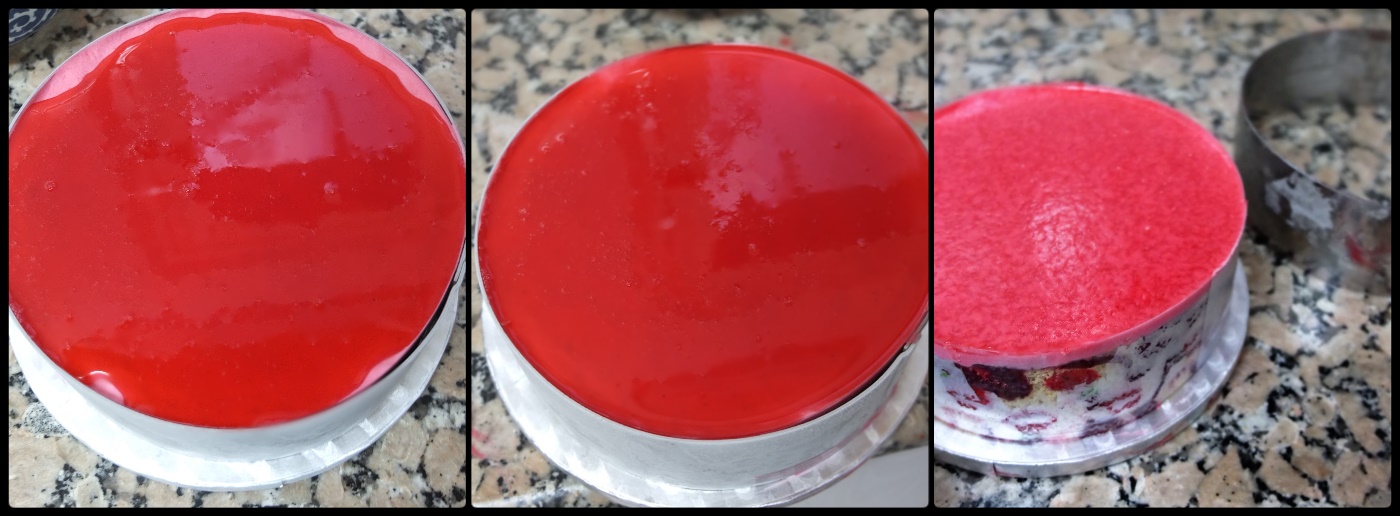
Finally, remove the cake ring (go around the sides with a butter knife first if necessary). Then if your cake is set enough cut the acetate strip with scissors at the seam where it’s stuck together then remove the tape in one quick movement. Decorate with macarons (optional) and chopped pistachios. Tada! 🙂

Ultra raspberry cloud mousse cake
Eating and storing this cake
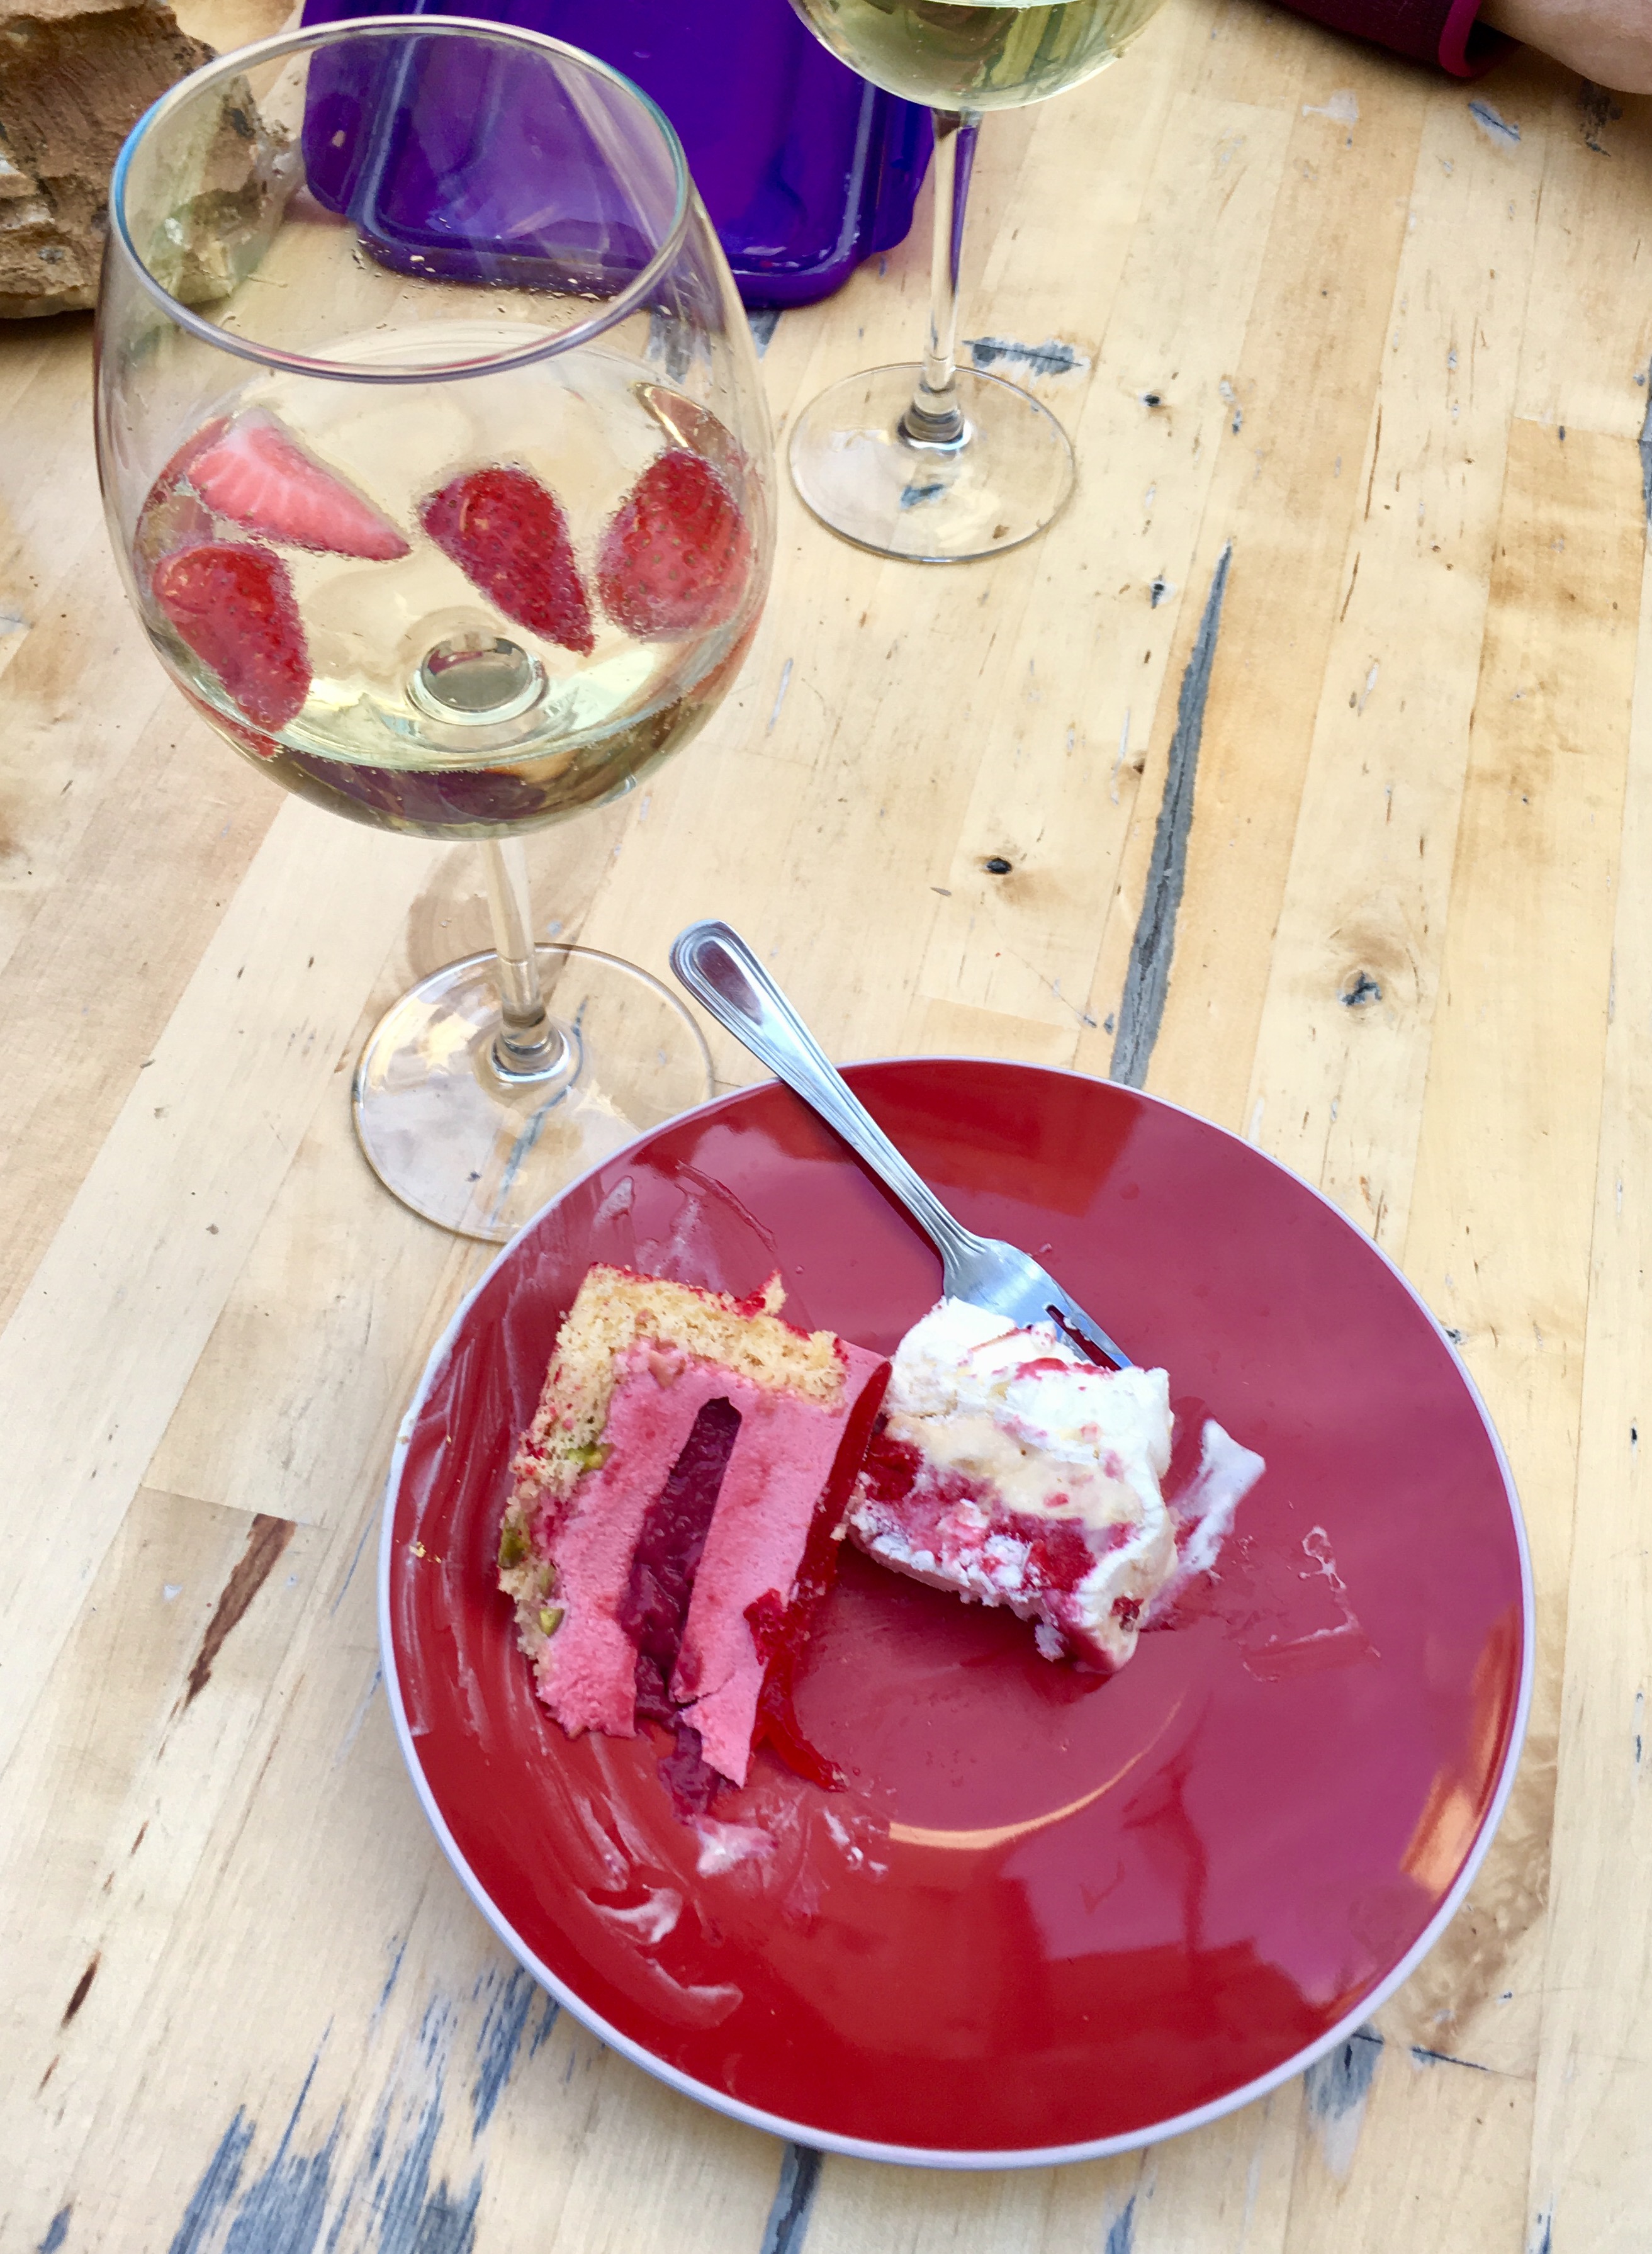
This cake keeps very well in the fridge up to 4 days or so. It also freezes really well for up to 2 weeks, but will also be okay in the freezer for 1 or 2 months. Defrost in the fridge for half a day, or just an hour at room temperature. It’s quite nice if still a bit frozen and cold. Lovely cake to have on a friend’s balcony (there was also some vacherin glacé ice-cream cake!). Cakes and cava with my friend Nine after an afternoon rock climbing. Just in case you were wondering what I do between cakes. Lol. 🙂
Yum yum! Do have a slice! And do consider making it – it’s really worth it!
Ultra raspberry cloud mousse cake
Or two slices!? It’s very light. Go on…

Ultra raspberry cloud mousse cake
Farewell for now sweet reader and thanks for dropping by! Have a lovely fresh and light end of the week and weekend with some happy baking and eating! 🙂 Lili x

The cake looks incredible, pure perfection! Love the recipe and all the tips you shared 🙂
LikeLiked by 1 person
Thank you so much for your lovely comments and I’m so happy you’ve enjoyed the recipe! 🙂
LikeLiked by 1 person
Pingback: Ultra raspberry cloud mousse cake recipe! | homethoughtsfromabroad626
Pingback: Ultra raspberry cloud mousse cake recipe! | frankensportblog
You did just show to have a great pastry heart, thanks!
LikeLiked by 1 person
Thank you for your lovely words! I’m touched. And thank you for the reblog. 🙂
LikeLike
Wow! What a lovely design, Lili. You are right: one can never have too much raspberry, and if the beautiful dessert tastes like summer (very poetic), I guess that tasting it, is like traveling to paradise. I would love to travel there! 🙂 Have an excellent week.
Marianne
LikeLiked by 1 person
Aw Marianne, thank you so much for another lovely visit from you! I’m happy you like this dessert. I think you’re always very poetic and wish I could give you some of this raspberry cake! Have a lovely week too! 🙂 Lili x
LikeLiked by 1 person
Thank you, Lili 🙂
LikeLiked by 1 person
Pingback: Happy new year! Top posts in 2016 and baking projects for 2017… | lili's cakes