
These delicious pastries are a hybrid of the wonderfully flaky British puff pastry horns I remember from my childhood filled with a yummy Sicilian cannoli filling of creamy ricotta with dark chocolate pieces and orange peel. Sprinkled with a hint of cinnamon. Later I’ll tell you the story behind this unplanned amalgam of traditional cakes and reveal a healthier mesquite ‘superfood’ version! You can adapt these puff pastry horns, filling with jam and whipped cream or perhaps coffee pastry cream. Then sprinkle with icing sugar or leave ‘au naturel’. They’re really easy to make following some simple tips. So can I tempt you to a cannoli cream horn? Can you visualise these for your teatime? 🙂

Cannoli cream puff pastry horns
How cannoli cream horns were invented
I appreciate somewhere on this planet people will be exclaiming ‘Pah, this isn’t a new invention, I’ve been eating them for years!’ (Um,.. I’ve just seen a few recipes for these online, darn). But they’re new to me. 🙂
Anyway, following an amazing workshop in Sicily with Giana learning to make traditional cannoli I was looking forward to making them with mum (have a look here if you’re interested in contacting the Uncovered Sicily website about a traditional Sicilian pastry class with Giana). Here’s a photo of the cannoli I made with her:

When I arrived at Mum’s London flat I almost immediately announced (after asking how everyone was): ‘We can make cannoli while I’m here Mum! I’ve learnt how to make cannoli!!!’ (big grin). But sadly it was not to be.
One day later there was a new baking announcement: ‘Oops, I forgot the recipe back home in Barcelona. Can’t make Giana’s cannoli!!!’ But I did have a partial recipe for the cannoli cream saved on my tablet and 6 unfilled puff pastry horns I’d brought with me from Barcelona.
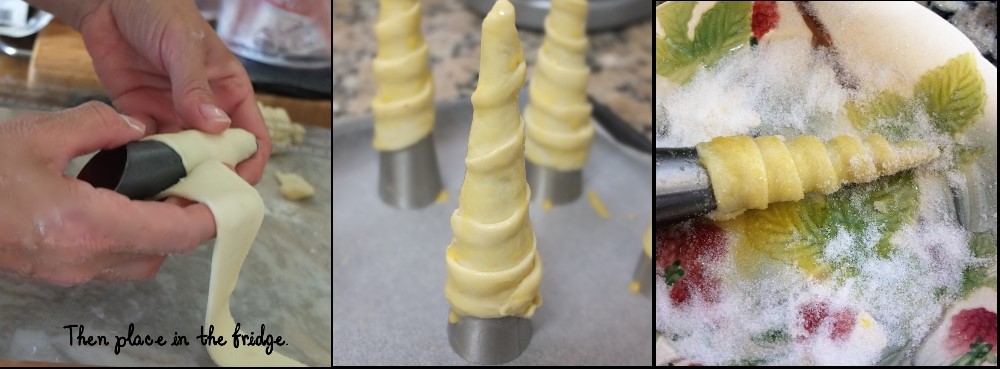
Puff pastry horns or cones
Yes, this sounds a little odd I know. I’ll just explain the presence of these horns. Well, the morning before travelling to London I finally got round to making these to use up my homemade puff pastry, which I didn’t want languishing in the freezer for 1 more month in my absence. But I realised filling them in Barcelona meant rushing around the kitchen like a mad woman (and possibly missing the plane) then carrying cream-filled pastry, rapidly getting softer not to mention pretty messy. The solution was clearly to take them to mum’s unfilled and they survived the trip really well.
And tada! The pastry horns came to my rescue when looking to house traditional cannoli ricotta cream, demonstrating that necessity truly is the mother of invention.
The marriage between the light crispy horns and creamy ricotta is a beautiful one so I was happy to make them twice more (just to tweak and check, ahem) finally coming up with a healthier mesquite version too!
Mesquite, a new superfood?
Mesquite comes from the tree (of the same name) – its seedpods are ground into a flour-like powder with a pleasantly sweet maple syrup-like flavour though at the same time it’s quite strong and a little earthy. It can be used to replace flour and also as a sweetener. Apparently it’s rich in calcium, magnesium, maganese, potassium, iron, zinc, protein and lysine plus it helps stabilise your sugar levels! You can read more about it in Mesquite Powder… the Secret Ingredient and 4 healthy sugar alternatives: Stevia, Lucuma, Mesquite, Xylitol. The article Top 6 healthy sugar alternatives also gives tips on how to use mesquite in baking.
Of course it’s been pointed out that while it can be used as a replacement for sugar or flour, we shouldn’t get carried away as there are healthier things we could be eating. Which is why some people are questioning whether it really is a ‘superfood’. Still, if it helps reduce your processed sugar or flour intake then it’s definitely worth looking into. And I did actually feel good after eating the mesquite horns version, so there you go. 🙂
September bakes
Just before the recipe (coming soon!) here’s a little inspiration in the shape of my September bakes. I spent the month travelling around Birmingham, Wales and Paris with mum, attending two baking courses in Paris to produce a cherry confection and a vanilla and chocolate mousse cake, which will be tweaked and adapted in the future. And with my niece in Birmingham we tried out vegan aquafaba meringues with the murky liquid from a can of chickpeas, which was fascinating especially if you like scientific experiments. And very handy if you’re vegan.

But now let’s make those cannoli horns…!
THE RECIPE – makes about 7 to 8 medium-sized horns
I found it difficult to find a detailed step-by-step recipe for puff pastry horns, so mine are mostly based on trial and error, with a little pastry common sense. The cannoli cream is based on Giana’s recipe, which means it’s delicious and not too sweet. Here are some tips arising from the kitchen experiments.
Baking tips
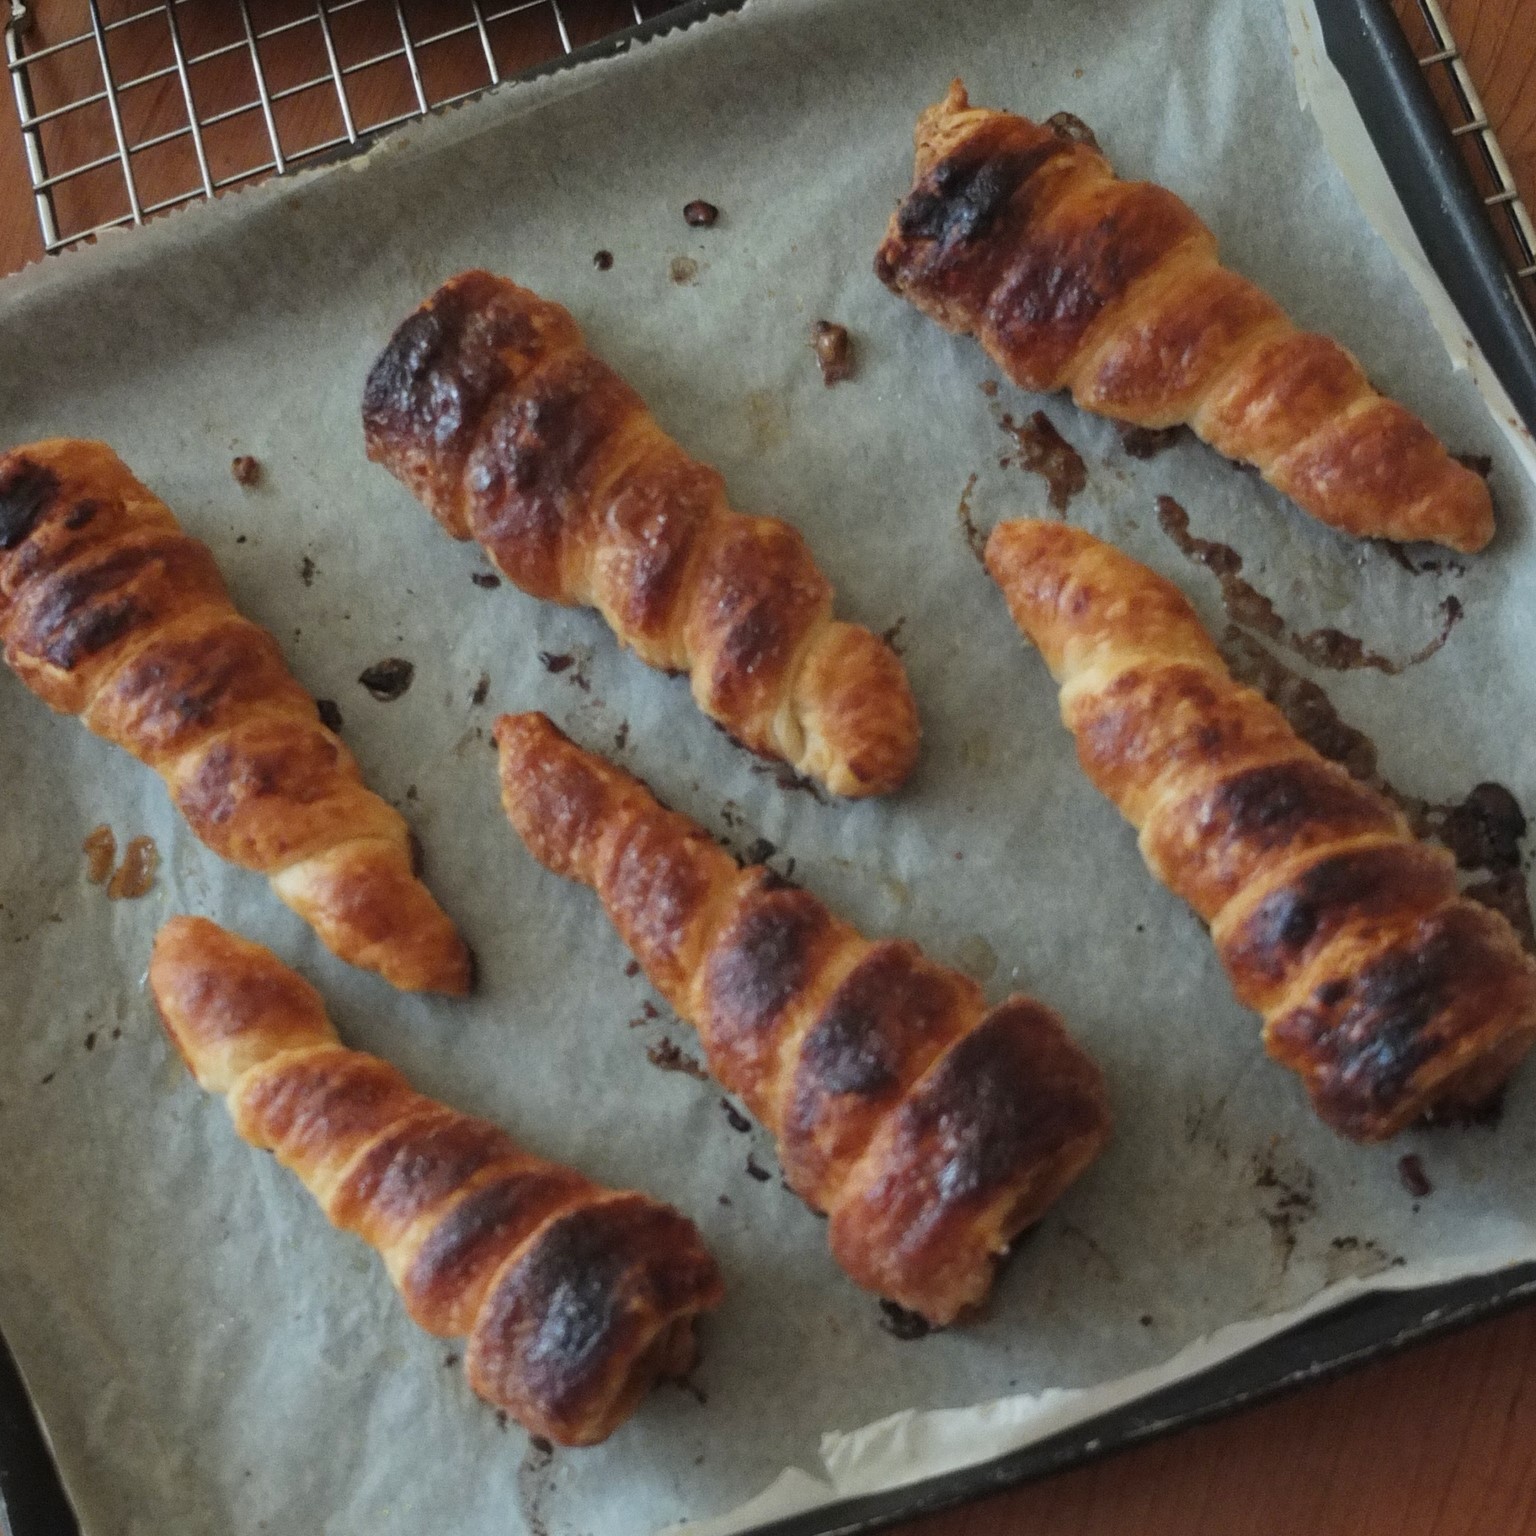
Puff pastry horns
- I prefer homemade inverted puff pastry as it tastes delicious and holds very well. You can follow the inverted puff pastry recipe in my basics section. But you can also use shop-bought all-butter or 20% butter puff pastry. I tried some and though it didn’t taste as good the horns were fine once filled with the cream. Also, if you buy ready-rolled you have conveniently even thin pastry (just roll it out a little thinner) which helps make nice horns.
- Your pastry needs to be rolled quite thin (1mm to 1.5mm) or it will be difficult for it to cook through.
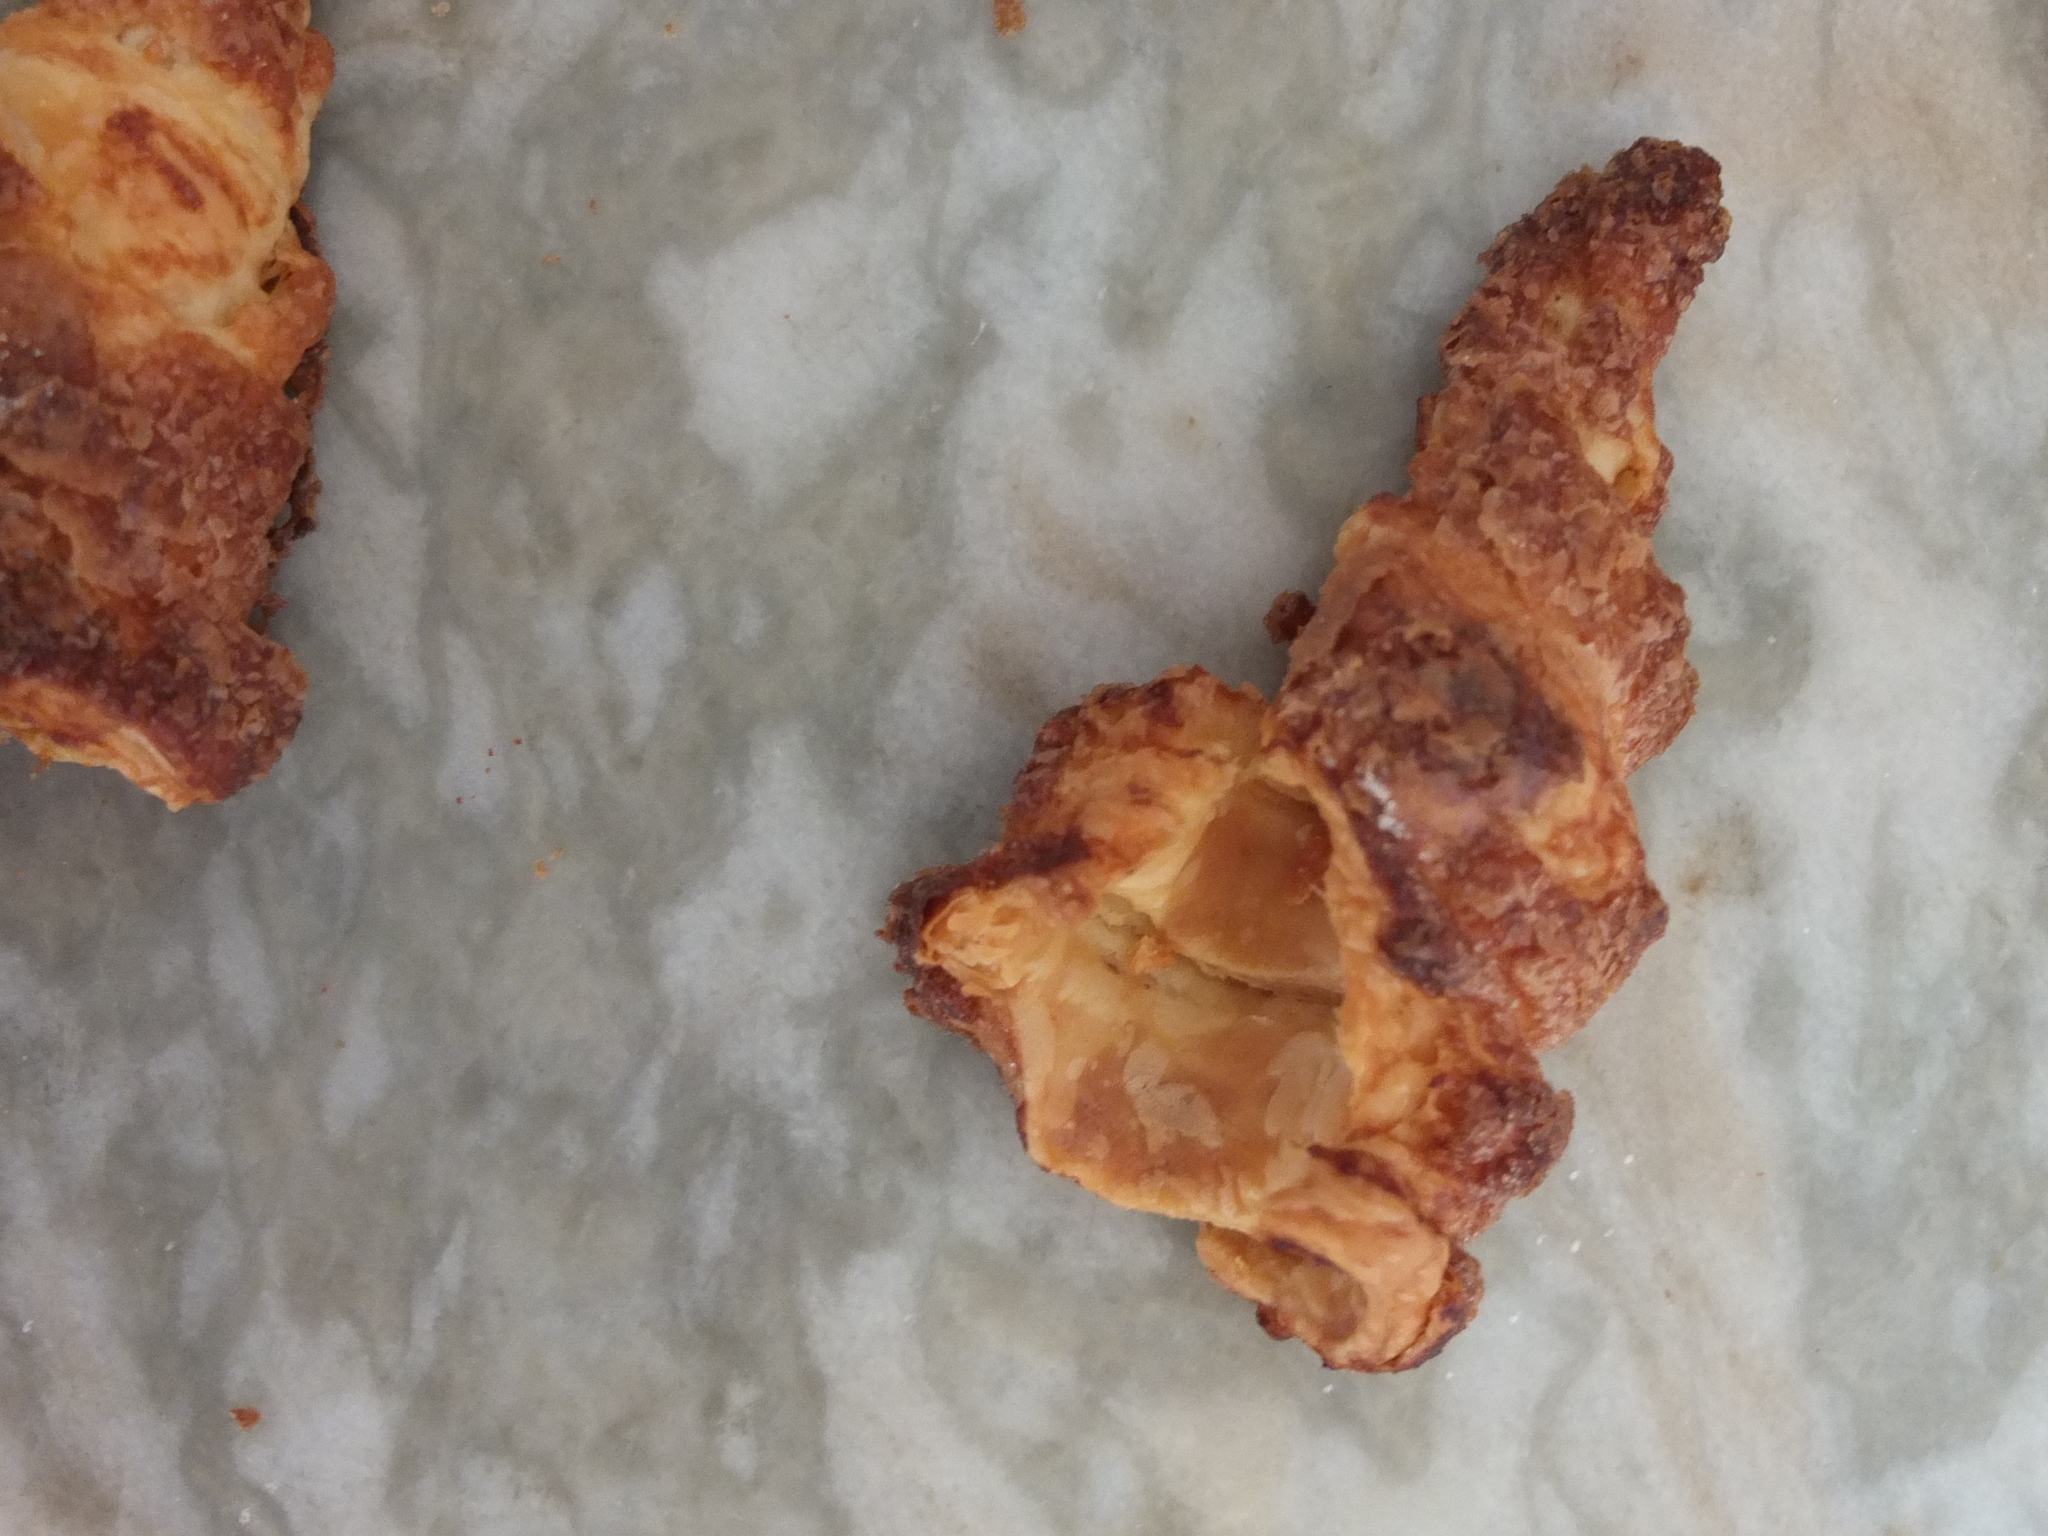
- Don’t stretch your pastry when you wrap it around the metal cone, because this can encourage holes to appear later.
- Make sure your final seam (where you stick down the last of your pastry) is underneath so face down on your baking tray. If the seam is on top it can come undone and you could get this sad horn. Sob.

- Make sure you chill the horns in the fridge between stages so the pastry keeps its shape better in the oven.
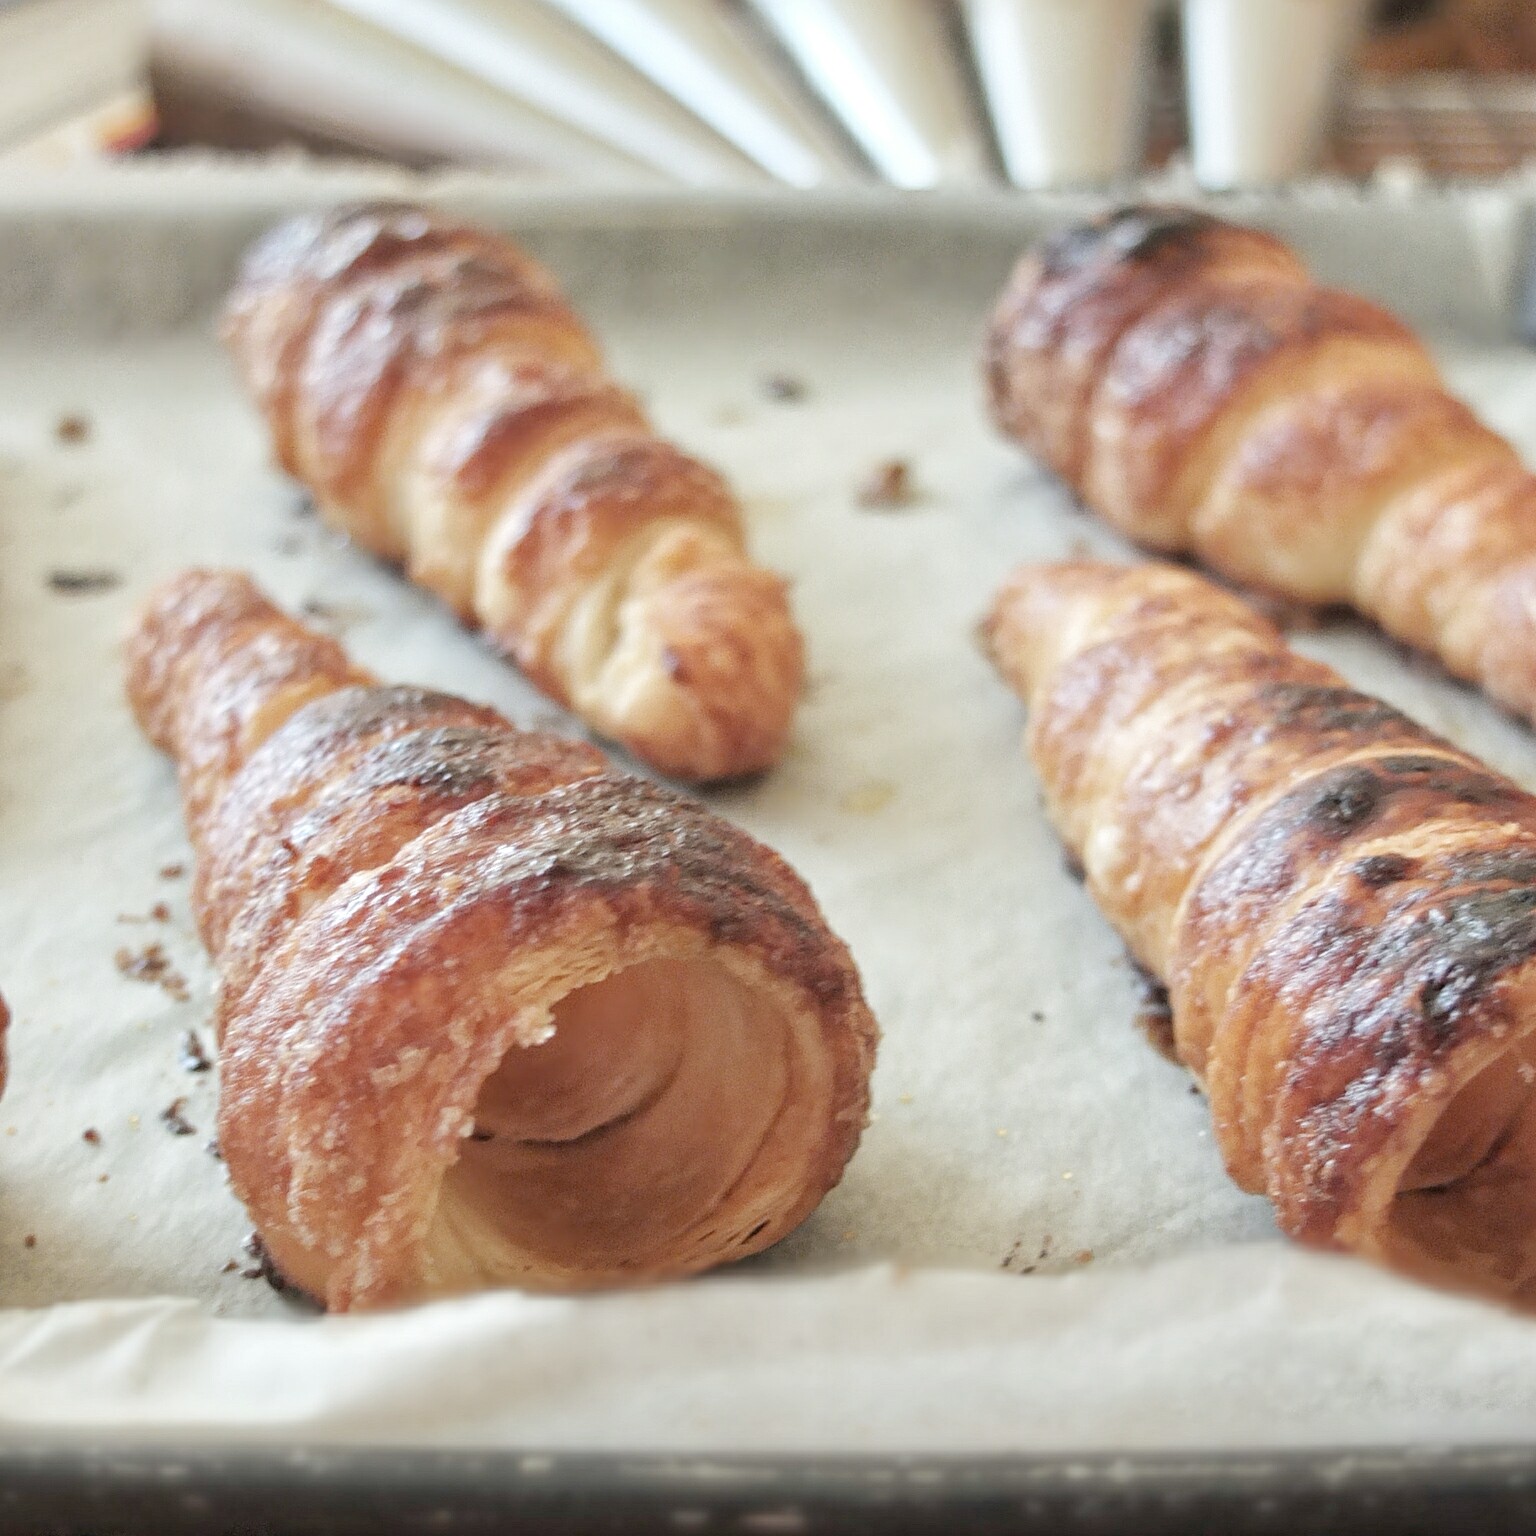
- After 10 to 15 minutes baking, it’s best to remove the metal cones from inside then bake another 5 to 10 minutes until you see the pastry has browned inside the horns too. This is something I decided to do so there would be a better bake all over.
- As in a lot of French baking, the pastry can get quite dark and look a bit burnt in places, but the taste is preferable to having pale undercooked pastry.

Puff pastry horns or cones
- As you can see in the photo I tried 3 kinds of metal cones and they all worked equally well. The big cone that has a flat rim is helpful because it stands up upside down, but this isn’t necessary.

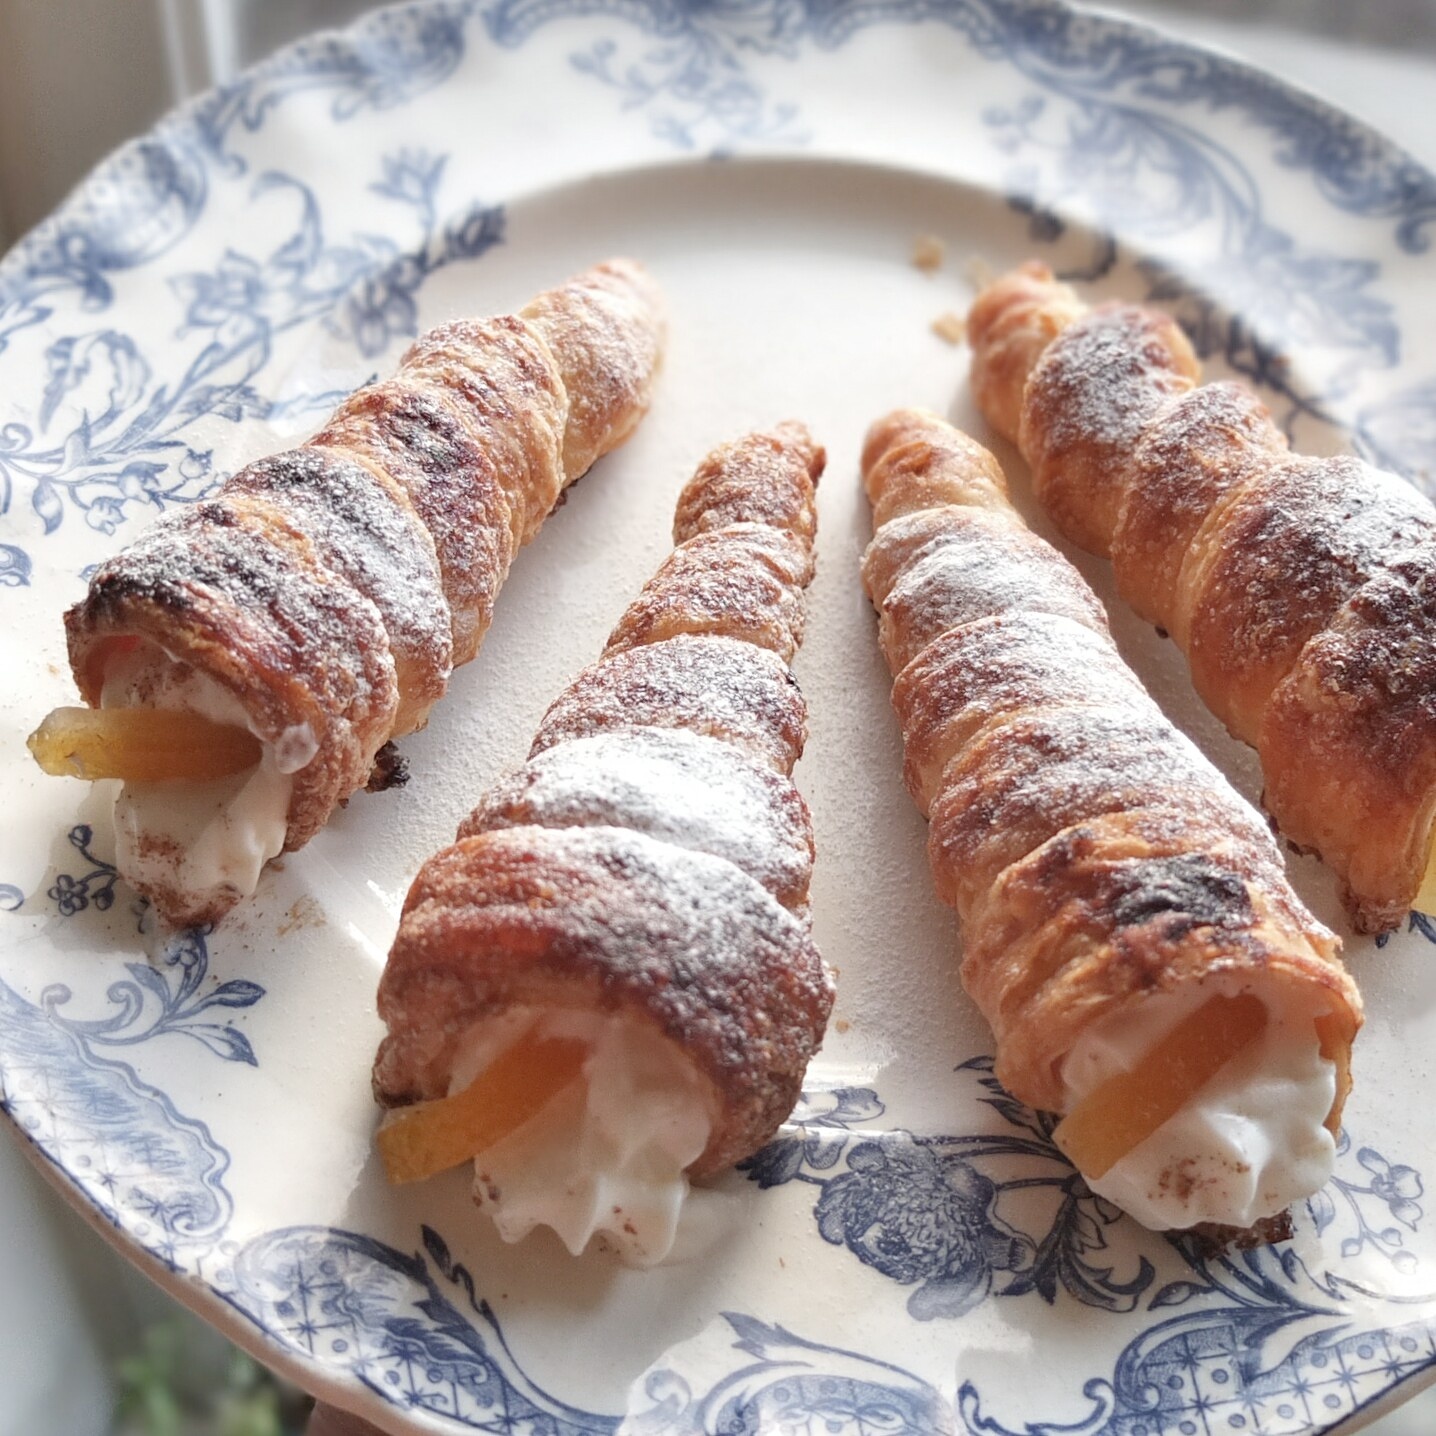
Ricotta cream
- It’s important to drain the ricotta first and prepare the ricotta the day before so it becomes firm for filling. My initial prototypes were delicious but you can see the cream (made on the same day) is a bit soft.
- There’s chocolate and orange peel folded in so there’s no point piping into the horns – it doesn’t get to the bottom and the pieces clog the nozzle up. Spoon in with a long teaspoon then push in to the bottom with a chopstick (this works!).
Ricotta cream (start preparing the day before)
- 360g/12 and 3/4oz ricotta (drained for a few hours or a morning)
- 120-130g/about 1 cup icing/powdered sugar, to taste
- a pinch of finely grated lemon zest
- a pinch of salt

Then the next day just before filling the horns:
- 1 or 2 teaspoons dark chocolate, roughly chopped
- several slices of candied orange
- a few pinches of ground cinnamon

Oh, and add a short slice or two of candied orange at the ends in the cream! Or, as my cake testers suggested, chop the candied orange and mix into the cream before filling.
Puff pastry horns/cones
Puff pastry horns or cones
- 200g/7oz puff pastry (homemade inverted puff pastry or shop-bought, at least 20% butter or all-butter)
- beaten egg (about half an egg)
- a little caster/superfine sugar on a plate


Baking
Preheat the oven to 200°C/400°F (static, non-convection oven) or 180°C/350°F (fan-assisted/convection). Bake 10 to 15 minutes then take out the metal cones and bake a further 5 to 10 minutes until the pastry is lightly browned inside and out. Outside the pastry might be a little dark but that’s okay. If you’re worried about how it looks sprinkle a little icing sugar over your horns after they’ve cooled. Allow to cool completely before filling, using a long teaspoon preferably and a chopstick to push cream (with the pieces of dark chocolate) down right to the bottom of your horns! Remember to add the candied orange and sprinkle a little cinnamon over the exposed cream. Yum yum.
Healthier version
The healthier ‘mesquite’ superfood version was an extra experiment. Mesquite has a very strong caramel-like and quite an earthy taste so I couldn’t totally replace the icing sugar with it, but there’s less than half the amount of sugar than in the original version (50g compared to 120-130g!). The balance between the two created a delicious flavour and the mesquite thickens the cream considerably, but in a good way.
- 360g/12 and 3/4oz ricotta (drained for a few hours or a morning)
- 50g/about 1/3 cup plus 4 teaspoons icing/powdered sugar, to taste
- 40g/about 1/3 cup mesquite powder, to taste
- a pinch of finely grated lemon zest
The mesquite powder also dominates so the classic cannoli taste disappears but these ‘healthier’ horns become delicious in their own right with a rather delicious special flavour. I had been thinking of throwing the remaining potent cream away (sorry) but suddenly found myself strangely addicted to it, so had another mesquite horn.

Storing and eating
Like most puff pastry confections, it’s always better to fill these horns just before eating. But I’ve eaten filled ones 1 or 2 days later and they’ve still been very nice! Store in the fridge in an airtight container.
And they might not seem like typical cakes for a trip in the wilderness, but we really enjoyed them in the mountains for a pre-climbing breakfast! So yummy.


Hope you’ll help yourself to a lovely light cannoli cream horn too!

Have a cannoli cream puff pastry horn!
Farewell sweet reader, it’s always nice to see you. Have a lovely week ahead with some yummy traditional or fusion edibles! Happy baking and eating! 🙂 Lili x

The puff pastry hones are the best!
LikeLiked by 1 person
Thank you, yes loving puff pastry horns too! 🙂
LikeLike
Oh Lili!
Why do you always come up with something so nice just when I need to loose a few pounds?😟😟😟😟
Dookes
LikeLiked by 1 person
Lol. 😂Thanks and I sympathise Dookes. Sometimes I tell myself the same thing. But these are really light. Tee hee. No really… 🙂 x
LikeLiked by 1 person
I sort of believe you……!😎
LikeLiked by 1 person
😉😅
LikeLiked by 1 person
Looks absolutely amazing!
LikeLiked by 1 person
Thank you! You’re very kind! 🙂
LikeLiked by 1 person
oh my…what an amazing culinary lesson. This cannoli’s look amazing. I am not sure I could recreate these so perfectly but will try for thanksgiving dinner!
LikeLiked by 1 person
Aw thank you Zeba! You’re very kind and I’m so pleased you’re making them for Thanksgiving! I’m sure they’ll be brilliant. 🙂
LikeLiked by 1 person
Pingback: Happy new year! Top posts in 2016 and baking projects for 2017… | lili's cakes